Documentation
Learn how to manage your DNS zones with DnsManager
Getting Started
Requirements
- macOS 14.0+ or iOS 17.0+
- A DNS provider account or server:
- Cloudflare — API token with Zone:Edit permissions
- AWS Route 53 — IAM credentials with Route 53 access
- Google Cloud DNS — Service account with DNS Admin role
- BIND9 — Server with TSIG authentication configured
Adding a Provider
DnsManager supports multiple DNS providers. To add a provider:
- Open Settings
- Tap Add Provider
- Select your provider type (Cloudflare, Route 53, Google Cloud DNS, or RFC2136/BIND9)
- Enter your credentials (see Providers for details)
- Add the zones you want to manage
You can add multiple providers and switch between them from the zone list.
Display Options
- Hide Auto-Generated DNSSEC — Hides RRSIG, NSEC, NSEC3, and NSEC3PARAM records. DS, CDS, CDNSKEY, and DNSKEY records are always shown (read-only).
- Clear Filters on Zone Change — Resets search text and record type filter when switching between zones.
- Reverse/Forward DNS Verification — Performs live DNS lookups to verify PTR consistency for A/AAAA records and forward consistency for PTR records. Results are displayed inline with color-coded indicators. Disable to skip the additional DNS queries.
- Sync to iCloud — Syncs your configuration and undo history across all your Apple devices.
Why hide DNSSEC records? RRSIG, NSEC, and NSEC3 records are automatically generated by your nameserver — they're not meant for humans to read or modify. RRSIG records contain cryptographic signatures that verify the authenticity of other records. NSEC/NSEC3 records provide authenticated denial of existence (proof that a name doesn't exist in the zone). For your own sanity, keep them hidden.
Supported Providers
DnsManager supports four DNS providers. Choose the one that matches your infrastructure.
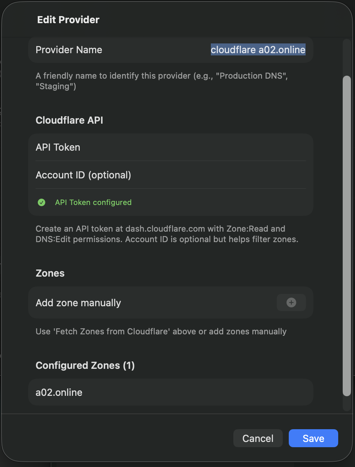
Cloudflare
Cloudflare offers a free DNS hosting tier with a powerful API. To connect DnsManager to Cloudflare:
- Log in to the Cloudflare dashboard
- Go to My Profile → API Tokens
- Click Create Token
- Use the Edit zone DNS template, or create a custom token with:
- Permissions:
Zone → DNS → Edit - Zone Resources: Select the zones you want to manage
- Permissions:
- Copy the token and paste it into DnsManager
Tip: Cloudflare's free tier includes unlimited DNS queries, making it ideal for testing and personal use.
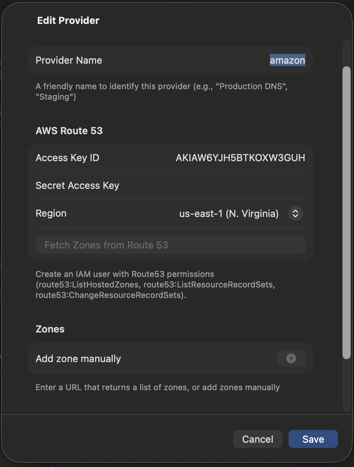
AWS Route 53
Amazon Route 53 is AWS's scalable DNS service. To connect DnsManager to Route 53:
- Log in to the AWS IAM Console
- Create a new IAM user or use an existing one
- Attach a policy with Route 53 permissions. Minimum required:
{ "Version": "2012-10-17", "Statement": [{ "Effect": "Allow", "Action": [ "route53:ListHostedZones", "route53:GetHostedZone", "route53:ListResourceRecordSets", "route53:ChangeResourceRecordSets" ], "Resource": "*" }] } - Generate an Access Key ID and Secret Access Key
- Enter these credentials in DnsManager along with your AWS region (e.g., us-east-1)
Note: Route 53 does not have a free tier. Hosted zones cost $0.50/month plus query charges.
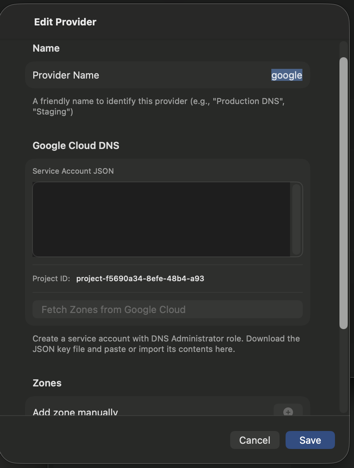
Google Cloud DNS
Google Cloud DNS is a scalable, reliable DNS service. To connect DnsManager to Google Cloud DNS:
- Go to the Google Cloud Console → IAM → Service Accounts
- Create a new service account
- Grant the DNS Administrator role (or a custom role with
dns.changes.create,dns.resourceRecordSets.*,dns.managedZones.get) - Create a JSON key for the service account
- In DnsManager, enter your Project ID and paste the JSON key contents
Note: Google Cloud DNS does not have a free tier, but new accounts receive $300 in credits.
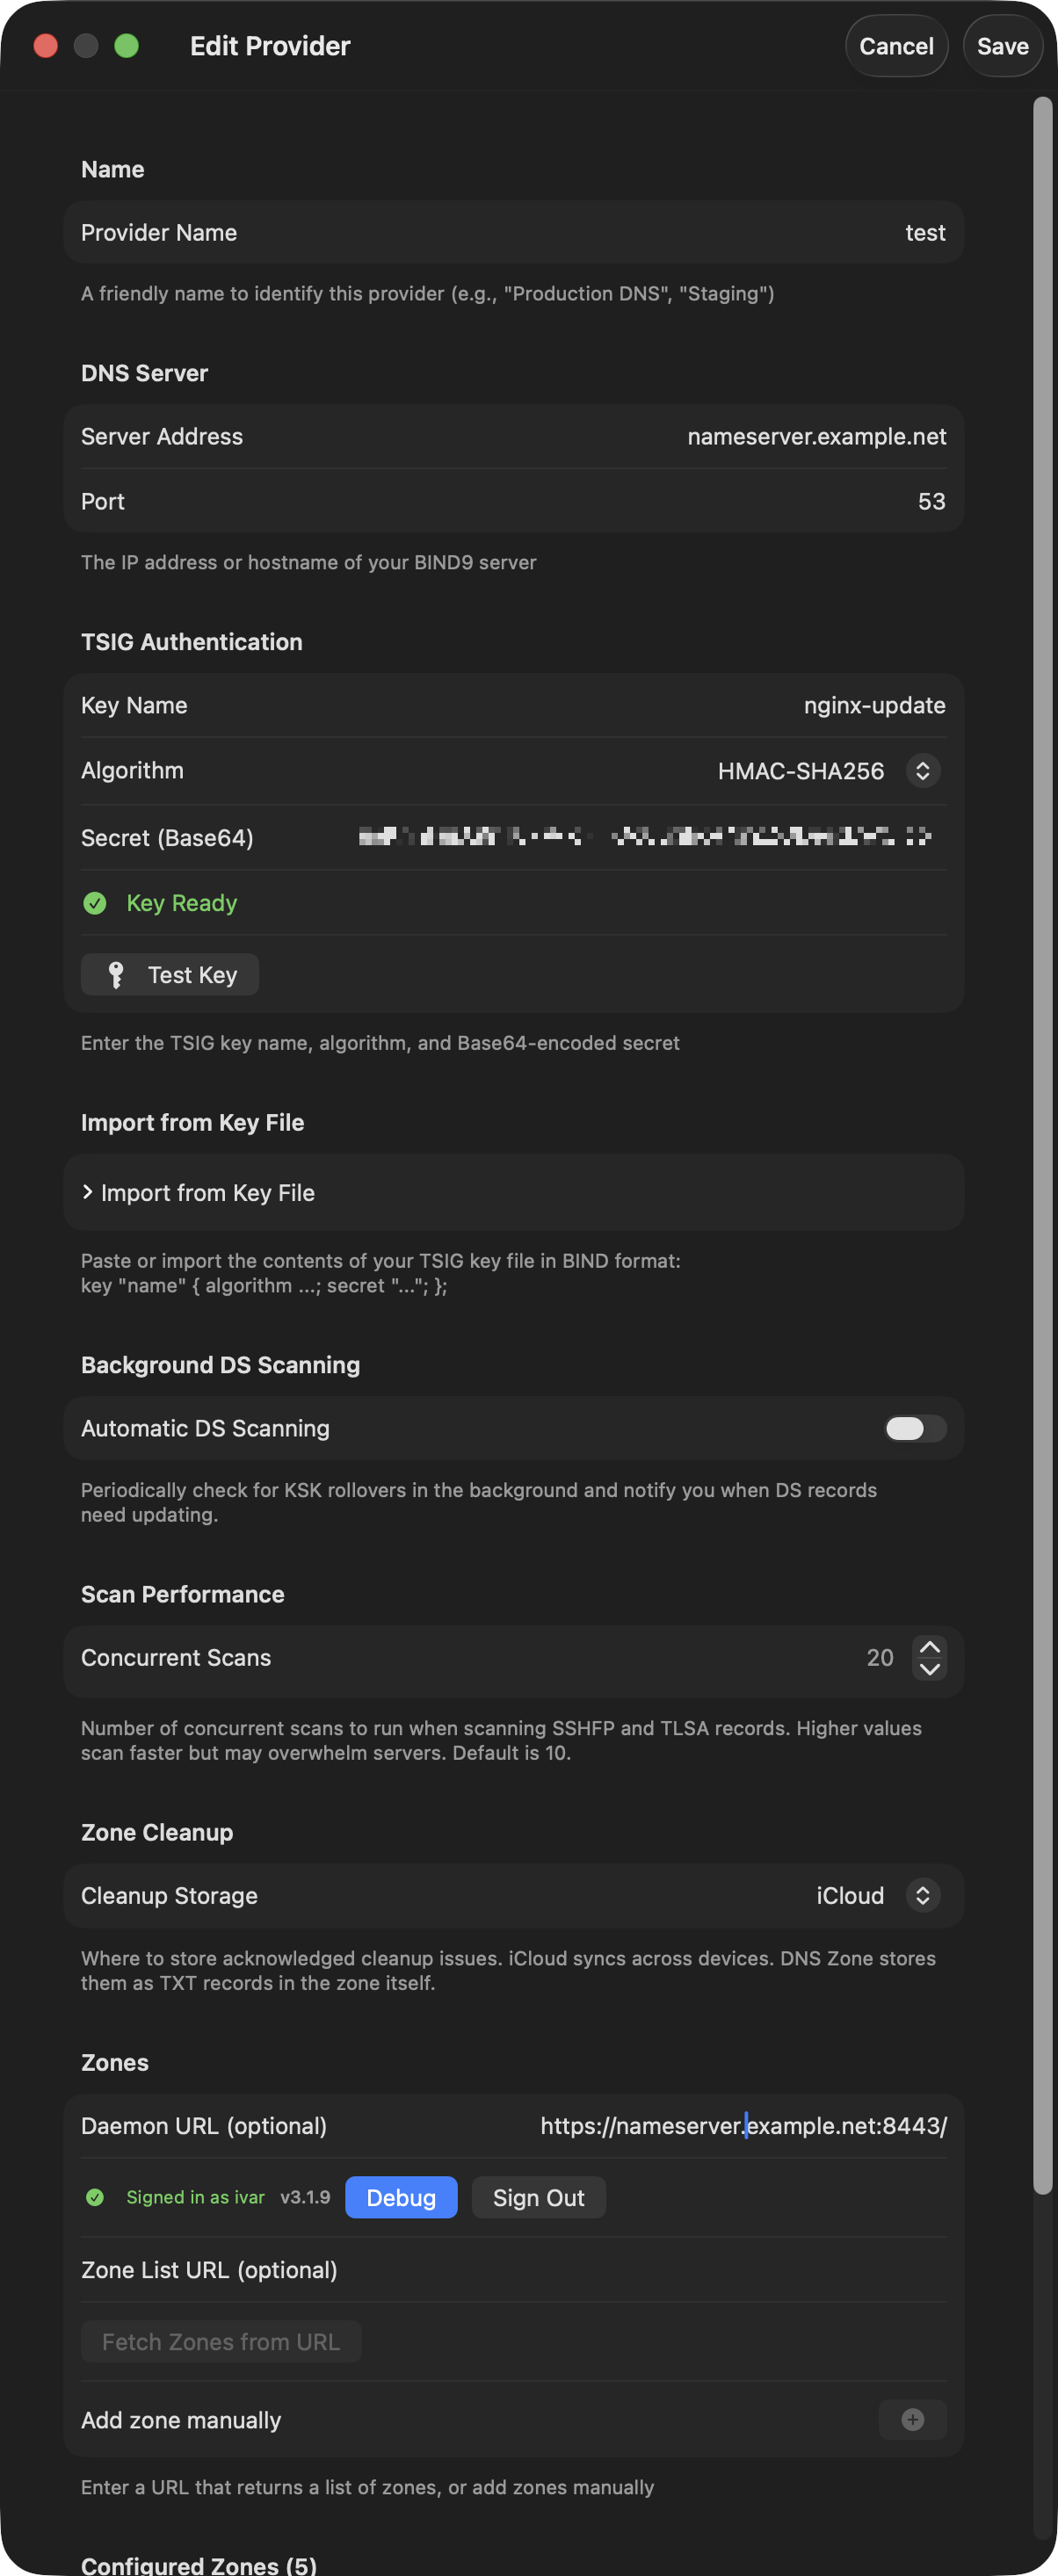
RFC2136 (BIND9)
For self-hosted BIND9 servers, DnsManager uses RFC2136 Dynamic DNS Updates with TSIG authentication:
- Enter your DNS server address (IP or hostname) and port (default: 53)
- Paste your TSIG key contents into the key field
The key should be in BIND format:
key "keyname" { algorithm hmac-sha256; secret "base64secret..."; };
After pasting the key, click Parse Key to validate. A green "Key Configured" indicator confirms success, showing the key name and algorithm.
See BIND9 Setup for detailed server configuration instructions.
BIND9 Server Setup
If you're using BIND9, DnsManager can automatically fetch your zone list from a simple HTTP endpoint running on your nameserver. This is optional — you can always add zones manually.
Zone List Server
We provide a lightweight Python script that runs on your nameserver and returns a JSON list of your primary zones. The script queries BIND9's named-checkconf to enumerate zones.
Download the server files:
- zone_server.py — The zone list server script
- zone-server.service — Systemd service file
- install.sh — Installation script
Installation (Debian/Ubuntu)
- Download the server files to your nameserver:
mkdir -p /opt/zone-server && cd /opt/zone-server
curl -O https://dnsedit.au/server/zone_server.py
curl -O https://dnsedit.au/server/zone-server.service
curl -O https://dnsedit.au/server/install.sh
chmod +x install.sh zone_server.py
- Edit the service file to use HTTP (recommended):
nano zone-server.service
The default configuration uses HTTP on port 8053. This is the recommended setup since the zone list server is typically only used occasionally to populate your zone list.
- Run the installer:
sudo ./install.sh
- Verify the service is running:
curl http://your-nameserver.example.com:8053/zones
Manual Installation
If you prefer not to use the install script:
- Copy the script to
/usr/local/bin/:sudo cp zone_server.py /usr/local/bin/ sudo chmod +x /usr/local/bin/zone_server.py
- Copy the service file:
sudo cp zone-server.service /etc/systemd/system/
- Enable and start the service:
sudo systemctl daemon-reload
sudo systemctl enable zone-server
sudo systemctl start zone-server
Disable After Use
Since you'll likely only use the zone list server occasionally to populate your zone list, you can disable it after fetching your zones to avoid having the endpoint exposed:
sudo systemctl stop zone-server
sudo systemctl disable zone-server
When you need to add new zones later, simply re-enable and start the service temporarily:
sudo systemctl enable zone-server
sudo systemctl start zone-server
Your zone list is saved in DnsManager, so you only need to run the server when adding new zones or refreshing the list.
HTTPS Configuration (Optional)
If you prefer to use HTTPS, the zone server supports Let's Encrypt certificates:
- Edit the service file and comment out the HTTP line
- Uncomment the HTTPS line and set your certificate path:
--cert-dir /etc/letsencrypt/live/nameserver.example.com
- Restart the service:
sudo systemctl restart zone-server
Using in DnsManager
- Open DnsManager Settings
- In the Zone List URL field, enter your server URL:
https://nameserver.example.com/
- Tap Fetch Zones to retrieve your zone list
The zones will appear in the "Configured Zones" list. You can still add or remove zones manually.
API Response Format
The zone server returns JSON in this format:
{
  "forward": ["example.com", "example.org"],
  "reverse": ["168.192.in-addr.arpa"]
}
If you have your own zone management system, you can implement this endpoint yourself.
TSIG Key Generation
DnsManager authenticates with BIND9 using TSIG (Transaction Signature) keys. Generate a key on your nameserver using tsig-keygen:
tsig-keygen -a hmac-sha256 dnsedit-key
This outputs a key block you can paste directly into named.conf:
key "dnsedit-key" {
    algorithm hmac-sha256;
    secret "BASE64_SECRET_HERE";
};
Copy the entire key block (including the secret) — you'll need it in both named.conf and in DnsManager's provider settings.
Zone Definition
Add a zone block to your named.conf (or an included file such as named.conf.local). This example shows a primary zone with TSIG authentication for dynamic updates and zone transfers:
zone "example.com" {
    type master;
    file "/var/cache/bind/example.com.db";
    key-directory "/var/cache/bind/keys/example.com";
    allow-update { key dnsedit-key; };
    allow-query { any; };
    allow-transfer {
        key dnsedit-key;    // DnsManager
        198.51.100.2;       // secondary-ns1
        203.0.113.5;        // secondary-ns2
    };
    inline-signing yes;
    dnssec-policy dnsedit;
};
Key points:
- allow-update — Lists the TSIG key(s) authorised to send DNS UPDATE requests. This is what DnsManager uses to add, modify, and delete records.
- allow-transfer — Controls who can perform zone transfers (AXFR). Include the same TSIG key so DnsManager can fetch the full zone, plus IP addresses of any secondary nameservers.
- key-directory — Where BIND stores the DNSSEC key files. You'll create this directory as part of the setup procedure below.
- inline-signing yes — BIND maintains a separate signed version of the zone automatically. Your zone file stays unsigned and human-readable.
- dnssec-policy — References the DNSSEC policy (see below). Remove this line and
inline-signingif you don't want DNSSEC.
DNSSEC Policy
Add a dnssec-policy block to named.conf (outside any zone block). This policy uses ECDSA P-256 keys with a KSK that never expires, so there is no need for parental agents or DS record rotation scripts:
dnssec-policy "dnsedit" {
    dnskey-ttl 2d;
    keys {
        ksk lifetime unlimited algorithm ecdsap256sha256;
        zsk lifetime 60d algorithm ecdsap256sha256;
    };
    max-zone-ttl 86400;
    parent-ds-ttl 600;
    parent-propagation-delay 2h;
    publish-safety 2h;
    retire-safety 2h;
    purge-keys 90d;
    signatures-refresh 15d;
    signatures-validity 25d;
    signatures-validity-dnskey 60d;
    zone-propagation-delay 2h;
};
- ksk lifetime unlimited — The Key Signing Key never rolls over. Once you publish the DS record at your registrar, it stays valid indefinitely. This is the simplest approach and eliminates the need for parental agents or scripts to monitor KSK changes.
- zsk lifetime 60d — The Zone Signing Key rotates every 60 days. BIND handles this automatically — no manual intervention required.
- ecdsap256sha256 — ECDSA P-256 produces compact keys and signatures, keeping DNS responses small. It is widely supported by all major resolvers.
- signatures-validity 25d — Signatures are valid for 25 days and refreshed every 15 days, providing a 10-day window to recover from signing failures.
Why unlimited KSK lifetime? Rolling a KSK requires updating the DS record at your domain registrar — a process that varies by registrar and is often manual. With an unlimited KSK lifetime, you set the DS record once and never touch it again. The ZSK still rotates regularly, maintaining cryptographic freshness where it matters.
Recommended Setup Procedure
Here is a step-by-step procedure for adding a new DNSSEC-signed zone:
- Add the zone definition to
named.conf(ornamed.conf.local) with thednssec-policyandinline-signingdirectives as shown above. Make sure the zone file exists — even a minimal one with just an SOA and NS record is enough. - Create the key directory for the zone and set ownership so BIND can write the key files:
mkdir -p /var/cache/bind/keys/example.com
chown bind:bind /var/cache/bind/keys/example.com
- Validate the configuration to catch any syntax errors:
named-checkconf
- Load the new zone — use
rndc reconfigureto pick up the new zone definition without disrupting existing zones:rndc reconfigure
BIND will load the zone, generate the initial KSK and ZSK, and begin signing automatically. You can verify the keys were created:ls /var/cache/bind/keys/example.com/
- Get the DS record from DnsManager — open the zone in the app. The DNSKEY records will appear in the record list. Find the KSK (flag 257) and tap it to open QuickLook, then tap "Copy DS Record (SHA-256)".
- Publish the DS record at your domain registrar's DNSSEC settings. This establishes the chain of trust from the parent zone down to yours.
- Verify the chain — back in DnsManager, tap the chain icon (🔗) in the zone toolbar to run DS Chain Validation. All links should show as valid.
With the unlimited KSK lifetime policy, this is a one-time setup. BIND handles ZSK rotation, re-signing, and all other DNSSEC maintenance in the background — you can add and edit records through DnsManager without ever thinking about DNSSEC again.
Prerequisites for the dnseditd Daemon
If you plan to install the dnseditd daemon for automated zone management, your BIND9 server needs the following configuration in place. The daemon reads these settings and manages zone definition files under a dedicated directory.
Directory Layout
The daemon expects these paths to exist and be writable by the dnseditd user:
/etc/bind/zones/              # zone definition .def files
/etc/bind/zones/policies/     # auto-generated DNSSEC policies
/var/named/master/            # zone data files
/var/named/keys/              # DNSSEC key files, one subdir per zone
Create them and set ownership:
sudo mkdir -p /etc/bind/zones/policies /var/named/master /var/named/keys
sudo chown -R bind:bind /var/named/master /var/named/keys
sudo setfacl -R -m u:dnseditd:rwx /etc/bind/zones /var/named/master /var/named/keys
named.conf.local Skeleton
The daemon adds include directives here. Start with a minimal file:
// Daemon-managed zones are included automatically
include "/etc/bind/zones/parental-agents.conf";
// Per-zone .def files are added/removed by the daemon
Do not put zone blocks directly in named.conf.local — the daemon only manages zones in separate .def files under zone_def_dir.
named.conf.options — Logging and Policies
Add the DNSSEC logging block (see daemon configuration) and include the policies file that the daemon generates:
options {
    // ... your existing options ...
    dnssec-validation auto;
};

include "/etc/bind/zones/policies.conf";

logging {
    channel dnssec_file {
        file "/var/log/named/dnssec-parental.log" versions 10 size 20m;
        severity debug 3;
        print-time yes;
        print-severity yes;
        print-category yes;
    };
    category dnssec   { dnssec_file; };
    category security { dnssec_file; };
    category config   { dnssec_file; };
    category notify   { dnssec_file; };
};
TSIG Keys for Dynamic Updates
Create at least one TSIG key (the editor key for general management) and add it to named.conf:
tsig-keygen -a hmac-sha256 editor | sudo tee /etc/bind/editor.key
echo 'include "/etc/bind/editor.key";' | sudo tee -a /etc/bind/named.conf
If you plan to use split-horizon views, also create a separate key for the internal view:
tsig-keygen -a hmac-sha256 editor-internal | sudo tee /etc/bind/editor-internal.key
echo 'include "/etc/bind/editor-internal.key";' | sudo tee -a /etc/bind/named.conf
The daemon and app need the secret portion of each key — copy them into the provider configuration in the app and into the daemon's config.toml.
rndc Control Channel
The daemon uses rndc to freeze/thaw zones, reload configuration, and query DNSSEC status. Make sure the rndc control channel is enabled and the key file is readable by the daemon:
sudo setfacl -m u:dnseditd:r /etc/bind/rndc.key
Hidden Primary Pattern
The daemon is designed around a hidden primary topology: your BIND9 server is the authoritative source, but it's not listed in public NS records. Public NS records point to secondary nameservers (for example ns1, ns2 at your hosting provider) that pull zones from your primary via TSIG-authenticated AXFR. This keeps the primary shielded from attack while public queries hit the secondaries.
Add the hidden primary name to the daemon config and make sure the name resolves on your local network (it does not need to be publicly resolvable):
[bind]
hidden_primary = "nameserver.example.com."
If the hidden primary name is within a zone you also manage (e.g. nameserver.example.com inside example.com), BIND requires glue A/AAAA records for it in the zone file. The daemon adds these automatically when converting a zone to split-horizon views.
Two Nameservers: Hidden Primary + Separate Recursive Resolver
A hidden primary serves authoritative answers for the zones it owns. It does not recurse for arbitrary client queries — and more importantly, it can't safely recurse for its own zones. If a client points at the hidden primary as their resolver and asks for www.example.com, BIND happily answers from its authoritative state. But if the same client asks for www.somewhere-else.com, the hidden primary tries to walk the public DNS hierarchy to find an answer, and the walk usually fails (no upstream forwarders configured, or the primary's network policy doesn't allow outbound to the roots, or DNSSEC validation refuses to anchor without a complete chain).
The standard fix is a two-nameserver topology on your LAN:
- The hidden primary (e.g.
192.168.4.214) — runs BIND astype primaryfor your zones. Doesn't recurse, doesn't serve general clients. Daemon (dnseditd) runs here, manages records, signs DNSSEC. - A separate recursive resolver (e.g.
192.168.4.215) — runs BIND as a plain recursing resolver. Validates DNSSEC. LAN clients use this as their DNS server. For zones the hidden primary owns, it forwards queries to192.168.4.214; for everything else, it recurses to the public roots normally.
The recursive resolver's options { } block looks like this — note the absence of any global forwarders:
options {
    directory "/var/cache/bind";

    dnssec-validation auto;
    response-policy { zone "rpz.local"; };

    allow-recursion { homenetworks; };
    allow-query     { homenetworks; };
};
And the per-zone forwards (in named.conf.local or an included file like forward-zones.conf):
zone "example.com" {
    type forward;
    forward only;
    forwarders { 192.168.4.214; };
};

zone "internal.lan" {
    type forward;
    forward only;
    forwarders { 192.168.4.214; };
};
// ... one block per daemon-managed zone, including RFC1918 and ULA
// reverse zones
The Global-Forwarder Trap
It's tempting to skip the per-zone forwards and just set a global one:
options {
    // ...
    forwarders { 192.168.4.214; };
    forward first;
};
This does not work, and the failure mode is genuinely opaque if you haven't seen it before. Here's what happens:
- A LAN client asks the recursive resolver (
215) formail.example.com Awith the DO bit set (DNSSEC validation requested). 215forwards the query to214.214is authoritative forexample.com, returns the answer (with RRSIG) immediately.215gets the answer and starts the DNSSEC validation walk: query.for DNSKEY, querycomfor DS, queryexample.comfor DS, etc. Each of those queries hits the global forwarder — i.e. back to214.214isn't authoritative for the root or for.com, doesn't recurse on its own, and either times out or returns SERVFAIL on those queries.215's validation walk stalls. After several retries the resolver gives up and returns SERVFAIL to the client — even though it had the answer from step 3.
From the client's perspective, queries for the hidden-primary's zones time out intermittently. Queries for everything else also break (since they all route through 214 first via the global forwarder). The kicker: forward first versus forward only doesn't help — forward first falls back to native recursion only when the forwarder returns SERVFAIL or doesn't respond. The forwarder DOES respond (with the authoritative answer or with SERVFAIL on the root queries) so the fallback never triggers.
The per-zone type forward; blocks fix it because they're narrowly scoped — queries for the hidden-primary's zones get forwarded, queries for the DS chain walk against public TLDs match no forward zone and fall through to the resolver's own recursion to the public roots. Validation completes cleanly.
Other Pitfalls in This Topology
- The daemon host's own
/etc/resolv.conf— must point at127.0.0.1(the local BIND) or at a non-loop address, never at the recursive resolver if the resolver forwards back to this host. Otherwise utilities on the daemon host can hang on DNS lookups. Setnameserver 127.0.0.1in/etc/resolv.confon the hidden primary. - Dynamic updates from LAN hosts — when a DHCP server or DNS-update client on the LAN does an UPDATE for a zone, the update must go to the hidden primary, not the recursive resolver. If the client uses standard DNS resolution to find the primary, it might end up sending the UPDATE to the recursive resolver, which can't accept it. Use an explicit IP or a hostname that resolves directly to
214, not via215. - Manual maintenance of the per-zone forwards — every time you add or remove a zone, the resolver's
forward-zones.confmust be updated. Forgetting this means the new zone is unreachable from LAN clients (resolver tries to recurse and fails) or the removed zone keeps trying to forward to a now-unauthoritative server. The dnseditd daemon's forward-zones automation (forward_zones_conf_pathsetting) keeps this file accurate on the primary side — you justscpit to the resolver after a zone change. - Split-horizon zone changes — converting a zone to split-horizon doesn't change the resolver's forward declarations (one zone name = one forward block, regardless of how many views the primary serves), but it does mean the resolver now sees view-aware answers depending on which IP the primary uses to identify it. Make sure the primary's view's
match-clientsACL correctly classifies the resolver as a LAN client so the right view answers. - Restart order matters (slightly) — if the recursive resolver starts before the hidden primary is ready, the first forwarded queries return SERVFAIL and the resolver caches them. Modern BIND (9.16+) defaults
servfail-ttlto 1 second so the cache flushes itself in stride; older versions defaulted to 10–30 seconds. If your resolver is on the older side, setoptions { servfail-ttl 1; };(or0;to disable SERVFAIL caching entirely) — that's the specific knob; the zone's SOA minimum field controls NXDOMAIN/NODATA caching only, not SERVFAIL.
dnseditd — Zone Management Daemon
The dnseditd daemon runs on your BIND9 nameserver and provides an authenticated HTTPS API for creating and removing DNS zones directly from the DnsManager app. It automates the complete zone lifecycle including DNSSEC signing, parent delegation, and secondary nameserver propagation.
The daemon is optional. DnsManager works fine against a plain BIND9 server using just RFC 2136 dynamic updates over TSIG — no daemon needed. Installing the daemon unlocks additional features that require direct filesystem and rndc access, which the RFC 2136 protocol cannot provide. The table below shows exactly what you gain by installing it so you can decide whether the extra functionality is worth running a third-party binary on your nameserver.
What Needs the Daemon?
Features in the left column work with any RFC 2136–capable server. Features in the right column require the dnseditd daemon because they either create/remove zones, touch BIND configuration files, or read DNSSEC key state that's not exposed through DNS.
| Feature | Without Daemon | With Daemon |
|---|---|---|
| Browse zones & records (AXFR) | ✓ | ✓ |
| Add / edit / delete records (DNS UPDATE) | ✓ | ✓ |
| DS Chain Validation | ✓ | ✓ |
| Zone Sanity Check (incl. SOA serial Fix) | ✓ | ✓ |
| Serial Sync Scanner | ✓ | ✓ |
| DS Update Scanner (KSK rollover monitor) | ✓ | ✓ |
| Background DS monitoring & notifications | ✓ | ✓ |
| TLSA / SSHFP scanners | ✓ | ✓ |
| Zone Cleanup (PTR ↔ forward consistency) | ✓ | ✓ |
| Reverse DNS inline checks | ✓ | ✓ |
| QuickLook for DNSSEC records | ✓ | ✓ |
| Create new zones | — | ✓ |
| Remove zones from the nameserver | — | ✓ |
| Enable / disable DNSSEC on a zone | — | ✓ |
| DNSSEC key status & rollover plans | — | ✓ |
| DNSSEC key history timeline | — | ✓ |
| Auto-generated per-TLD DNSSEC policies | — | ✓ |
| Parental agents management | — | ✓ |
| Automatic DS publishing to parent zones | — | ✓ |
| Automatic NS + glue delegation | — | ✓ |
| Convert zone to split-horizon views | — | ✓ |
| Merge split-horizon views back to single zone | — | ✓ |
| SSH-based secondary nameserver provisioning | — | ✓ |
| Bulk zone actions (bump all serials, etc.) | — | ✓ |
| One-click conversion of an existing BIND9 server | — | ✓ |
| Automatic Let's Encrypt certificate for the daemon | — | ✓ |
| Privilege-separated AXFR-only TSIG keys per secondary | — | ✓ |
| Mixed BIND9 + PowerDNS secondary fleets | — | ✓ |
| Daemon-authoritative DS update classification | approximate | ✓ |
| TSIG key management (audit, create, retire) | — | ✓ |
| View configuration editor (match-clients, allow-transfer) | — | ✓ |
| DNSSEC signature health scanner | — | ✓ |
If you already have a workflow for creating zones (manual editing, Ansible, a config-management system) and don't need DNSSEC key lifecycle visibility from the app, you can skip the daemon entirely and just use DnsManager for record editing and validation. All of the query-and-verify tooling — including the new Serial Sync Scanner and the DS chain validator — works over plain DNS.
Trust considerations. The daemon is a single statically-linked Go binary. It runs as a dedicated non-root system user, talks to BIND only through rndc and file I/O in a few well-defined directories, and authenticates every HTTPS request with a JWT signed by a key that only exists on the server. The source is open, but if you'd rather not run a third-party binary on your authoritative nameserver, the features above still work without it.
Overview
When you add a zone through the app, the daemon:
- Creates the zone data file with SOA and NS records
- Creates a DNSSEC key directory (if DNSSEC is enabled)
- Auto-generates a DNSSEC policy for the TLD if one doesn't exist
- Writes a zone definition file with all BIND configuration
- Adds an include directive to named.conf.local
- Runs
rndc reconfigto load the zone - SSHes to each secondary nameserver to provision the zone
The app then automatically adds NS delegation records (and DS records for DNSSEC) to the parent zone if it's managed by the same provider. For zones where the parent isn't managed, the DS record is shown for manual submission to the registrar.
Zone removal reverses all steps — removing the zone from secondaries, deleting all files (including .signed, .jnl, and key files), and cleaning up NS/DS records from the parent zone.
Installation
The daemon is distributed as a self-extracting installer script that includes the statically-linked binary, creates a system user, sets file permissions, and installs a systemd service.
# Download the installer for your architecture and run as root:
chmod +x dnseditd-installer-amd64.sh
sudo ./dnseditd-installer-amd64.sh

# The installer:
# - Checks and installs dependencies (acl, openssh-client)
# - Installs the binary to /usr/local/bin/dnseditd
# - Creates a dedicated 'dnseditd' system user
# - Generates an SSH key for secondary nameserver access
# - Creates an example config at /etc/dnseditd/config.toml
# - Sets filesystem ACLs for non-root operation
# - Installs and enables a systemd service

# To uninstall:
sudo ./dnseditd-installer-amd64.sh --uninstall
Configuration
Edit /etc/dnseditd/config.toml to match your environment. Key sections:
TLS (required)
[server]
listen = ":8443"
tls_cert = "/etc/letsencrypt/live/cert.crt"
tls_key = "/etc/letsencrypt/live/privkey.pem"
Registration Password
Generate a password hash (the password is never stored or transmitted in plaintext):
dnseditd --hash-password
# Enter your password, then copy the output into config.toml:

[webauthn]
registration_password_hash = "a1b2c3d4..."
# Refresh token lifetime in days (0 = never expires)
refresh_token_days = 0
BIND Configuration
[bind]
rndc_path = "/usr/sbin/rndc"
named_local_path = "/etc/bind/named.conf.local"
zone_def_dir = "/etc/bind/zones"
zone_file_pattern = "/var/named/master/{zone}.DB"
key_dir_pattern = "/var/named/keys/{zone}"
hidden_primary = "nameserver.example.com."
default_ns = "ns1.example.com."
default_admin = "admin.example.com."
allow_update = ["dnseditor-key", "dhcpd"]
allow_transfer = ["secondary-key"]
Resolving Nameserver Sync (Optional)
If you've split your DNS into hidden primary + separate recursive resolver (common when the hidden primary is also authoritative for zones it can't safely recurse over — it'd loop trying to query the roots for its own data), the daemon can maintain a BIND include file listing every managed forward zone as a type forward; forward only; block. scp the file to your resolver after a zone change and the recursive resolver always knows which zones to forward to the hidden primary.
Without this, a resolver configured to forward everything to the hidden primary will hang when the primary tries to recurse for its own data; specifying forwards per zone avoids the loop. Maintaining that per-zone list by hand drifts immediately after the first split/merge — this option keeps it accurate.
[bind]
# ... existing fields ...

# Path where the daemon writes the forward-zones include file. Empty
# (or absent) disables the feature. The file is rewritten after every
# zone add/remove/split/merge via RebuildNamedLocal.
forward_zones_conf_path = "/etc/bind/forward-zones.conf"

# IPs to put in the `forwarders { }` clause of each generated block.
# Defaults to [primary_address] if unset. Supports v4 + v6 for
# dual-stack setups.
forward_zones_forwarders = ["192.168.4.214", "2401:dc20:2344:4:1:dead:beef:dead"]
Output format (auto-generated, do not edit by hand):
// Auto-generated by dnseditd — do not edit by hand.
// scp this to your resolving nameserver and include it from named.conf.local.
//
// 8 zone(s), forwarders: 192.168.4.214

zone "example.com" {
    type forward;
    forward only;
    forwarders { 192.168.4.214; };
};

zone "internal.lan" {
    type forward;
    forward only;
    forwarders { 192.168.4.214; };
};
// ...
On the resolving nameserver, include it from named.conf.local:
include "/etc/bind/forward-zones.conf";
Zone filtering:
- Forward zones — always included.
- RFC1918 reverse zones (10/8, 172.16/12, 192.168/16 under
.in-addr.arpa) — included. Recursive resolvers can't reach these via parent delegation since the public IPv4 PTR hierarchy stops at the registry, so the resolver needs an explicit forward. - ULA reverse zones (fc00::/7 under
.ip6.arpa, i.e. zones ending in.c.f.ip6.arpaor.d.f.ip6.arpa) — included for the same reason. - Public IPv6 reverses — excluded. The global IPv6 PTR delegation hierarchy reaches them from any resolver without explicit forwards.
- Other public IPv4 reverses (anything under
.in-addr.arpathat isn't RFC1918) — excluded.
Split-horizon zones get one entry each (not per view) since the same forwarder serves both views authoritatively.
DNSSEC
When enabled, the daemon auto-generates per-TLD DNSSEC policies and discovers parental agent IP addresses from public DNS.
[dnssec]
enabled = true
policy_pattern = "dnssec-policy-{tld}"
options_path = "/etc/bind/named.conf.options"
inline_signing = true
BIND Logging for DNSSEC Key History
To enable the DNSSEC key history feature (which shows a detailed timeline of key rollovers), BIND must be configured to log DNSSEC events to a file. Add this to the logging block in your named.conf.options:
logging {
  channel dnssec_file {
    file "/var/log/named/dnssec-parental.log" versions 10 size 20m;
    severity debug 3;
    print-time yes;
    print-severity yes;
    print-category yes;
  };

  category dnssec   { dnssec_file; };
  category security { dnssec_file; };
  category config   { dnssec_file; };
  category notify   { dnssec_file; };
};
Create the log directory and set permissions:
sudo mkdir -p /var/log/named
sudo chown bind:bind /var/log/named
sudo setfacl -m u:dnseditd:rx /var/log/named
The daemon auto-discovers the log file path from your named.conf.options — no additional daemon configuration is needed. After adding the logging block, reload BIND:
sudo rndc reconfig
The log captures DNSSEC key lifecycle events, parental DS checks, and key state transitions. With 10 rotated files at 20MB each, the raw logs retain several weeks of history depending on the number of zones. The daemon caches all parsed events in a database, so key history is preserved even after BIND rotates older log files out of existence.
Secondary Nameservers
Each secondary is keyed by its NS hostname. Set the backend field to bind9 or powerdns; the daemon then ships an embedded helper to the host on first contact (over SSH) and uses idempotent helper commands for add-zone, install-key, migrate-slaves, and reload. You can run a mixed BIND9 + PowerDNS fleet — backend swaps invalidate the helper-ready cache automatically.
# BIND9 secondary
[secondaries."ns2.example.com"]
host = "ns2.example.com"
user = "root"
key_file = "/etc/dnseditd/ssh/id_ed25519"
backend = "bind9"

# PowerDNS secondary (gsqlite3 + dnssec=yes is enforced by the helper)
[secondaries."ns3.example.com"]
host = "ns3.example.com"
user = "root"
key_file = "/etc/dnseditd/ssh/id_ed25519"
backend = "powerdns"
Copy the SSH public key from /etc/dnseditd/ssh/id_ed25519.pub to each secondary's authorized_keys file.
Each secondary gets its own AXFR-only TSIG key named dnseditor-axfr-<short>. The app's update keys never leave the primary, so a compromised secondary cannot write to the zone — only pull it. The helper installs the key in the secondary's local config, declares it on every newly-added zone, and re-issues it during migrate-slaves when adopting an existing legacy slave config.
Older deployments using inline add_command/del_command shell templates with {zone} and {tsig_key} placeholders still work — they bypass the helper and are kept for advanced cases. New installs should prefer the backend field so the helper's safety nets (PowerDNS set-presigned, cache purge, BIND rndc addzone with retries) apply.
BIND named.conf Structure
The daemon manages several BIND configuration files. Understanding the expected structure helps avoid conflicts when the daemon writes zone definitions, DNSSEC policies, and parental agent blocks.
named.conf.local
The daemon adds include directives for zone definition files and the parental agents configuration. A typical managed named.conf.local looks like:
include "/etc/bind/zones/parental-agents.conf";
include "/etc/bind/zones/example.com.def";
include "/etc/bind/zones/example.au.def";
include "/etc/bind/zones/sub.example.au.def";
Each zone gets its own .def file in the zone definitions directory. The parental agents include is automatically prepended (before zone includes) so BIND resolves named agent blocks before zones reference them.
Do not add zone definitions directly to named.conf.local — use the daemon's Zone Manager to create zones, or place manual zone definitions in separate files.
Zone Definition Files (.def)
Each zone managed by the daemon has a .def file containing a complete BIND zone block:
zone "example.com" {
    type master;
    file "/var/named/master/example.com.DB";
    key-directory "/var/named/keys/example.com";
    allow-update { key dnseditor-key; };
    dnssec-policy dnssec-policy-com;
    parental-agents { tld-com; };
    inline-signing yes;
    allow-query { any; };
    allow-transfer { key secondary-key; };
};
The parental-agents directive references a named block. For zones whose parent is managed locally (e.g. sub.example.com where example.com is on the same server), the daemon uses a block named after the parent zone with the parent's NS IP addresses. For top-level zones, it uses tld-{tld} with the TLD's authoritative nameserver IPs.
Parental Agents (parental-agents.conf)
Named parental agent blocks are stored in a shared file included from named.conf.local:
parental-agents "tld-com" {
    192.5.6.30;
    192.26.92.30;
    192.31.80.30;
};

parental-agents "tld-au" {
    58.65.254.1;
    65.22.196.1;
};

parental-agents "example.com" {
    203.0.113.1;
    198.51.100.2;
};
The daemon creates and updates these blocks automatically. The Parental Agents Scanner (in Zone Manager) detects misconfigured or inline agents and offers to migrate them to the named format.
Daemon Connection & Zone Manager
DNSSEC Policies
DNSSEC policies are stored as individual .policy files in a policies/ subdirectory, included via named.conf.options:
# In named.conf.options:
include "/etc/bind/zones/policies.conf";

# policies.conf contains:
include "/etc/bind/zones/policies/dnssec-policy-com.policy";
include "/etc/bind/zones/policies/dnssec-policy-au.policy";
Each policy file contains a complete dnssec-policy block. The daemon auto-generates policies per TLD when creating DNSSEC-signed zones, and migrates any existing inline policies from named.conf.options to separate files on first startup.
The parent-ds-ttl value in each policy is automatically updated by the daemon's weekly DS TTL checker, which queries the parent zone's authoritative nameservers for the actual DS record TTL.
Enabling and Disabling DNSSEC
When you right-click a zone and toggle DNSSEC:
- Enable: The daemon adds
dnssec-policy,key-directory,parental-agents, andinline-signingto the zone definition, creates the key directory, reloads BIND, waits for key generation, and adds NS+DS records to the parent zone if managed. - Disable: The daemon checks that no DS record exists at the parent (queries both authoritative NS and public resolvers). Then freezes the zone, flushes the journal, strips all DNSSEC records from the zone file, bumps the SOA serial to ensure secondary propagation, removes the DNSSEC directives from the zone definition, and reloads BIND. Key files are preserved on disk.
Disabling DNSSEC while a DS record exists at the parent will break the trust chain. The daemon refuses to proceed unless the DS has been removed and public resolver caches have expired. A force override is available for zones that were never properly delegated.
Bootstrap Setup Wizard
Starting in 4.0.6, the daemon ships with a one-time bootstrap channel for first-run setup — no need to hand-edit zone files or copy TSIG keys around. The wizard is the recommended path for adopting an existing BIND9 server.
On first start, the daemon:
- Mints a self-signed ECDSA P-256 TLS cert (90-day validity, FQDN CN when
bootstrap.public_hostnamesis set, SAN with FQDN + non-loopback IPs). - Generates a one-time bootstrap token and writes it to
/var/lib/dnseditd/bootstrap.txtas well as the systemd journal (journalctl -u dnseditd). - Exposes a small set of
/api/v1/bootstrap/*routes gated by the bootstrap token and a local-network check.
In the app, open Settings → Add daemon (or the Daemon Bootstrap sheet from a provider's settings) and follow the four steps:
- Test — enter the daemon URL (e.g.
https://ns1.example.com:8443) and probe/api/v1/statusunauthenticated. The wizard reads back the cert kind, daemon hostname, and version. If the daemon is already serving a CA-trusted certificate (e.g. from the Let's Encrypt step below, or a managed cert), the fingerprint field hides — system trust is enough. With a self-signed cert, the SPKI hash is captured for pinning. - Scan — paste the bootstrap token, then read
named.confread-only. The daemon returns the parsed zone list, a per-zone classification (ENABLE_DYNAMIC,ADOPT_AS_IS,SKIP,NEEDS_ATTENTION), and a markdown summary. Nothing is written. - Convert — apply the plan. The daemon mints two HMAC-SHA256 TSIG keys (
dnseditor-internal+dnseditor-external), writes/etc/bind/dnseditor-keys.confanddnseditor-zones.conf, snapshots the entire BIND config directory into/var/lib/dnseditd/backups/<timestamp>/, replacesnamed.conf.localwith a 3-line includes-only stub (the original is renamed to.pre-dnseditor.bak), and runsrndc reconfig. The convert step is idempotent: if any of the daemon-owned files already exist, it refuses rather than clobber. - Issue cert (optional) — see the Let's Encrypt section below. Available before or after Convert.
On success, the response carries the minted TSIG secrets, the managed zone list, and the backup paths. The app then auto-creates a ProviderConfiguration named after the daemon's hostname, with the external key as the main TSIG and the internal key reserved for any future split-horizon conversion. The bootstrap token is revoked when the wizard calls /api/v1/bootstrap/complete.
Rollback. If rndc reconfig fails, the daemon restores named.conf.local from the backup, removes the new include files, and surfaces the rndc error. Manual rollback is also straightforward: stop the daemon, copy the snapshot back from /var/lib/dnseditd/backups/<timestamp>/, run rndc reconfig.
Idempotency safeguard. Re-running Convert on an already-converted server returns an "already converted" error rather than overwriting and rotating the keys. This is intentional — a misclick must not rotate keys that are already in use by the app.
Automatic Let's Encrypt Certificate
The daemon can mint and renew its own Let's Encrypt certificate via DNS-01, removing the need to wire up a separate ACME client just for the daemon's hostname. From the bootstrap wizard, click Issue Let's Encrypt cert on the scan-result page.
The flow:
- The app picks the right RFC 2136 provider for the daemon's hostname using a longest-suffix match across configured providers' zones — the daemon's FQDN does not need to live in a zone the daemon manages.
- The app extracts the external-view TSIG key (or the main TSIG for single-view zones) and hands it to the daemon as ACME challenge credentials.
- The daemon runs a TSIG-signed UPDATE preflight (
_test.<hostname>TXT add-then-delete) before any LE traffic. Failures are returned with stage-labelled errors (NOTAUTH, NOTZONE, timeout) so you know which RFC 2136 step actually failed. - On success, the daemon stores the credentials and runs
lego.Obtainusing its own DNS-01 implementation. The cert's private key is a stable ECDSA P-256 key generated once and reused across every renewal — TLSA records pinned to selector=1 (SubjectPublicKeyInfo) survive every renewal. - A daily renewer ticks the certificate; renewal kicks in at
renew_days_before(default 30 days). The ACME hot-reload picks up the new cert without restarting the daemon.
Configuration:
[acme]
enabled = true
email = "you@example.com"
directory_url = "https://acme-v02.api.letsencrypt.org/directory"
renew_days_before = 30
# Optional: override the propagation resolver lego uses for DNS-01 self-check
propagation_resolver = "1.1.1.1:53"
Status fields exposed on /api/v1/status: cert_kind (self-signed / acme / file), has_le_cert, cert_fingerprint, cert_spki_sha256, cert_expires_at, acme_renew_at, acme_last_renewal_attempt, acme_last_renewal_error.
Cross-provider. Common case: the daemon manages example.com while the daemon's own hostname is ns1.example.net in another provider. The app handles this transparently — it routes the DNS-01 challenge into the provider that owns the daemon's hostname zone.
App-mediated, not direct. The daemon does not need outbound RFC 2136 access to your authoritative servers. The app proxies the challenge add/delete via the existing per-provider DNS UPDATE path, which means the daemon can issue itself an LE cert even when the only network reachable from the daemon host is the public internet.
Connecting from the App
The bootstrap wizard above is the recommended path for new installs — it auto-creates the provider, signs in, and wires up TSIG keys in one flow. The classic manual flow still works:
- In DnsManager, go to Settings and edit your RFC2136 provider
- In the Zone Management section, enter the daemon URL (e.g.
https://nameserver.example.com:8443) - Click Connect — if the daemon is reachable, you'll see "Daemon online"
- Click Register — enter a username and the registration password you configured
- Once registered, you'll see "Signed in as [username]"
- Press the + button in the zone list to open the Zone Manager
Registration requires your device to be on the same network as the nameserver (local network detection). After registration, you can manage zones from anywhere over the internet.
Authentication
The daemon uses a challenge-response protocol where the password is never transmitted:
- App requests a random nonce from the daemon
- App computes
HMAC-SHA256(nonce, SHA256(password))locally - Daemon computes the same HMAC using the stored hash and compares
- On match, a JWT access token (1 hour) and refresh token are issued
- The app stores both tokens in the Keychain
- When the access token expires, the app silently refreshes it using the refresh token
Registration is restricted to clients on the local network. Authentication works from any network.
Security
- Runs as a dedicated non-root user (
dnseditd) with minimal filesystem ACLs - systemd hardening:
NoNewPrivileges,ProtectSystem=strict,ProtectHome - Zone names validated with strict regex before any shell operations
- All SSH arguments are shell-escaped to prevent injection
- Rate limiting: 3 failed registration attempts per minute per IP
- JWT signing key persists in the database across daemon restarts
- TLS required for all connections (no plaintext HTTP in production)
Troubleshooting
Enable the Daemon Communication debug category in the app's debug settings to log all API calls, authentication flows, and server responses.
On the server, view daemon logs with:
journalctl -u dnseditd -f
For testing without authentication (private networks only):
dnseditd --config /etc/dnseditd/config.toml --no-auth
For testing without making changes to BIND or secondaries:
dnseditd --config /etc/dnseditd/config.toml --no-auth --dry-run
You can also enable verbose debug logging from the app — toggle the Debug button in the provider settings next to the daemon connection status. This logs full request/response details to the daemon's journal.
Split-Horizon Views
Split-horizon DNS (BIND "views") lets a single zone serve different records to different clients. The classic use case is a corporate zone that returns private RFC1918 addresses to LAN clients while returning public addresses to the internet. DnsManager can convert a normal zone into a split-horizon zone, manage both views side by side, and merge them back if you change your mind.
Concepts
When a zone is split-horizon, DnsManager maintains two independent copies:
- External view — the zone your public NS records point to. Served to clients outside your trusted networks and to public secondaries via AXFR. This is where public records (MX, web, etc.) live.
- Internal view — served to clients that match your trusted network ACL (or authenticate with the internal TSIG key). This is where private addresses and LAN-only hostnames live.
BIND keeps each view fully signed and independent. The DS records at the parent zone reference the external view's KSK so public resolvers can validate answers. The internal view is signed with its own KSK and is never published — clients trust it because they reach it through a TSIG-authenticated path.
Daemon Views Configuration
Before you can convert a zone to split-horizon, configure the views in /etc/dnseditd/config.toml. Every view needs a match_clients ACL (which BIND clients it serves) and at least one TSIG key in allow_update so the app can add records to it. You can edit these settings either in the config file directly or from the app via Zone Manager → Edit Views, which applies changes live with named-checkconf validation and automatic rollback if BIND rejects the new configuration.
[views.external]
# Public clients: anyone not in the internal ACL, not using the internal TSIG key
match_clients = [
    "!key editor-internal",
    "!homenetworks",
    "any",
]
allow_update = ["editor"]
allow_transfer = [
    "editor", "moss", "hamar", "brizzy",  # TSIG keys for secondaries
]

[views.internal]
# LAN clients: private subnets and the internal TSIG key
match_clients = [
    "key editor-internal",
    "homenetworks",
]
allow_update = ["editor-internal"]
allow_transfer = ["editor-internal"]

[views.global]
# Zones that have NOT been converted to split-horizon — served in both views
# via BIND "in-view" references. Same ACLs as external by default.
match_clients = ["any"]
Define the homenetworks ACL and TSIG keys in named.conf:
acl homenetworks {
    192.168.0.0/16;
    10.0.0.0/8;
    fd00::/8;
};

include "/etc/bind/editor.key";
include "/etc/bind/editor-internal.key";
Restart the daemon to pick up the new configuration:
sudo systemctl restart dnseditd
Once views are configured in the daemon, existing zones continue to be served from the "global" view via in-view references. Nothing changes until you explicitly convert a zone to split-horizon.
Gotcha: ACME / Let's Encrypt keys must target the external view. If you have any ACME client (Let's Encrypt, other CAs, your firewall, mail server, etc.) writing _acme-challenge TXT records over DNS-01, its TSIG key must be allowed to update the external view — not the internal view. Let's Encrypt's validators query your authoritative nameservers from the public internet, so the challenge record has to live in the view that public clients see. If the ACME key only writes to the internal view, nsupdate reports success but LE can never see the record, the challenge times out, and the certificate silently fails to renew. You typically only discover this when the existing certificate expires.
How to apply it. Add every ACME-client TSIG key to the external view in both places — match_clients (so BIND routes the client's UPDATE to that view) and allow_update (so the view accepts the write) — plus the same pair under [views.global] so it can still update non-split zones. Deliberately leave the key out of [views.internal] entirely. Doing this before you start converting zones means every future split inherits the correct exclusion automatically. Example with an ACME-client key named acme:
[views.external]
match_clients = ["editor", "acme", "!homenetworks", "any"]   # acme key routes to external
allow_update  = ["editor", "acme"]

[views.internal]
match_clients = ["editor-internal", "homenetworks"]
allow_update  = ["editor-internal"]                          # no "acme" — keeps challenge records out

[views.global]
match_clients = ["editor", "acme", "any"]
allow_update  = ["editor", "acme"]                           # ACME can still update non-split zones
Important: If you only add the ACME key to allow_update and forget match_clients, BIND may route the UPDATE to the wrong view depending on view order and how the any fallback resolves. The symptom is the same as the gotcha above — nsupdate reports success but the record lands somewhere LE can't see it. Both lists need the key.
To verify which view a challenge record lands in, query both view-specific nameservers directly during a renewal:
dig @<external-ns> _acme-challenge.host.example.com TXT
dig @<internal-ns> -y <internal-key> _acme-challenge.host.example.com TXT
If the record appears on the internal nameserver but not the external one, you've found the misconfigured key.
App-side View Keys
The app also needs both TSIG keys so it can query and update each view. In the DnsManager provider settings (for your BIND9 / RFC2136 provider), add both keys to the View TSIG Keys list:
- external →
editorkey (the one used for regular zone management) - internal →
editor-internalkey
The app automatically picks the right key when querying or updating a view-specific zone.
Converting a Zone to Split-Horizon
Right-click (macOS) or long-press (iOS/iPad) a zone in the sidebar and pick Convert to Split-Horizon. The app walks you through a multi-step wizard:
- Infrastructure Setup — the daemon renames the existing zone file to the external view, creates a minimal internal zone (SOA + NS only), and asks BIND to generate fresh DNSSEC keys for the internal view. This takes about 10–30 seconds.
- DS Publishing — once the internal view has its KSK, the app computes the DS record and publishes it to the parent zone (automatically if the parent is also managed, otherwise it shows the DS for you to paste into your registrar's control panel). The wizard then polls all parent nameservers and waits until the DS is visible everywhere.
- Hostname Selection — choose which hostnames from the external view should also appear in the internal view. Records are grouped by hostname with inline summaries and a search bar. Two shortcut buttons are available:
- Copy All Records to Internal View — mirrors every record into the internal view so both views start out identical. You can prune the internal view afterwards.
- Select All / Deselect All — bulk-select specific hostnames for migration.
- Populating the Internal View — for each selected hostname, the app sends DNS UPDATE messages directly to BIND using the internal TSIG key. BIND handles the updates through its normal path, so inline-signing produces correct RRSIGs for every record.
- Finalizing — the daemon swaps the temporary match-clients back to the real ACLs from your config so LAN clients start hitting the internal view. The sidebar now shows the zone with a chevron; expand it to see both external and internal entries.
The external view is your old zone, serving the same records as before. From the moment the DS is published, public resolvers see unchanged answers. The switchover only affects internal clients, and only after finalize.

Editing Records per View
Once a zone is split, the sidebar shows an expand chevron. Tap the external or internal entry to edit that view independently. Each view has its own record list, its own DNSSEC keys, and its own serial number. DnsManager uses the view's TSIG key automatically for all queries, adds, updates, and deletes.
The zone title bar shows a badge indicating which view you're currently editing.
Bidirectional Sync (4.6.0+)
For records that should mirror between views — most TXT, MX, and any host whose IP is identical on both sides of the firewall — DnsManager maintains an automatic-propagation link. When you edit the source side, the change is applied to the destination side via a second DNS UPDATE in the same save action.
The marker's location encodes direction:
- Marker in internal view (outgoing sync) — internal is the source. Edits to the internal-view record propagate outward to external. Use when the internal view is your canonical workspace and external is the public projection.
- Marker in external view (incoming sync) — external is the source. Edits to the external-view record propagate inward to internal. Use when most records are managed via the external view (the common homelab pattern: external is the public-facing canonical version, internal is a small set of LAN-specific overrides).
Both directions can coexist within the same zone — one hostname can sync outward while another syncs inward. Per-record direction is set in the convert wizard's populate dialog (three-way picker: Don't sync / Internal → External / External → Internal) and editable later via the record editor's sync toggle.
Each synced record's row shows a directional badge:
- Filled right-arrow in accent color on the source side — "this row is sending"
- Hollow left-arrow in blue on the destination side — "this row is receiving"
Editing on the destination side opens a "Break sync from source view?" confirmation — saving past the prompt removes the marker and lets the two views diverge from that point. Deleting a synced record from the source side opens a Delete from Both / Delete from This View Only choice. Both flows work symmetrically regardless of which side is the source.
The marker itself is a _sync.<hostname> TXT record with value "sync" living in the source view's apex. The editor hides these records from the normal record list and surfaces them only via a "N hidden sync markers" banner at the top of the source view. Merging the zone back to a single view cleans them up automatically.
DS Chain Validator and Split-Horizon
The DS Chain Validator is view-aware. When you run it on a split-horizon zone:
- It queries the provider's primary (the hidden master) with the appropriate TSIG key to discover the authoritative NS for the view you selected.
- It walks the chain from root → TLD → parent normally via public nameservers.
- At the leaf zone it queries DNSKEY/CDS/CDNSKEY from the view-specific NS — the hidden primary for the internal view, or the public secondaries for the external view.
- After validation it also queries the other view's KSKs and labels any DS record that belongs to the other view as "used in external view" (or internal), rather than flagging it as orphaned.
This means a healthy split-horizon zone with two DS records at the parent — one per view — shows both as valid, with the currently-validated view's DS shown first.

Merging Views Back to a Single Zone
If you later decide the split-horizon complexity isn't worth it, right-click the zone and pick Merge Views. The merge sheet offers five strategies:
- Keep external only — discard internal records, restore the external view as a global zone.
- Keep internal only — discard external records, promote the internal view. External DNSSEC keys are preserved so the DS at the parent stays valid.
- Merge, external wins — combine all records; where a hostname exists in both views, keep the external version.
- Merge, internal wins — same, but internal wins conflicts.
- Manual merge — the app detects hostnames that differ between the two views and shows them side by side with a segmented picker so you can choose per hostname (external / internal / both).
After the merge the daemon writes a fresh zone file, removes the internal view's def/keys, renames the external key directory back to the global position, and reconfigs BIND. The internal DS record is also cleaned up from the parent zone if it's managed. Any _sync.* TXT markers from the bidirectional sync feature are stripped from the merged zone (they have no meaning in a single-view zone).

Caveats
- Resolver caches — after conversion your LAN resolvers may still serve cached answers from before the split. If clients see "no valid signature" errors, restart the resolving nameserver (
systemctl restart named) or flush its cache (rndc flushname example.com). - Hidden primary in-zone — if your hidden primary is itself within the zone being converted (e.g.
nameserver.ih36.netinsideih36.net), BIND requires glue A/AAAA records in the zone file. The daemon adds these automatically from the external zone during conversion. - DS record TTL — the DS record at the parent caches for its TTL (typically 24 hours). If you add a second DS for the internal view, plan for public resolvers to take up to that TTL before they see the new DS alongside the old one.
- Internal view serials — the internal and external views each have independent SOA serials. A "primary behind secondary" mismatch can appear if you rollback the server to a snapshot; use the Zone Sanity Check's Fix button on the primary's SOA row to bump the serial above the secondaries.
Record DNSSEC Validation
Starting in 4.6.0, every record in a DNSSEC-signed zone is cryptographically verified against the zone's own DNSKEY records each time the zone loads. The check is entirely local — no chain walk to the parent, no network queries — and runs in the background within a few hundred milliseconds even for zones with thousands of records.
What the Badges Mean
Each record's row shows a small status badge next to the type pill, plus a short colored label alongside TTL:
- Green checkmark — RRSIG verifies cryptographically. The record's signature matches the canonical RRset bytes signed by the DNSKEY it references.
- Yellow clock + "Expires in Xh" — signature still verifies, but its expiration window closes within 48 hours. Auto-signing zones should never sit in this state; if a record stays here for long, the signer probably stalled.
- Red X + "Bad signature" — RRSIG present but the cryptographic check failed. Usually means the record was edited out of band (e.g. a hand-edit to the
.signedfile) or the wire-format encoding of the RDATA differs from what the signer used. - Orange ? + "Missing signature" — zone is signed but no RRSIG covers this RRset. Either the signer skipped this record or someone added it after the last resign cycle.
- Red clock + "Expired signature" — RRSIG's expiration timestamp is in the past. Validating resolvers reject these as bogus.
- Red key.slash + "No matching DNSKEY" — RRSIG references a key tag the zone's DNSKEY set doesn't contain. Typically a botched key rollover that removed the old KSK before all signatures were re-signed with the new one.
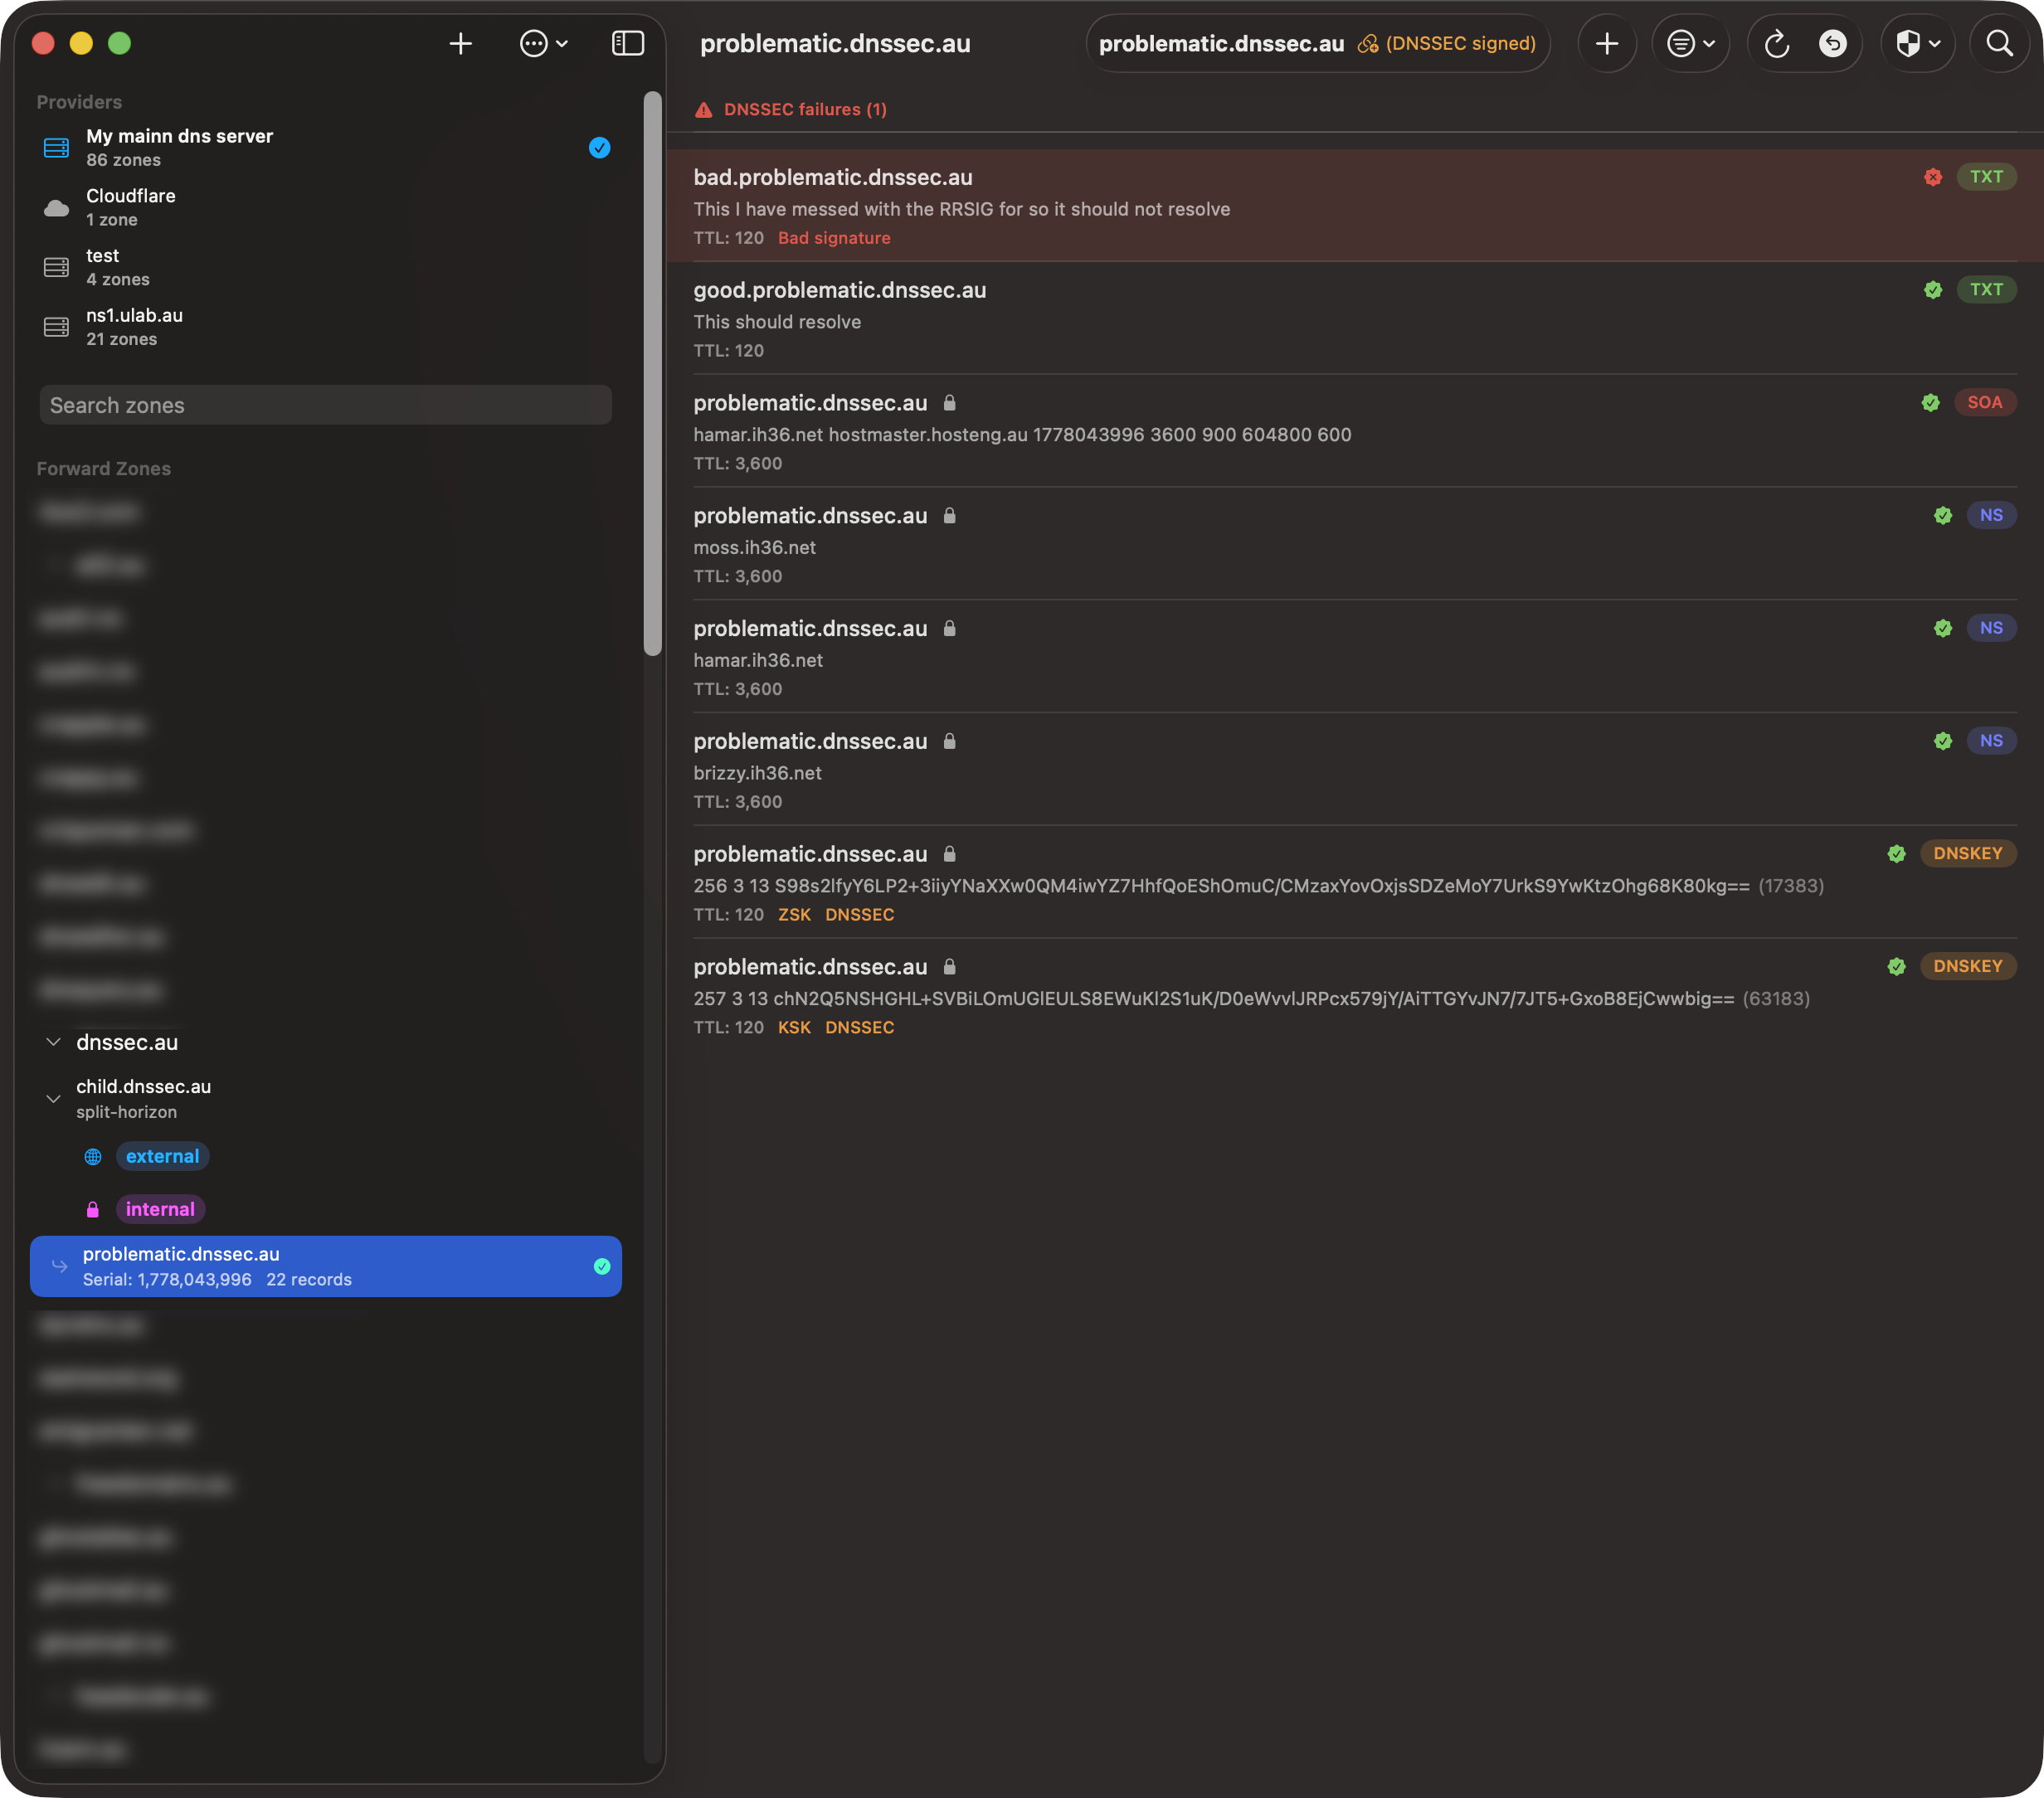
The "DNSSEC Failures" Section
Records whose validation is provably wrong (Bad signature, Expired, No matching DNSKEY, etc.) are lifted to a dedicated section at the top of the zone with a tinted red row background, so a single broken record can't hide in a long zone. Missing-signature records get an inline badge but don't lift to the failures section — that case happens routinely during auto-resign cycles and isn't worth alarm-bell treatment.
The failures section bypasses search and type filters — even when you've filtered to only A records, a failing TXT will still appear at the top.
What This Catches
Most real-world DNSSEC outages start as a single record going bogus before any user notices. By the time complaints arrive (or worse, a validating monitoring system pages), the resolver caches have already been poisoned with SERVFAIL responses that last for the TTL. Record-level validation surfaces the broken state immediately on zone load:
- Hand-edited
.signedfile — operator updates a record directly in the auto-signed zone file without going throughnsupdate. The signature no longer matches the new RDATA. - Stalled signer —
dnssec-policydaemon stops running but BIND keeps serving the last-signed RRSIGs. Records added via dynamic update afterwards have no covering signature. - Botched key rollover — a KSK is removed before all RRSIGs are re-signed. Records still referencing the old key tag fail validation.
- Zone file edited without bumping SOA — BIND doesn't notice the change, secondaries don't transfer, the original signatures still cover the original RDATA on the primary but signatures and data have diverged elsewhere.
How the Verification Works
For each RRset in the zone (records grouped by name + type), the validator looks up the RRSIG record that covers it, finds the matching DNSKEY by key tag and algorithm, reconstructs the canonical wire-format RRset per RFC 4034 §6.2 (lowercase owner names where applicable, RRSIG's original TTL, RDATA-only sort for multi-record RRsets), then runs the appropriate signature verification:
- RSA/SHA-1, SHA-256, SHA-512 (algorithms 5, 7, 8, 10) via Security framework's
SecKeyVerifySignature - ECDSA P-256/SHA-256, P-384/SHA-384 (algorithms 13, 14) via CryptoKit
- Ed25519 (algorithm 15) via CryptoKit
This is a self-contained check against the zone's own DNSKEY — it tells you that each record's signature is internally consistent with the zone, not that the zone's DS chain is anchored at the parent. For the full chain-of-trust walk, use the existing DS Chain Validator; the two checks complement each other.
Delegation NS Records
NS records at a delegation point (non-apex NS in the parent zone) are not signed by the parent per RFC 4035 §2.2 — the child zone signs its own apex NS. The local validator can't see the child's apex NS, so initially it flags every delegation NS as Missing signature. A second-pass async probe runs after the local check completes: for each non-apex NS marked Missing, the validator queries the child zone's apex NS+DNSKEY through a recursive resolver and verifies the child's RRSIG. On success the parent's delegation NS badge clears to "no badge" (legitimately unsigned). On failure (child has no DNSKEY, no RRSIG, or signature doesn't verify) the delegation gets Bad-signature treatment, because that is a real chain break.
The probe is also gated on the parent zone having a DS record for the delegation. Insecure delegations (no DS) skip the probe entirely — those children are intentionally unsigned and the parent's missing signature is the correct state.
DNSSEC Management
DNSSEC Status
View real-time DNSSEC key status for any daemon-managed zone. Shows active, retiring, and removed keys with lifecycle dates, state transition badges, and rollover controls.
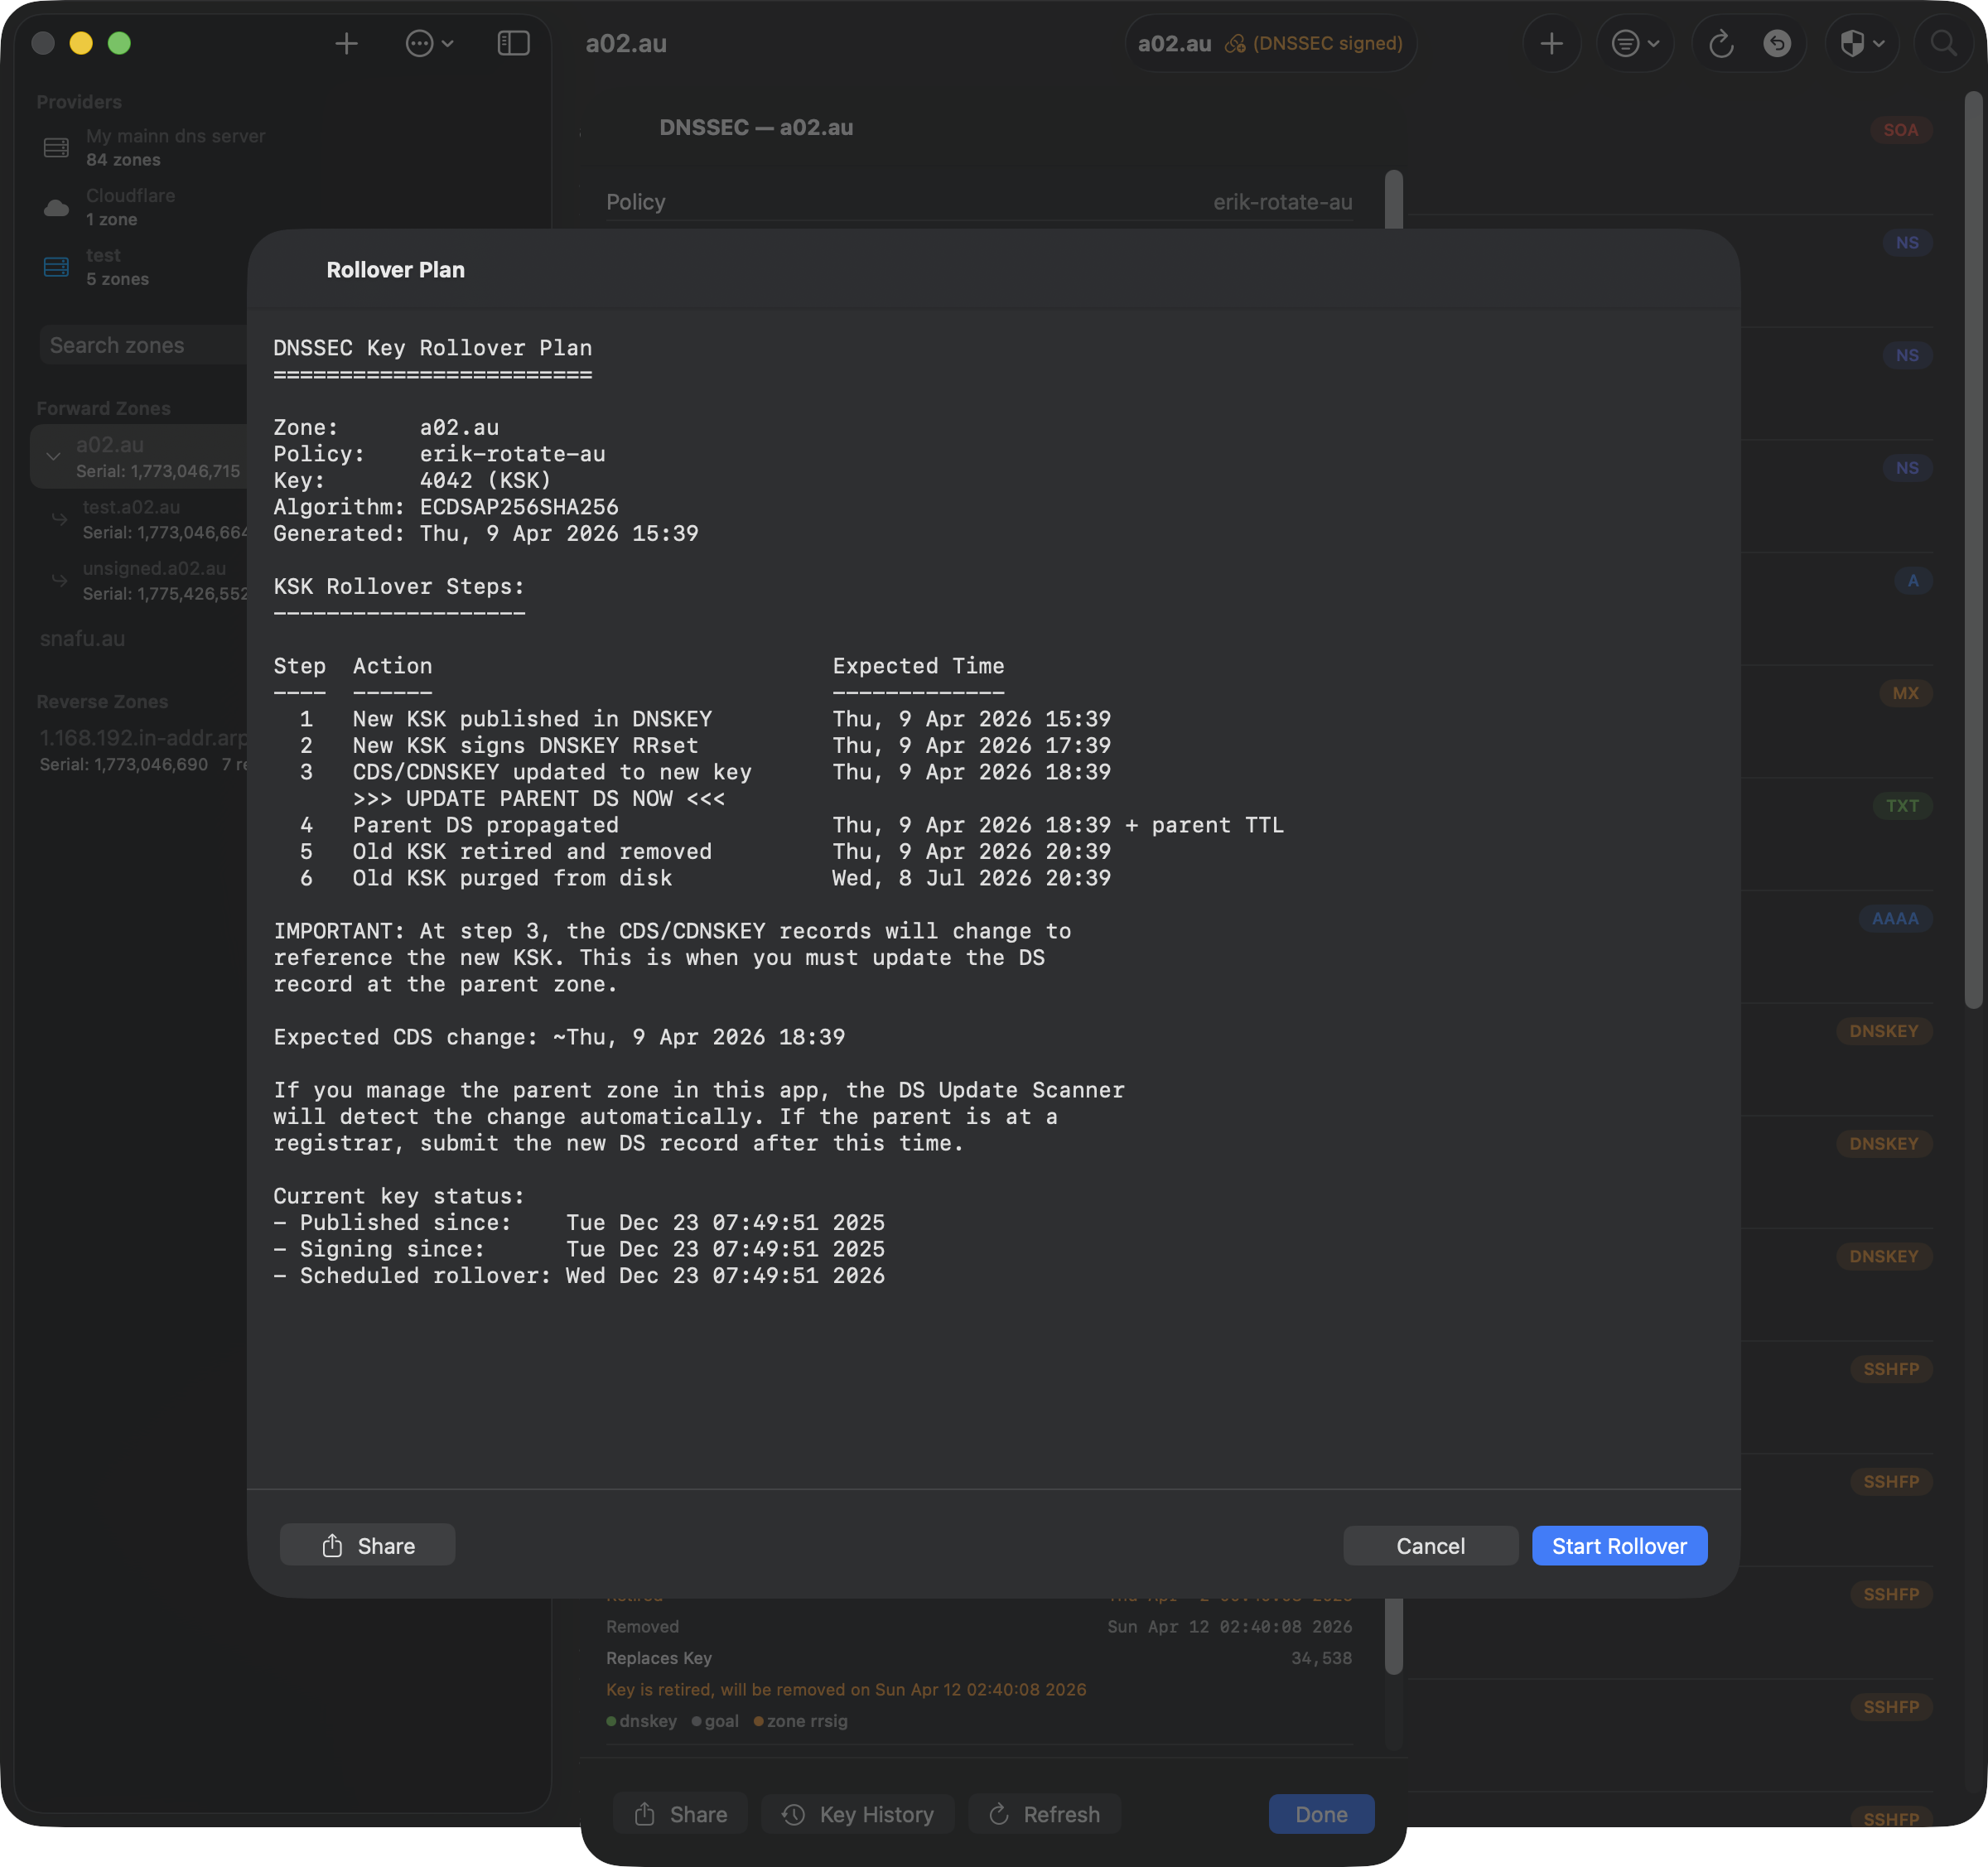
Key Rollover
Trigger KSK rollovers with a step-by-step plan showing expected timing for each phase. The rollover button is disabled during active transitions to prevent conflicts.
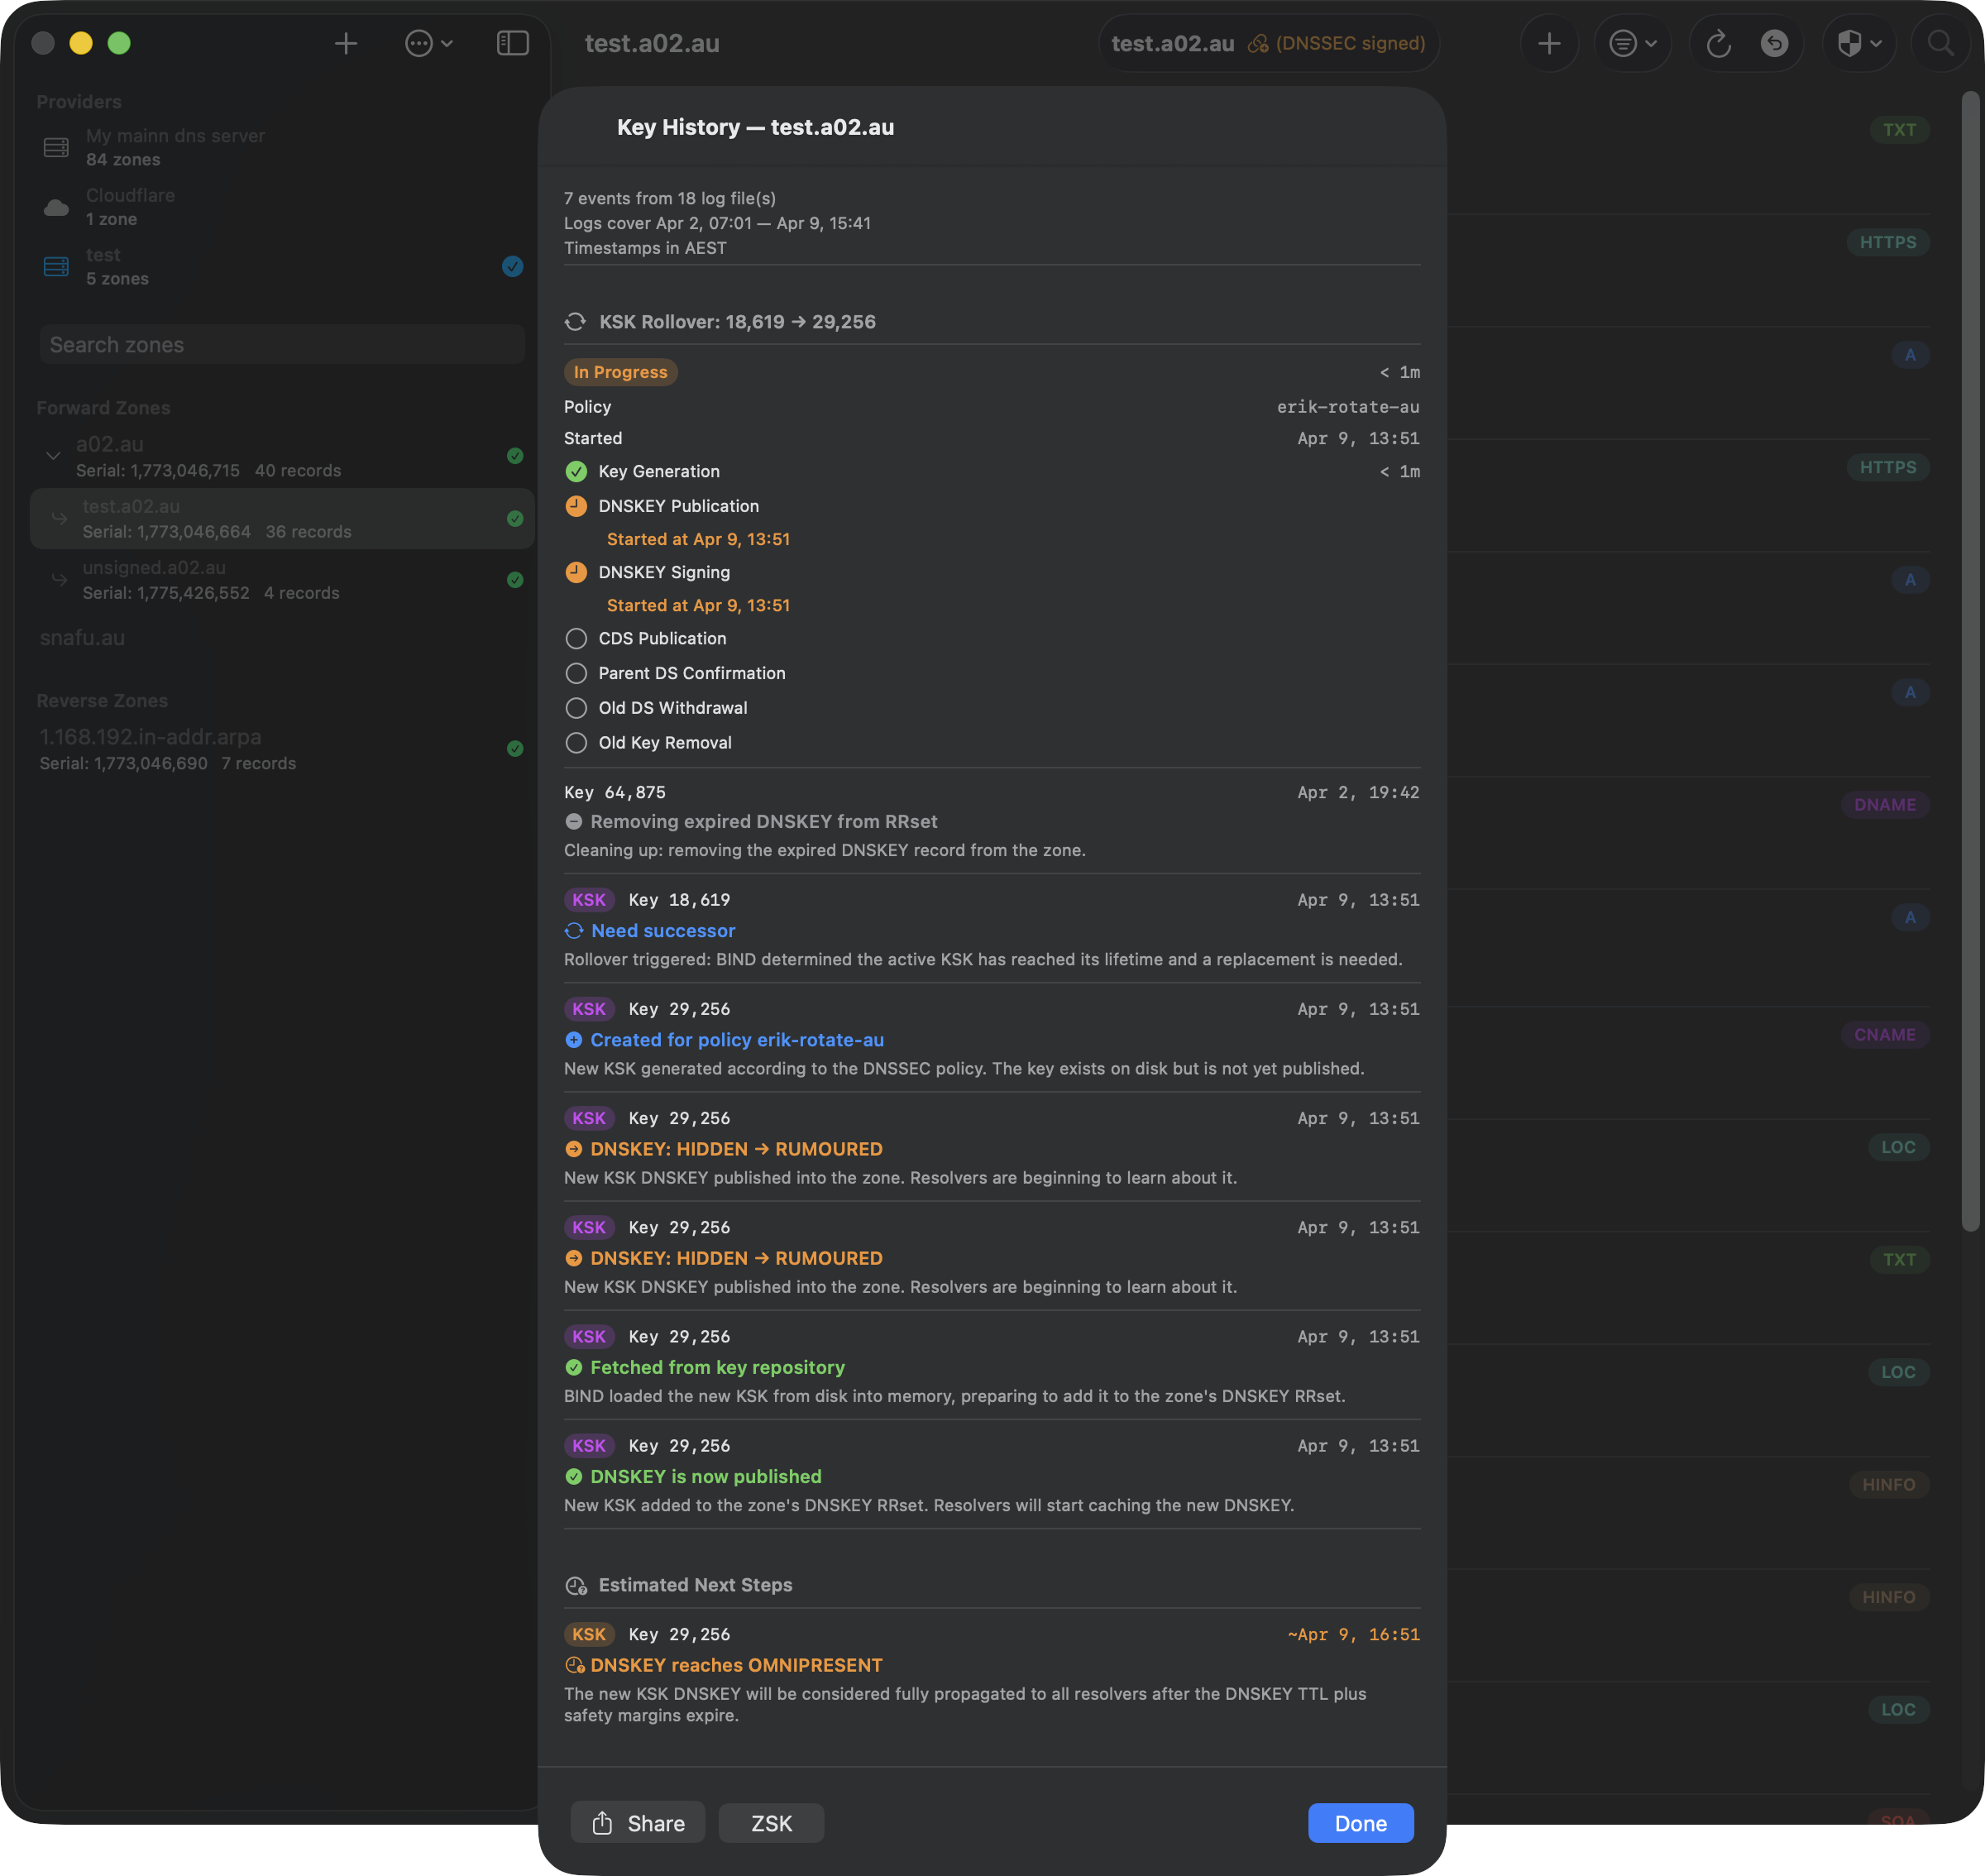
Key History
An annotated timeline of every DNSSEC key lifecycle event from BIND's logs. Each event includes a human-readable explanation. Rollover summary shows phase-by-phase timing. Predictions estimate when pending transitions will complete.
The daemon caches parsed log data in a SQLite database for instant retrieval — even with gigabytes of DNSSEC logs, Key History loads in under a second. A daily background scan keeps the cache fresh by reading only new log entries since the last scan, with automatic handling of BIND's log file rotation. Use the Rescan button in the toolbar to force a full cache rebuild from the raw logs when you need to confirm you're looking at the latest data.
Key History requires BIND to be configured with DNSSEC logging — see BIND Logging for DNSSEC Key History in the daemon configuration section for the required named.conf.options logging block.
TSIG Key Management
DnsManager provides full lifecycle management for TSIG keys used by your BIND9 server — audit existing keys, mint new ones, edit zone grants, and retire keys you no longer need. All operations are performed through the daemon's API; secrets never leave the server except when explicitly copying a key block.
TSIG Audit
The TSIG Audit (Zone Manager → TSIG Keys) walks the live named.conf and reports every TSIG key it finds, along with the zones and views each key is granted access to. The audit understands ACL indirection, update-policy, rndc controls, and view-level defaults — it follows the full BIND configuration tree to produce a complete grant map.
Each key shows its zone × view grants and any anomalies the audit detected:
- Undefined key — referenced in a zone definition but not declared in
named.conf - Unused key — declared but not referenced by any zone or view
- Mixed-view key — granted to both views of the same split-horizon zone, which is usually unintentional and can leak internal records
- ACME key not in external view — an ACME/Let's Encrypt client key that can't reach the external view, so DNS-01 challenges will silently fail
The audit results are exportable as a plain-text report via the share button.
Add Key
Mint a new TSIG key with any standard HMAC algorithm (HMAC-SHA1, HMAC-SHA224, HMAC-SHA256, HMAC-SHA384, HMAC-SHA512, or HMAC-MD5). The daemon generates a cryptographically random secret sized per RFC 2104, grants the key to the zones you select, and auto-includes the key file in named.conf.local if the include directive is missing. The secret is shown once with a copyable BIND key block — copy it before dismissing the sheet, as the daemon does not store the secret in retrievable form after this point.
Edit Zone Grants
Select a key in the audit and tap Edit Zones to modify which zones the key can access. The zone picker shows all managed zones with a view lens (external, internal, or global) and supports search filtering and tri-state select-all. Grants are reconciled per view — adding a key to a zone's external view does not automatically grant it to the internal view. Changes are applied as surgical edits to the zone's .def file (allow-update and allow-transfer clauses), and the key is propagated into the target view's header (match-clients routing) so BIND routes the client's UPDATE to the correct view.
Copy Key
Tap Copy Key on any key in the audit to fetch a ready-to-paste BIND key block. This is useful for configuring secondary nameservers, ACME clients, or any other system that needs the TSIG credentials. The key block is fetched from the daemon over the authenticated API channel.
Retire Key
Retiring a key removes it from all zone definitions and deletes the key block from named.conf. The retirement flow includes a safety ladder:
- Checks whether the key file is managed by the daemon (manual key files require manual removal)
- Lists all zone and view grants that will be revoked
- If the key has a do-not-retire flag (set in metadata), asks for explicit confirmation
- Revokes all grants from zone
.deffiles before removing the key block
Key Metadata
Each key carries operator-supplied metadata stored daemon-side: a free-text description, the key's intended use (which auto-classifies secondary keys for protection), external client names (who or what uses this key outside the daemon), and a do-not-retire flag. Metadata is surfaced in the audit list and in the retirement confirmation dialog so operators don't accidentally retire a key that an external system depends on.
Managing Zones
Zone List Toolbar
The toolbar above the zone list provides quick access to zone management:
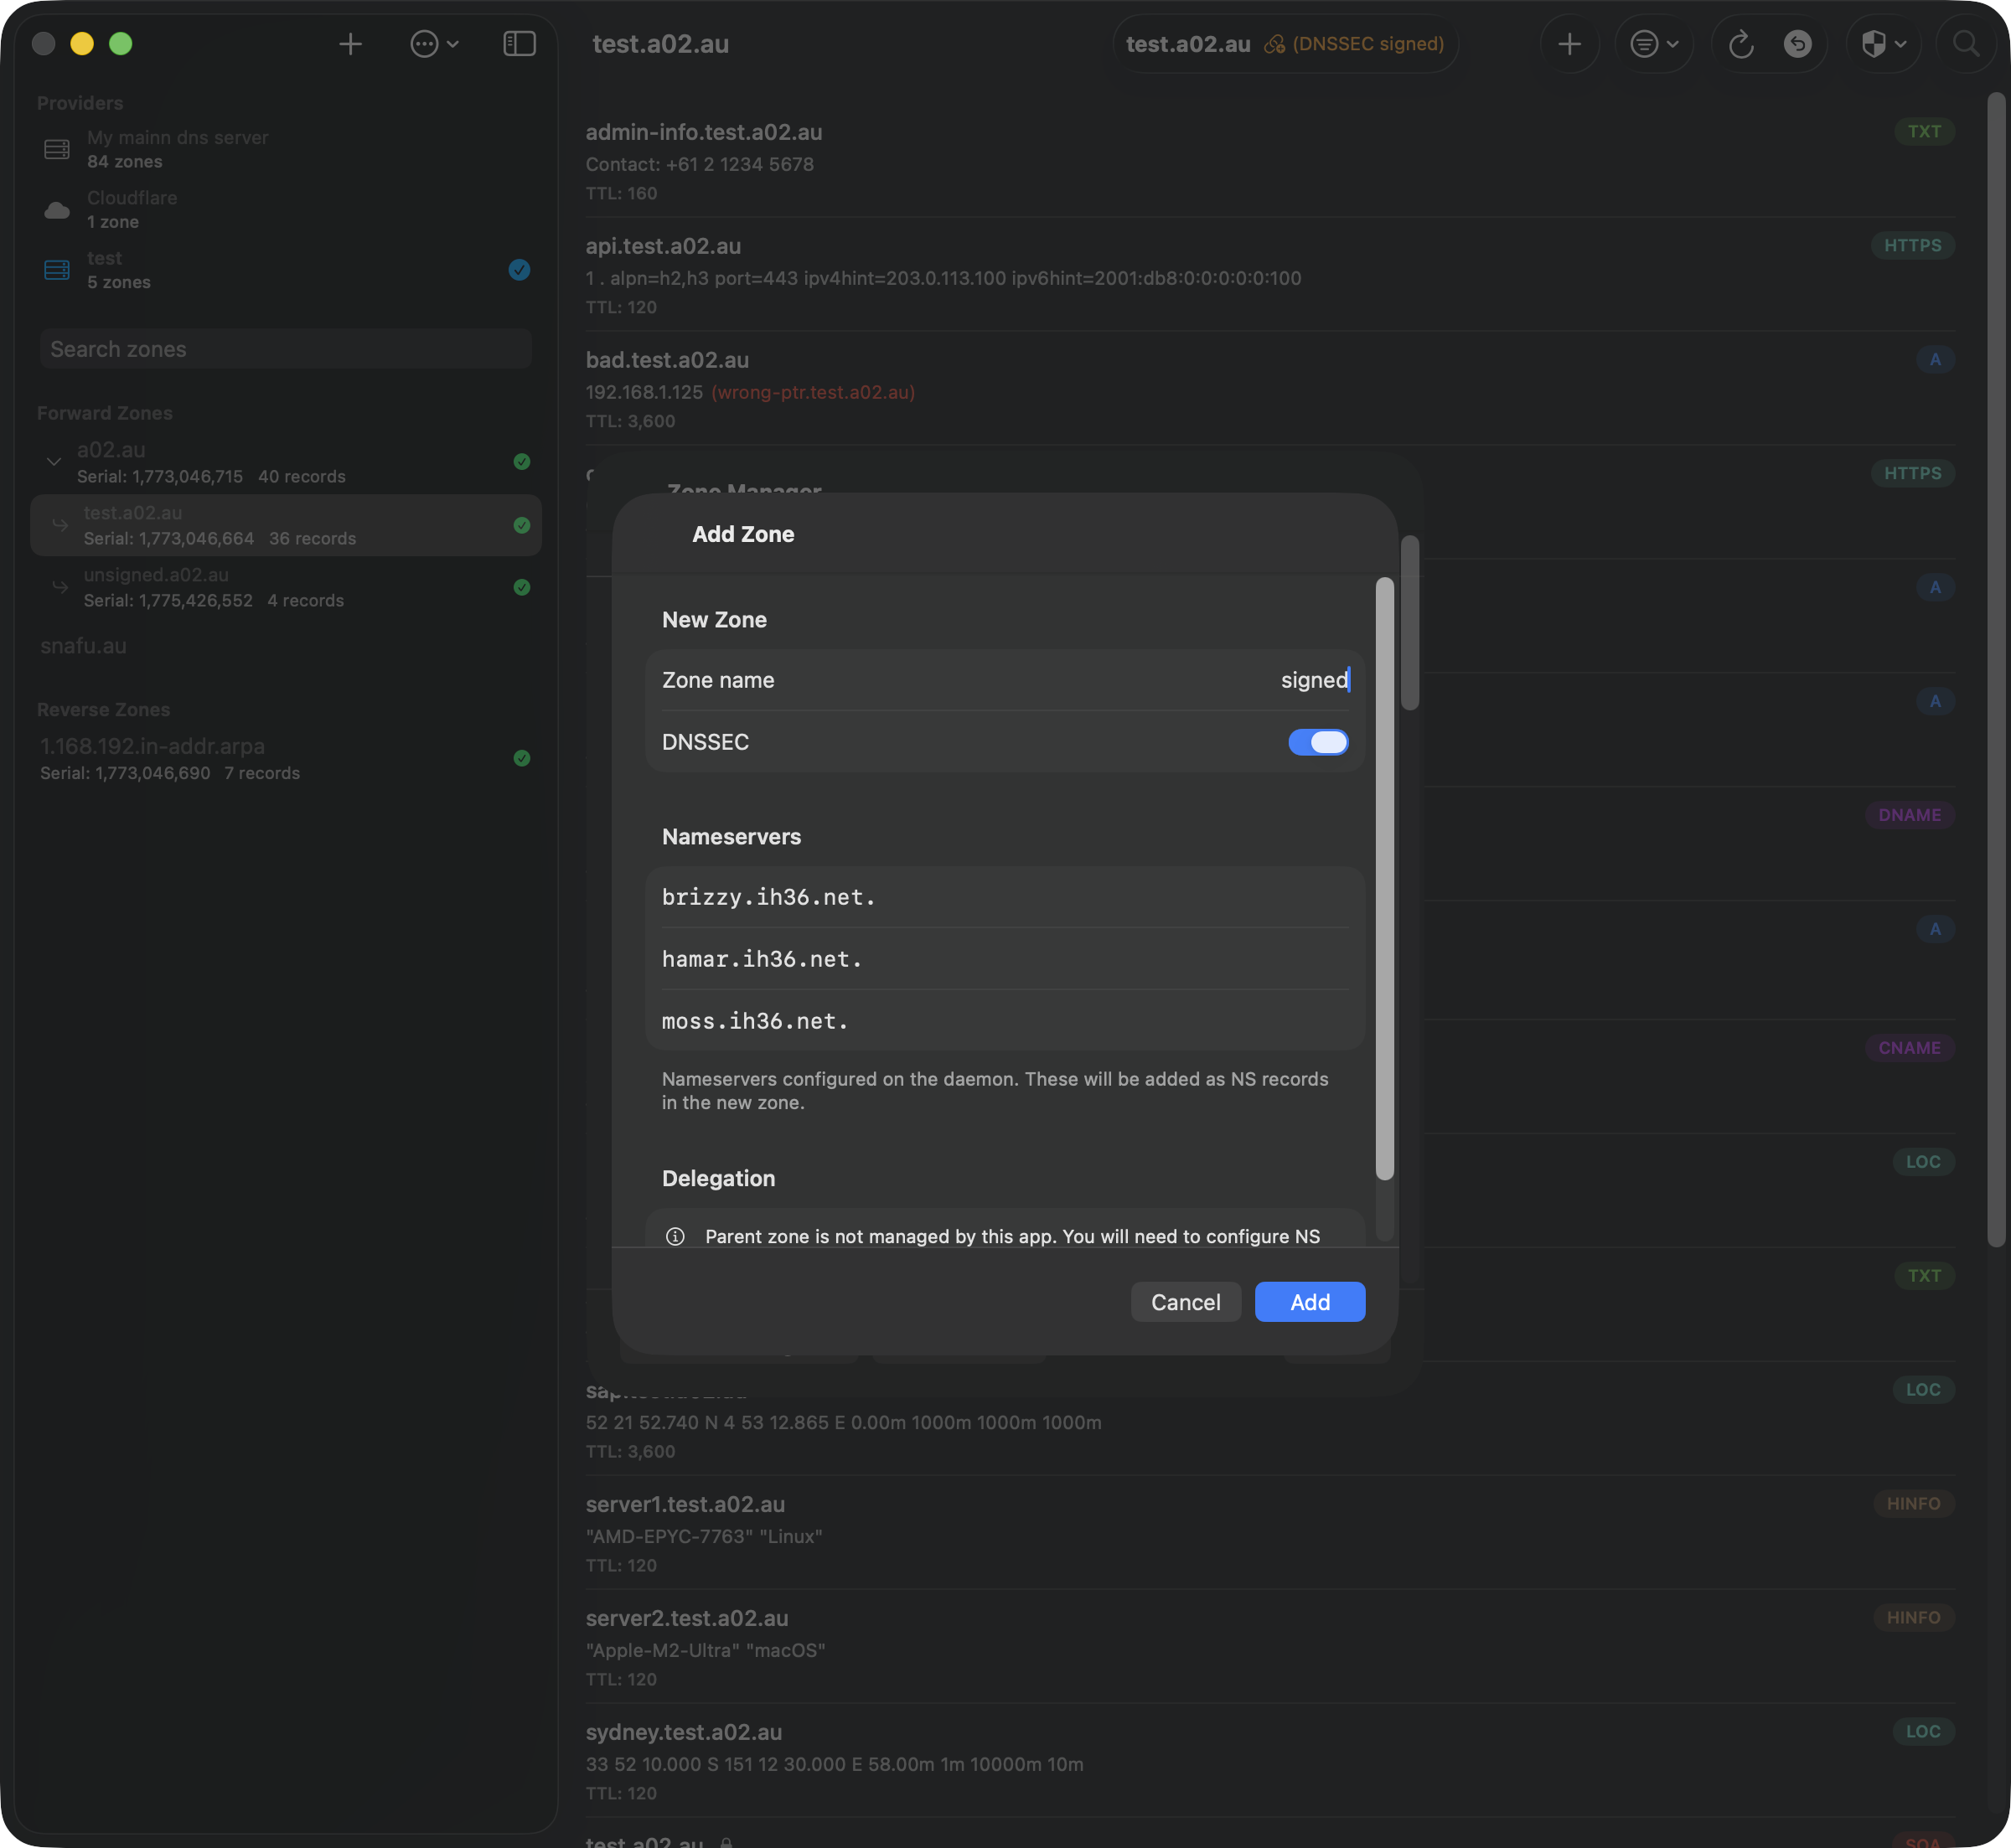
- + — Add a new zone manually
- ↻ — Refresh the zone list
- ⧉ — Toggle the sidebar view
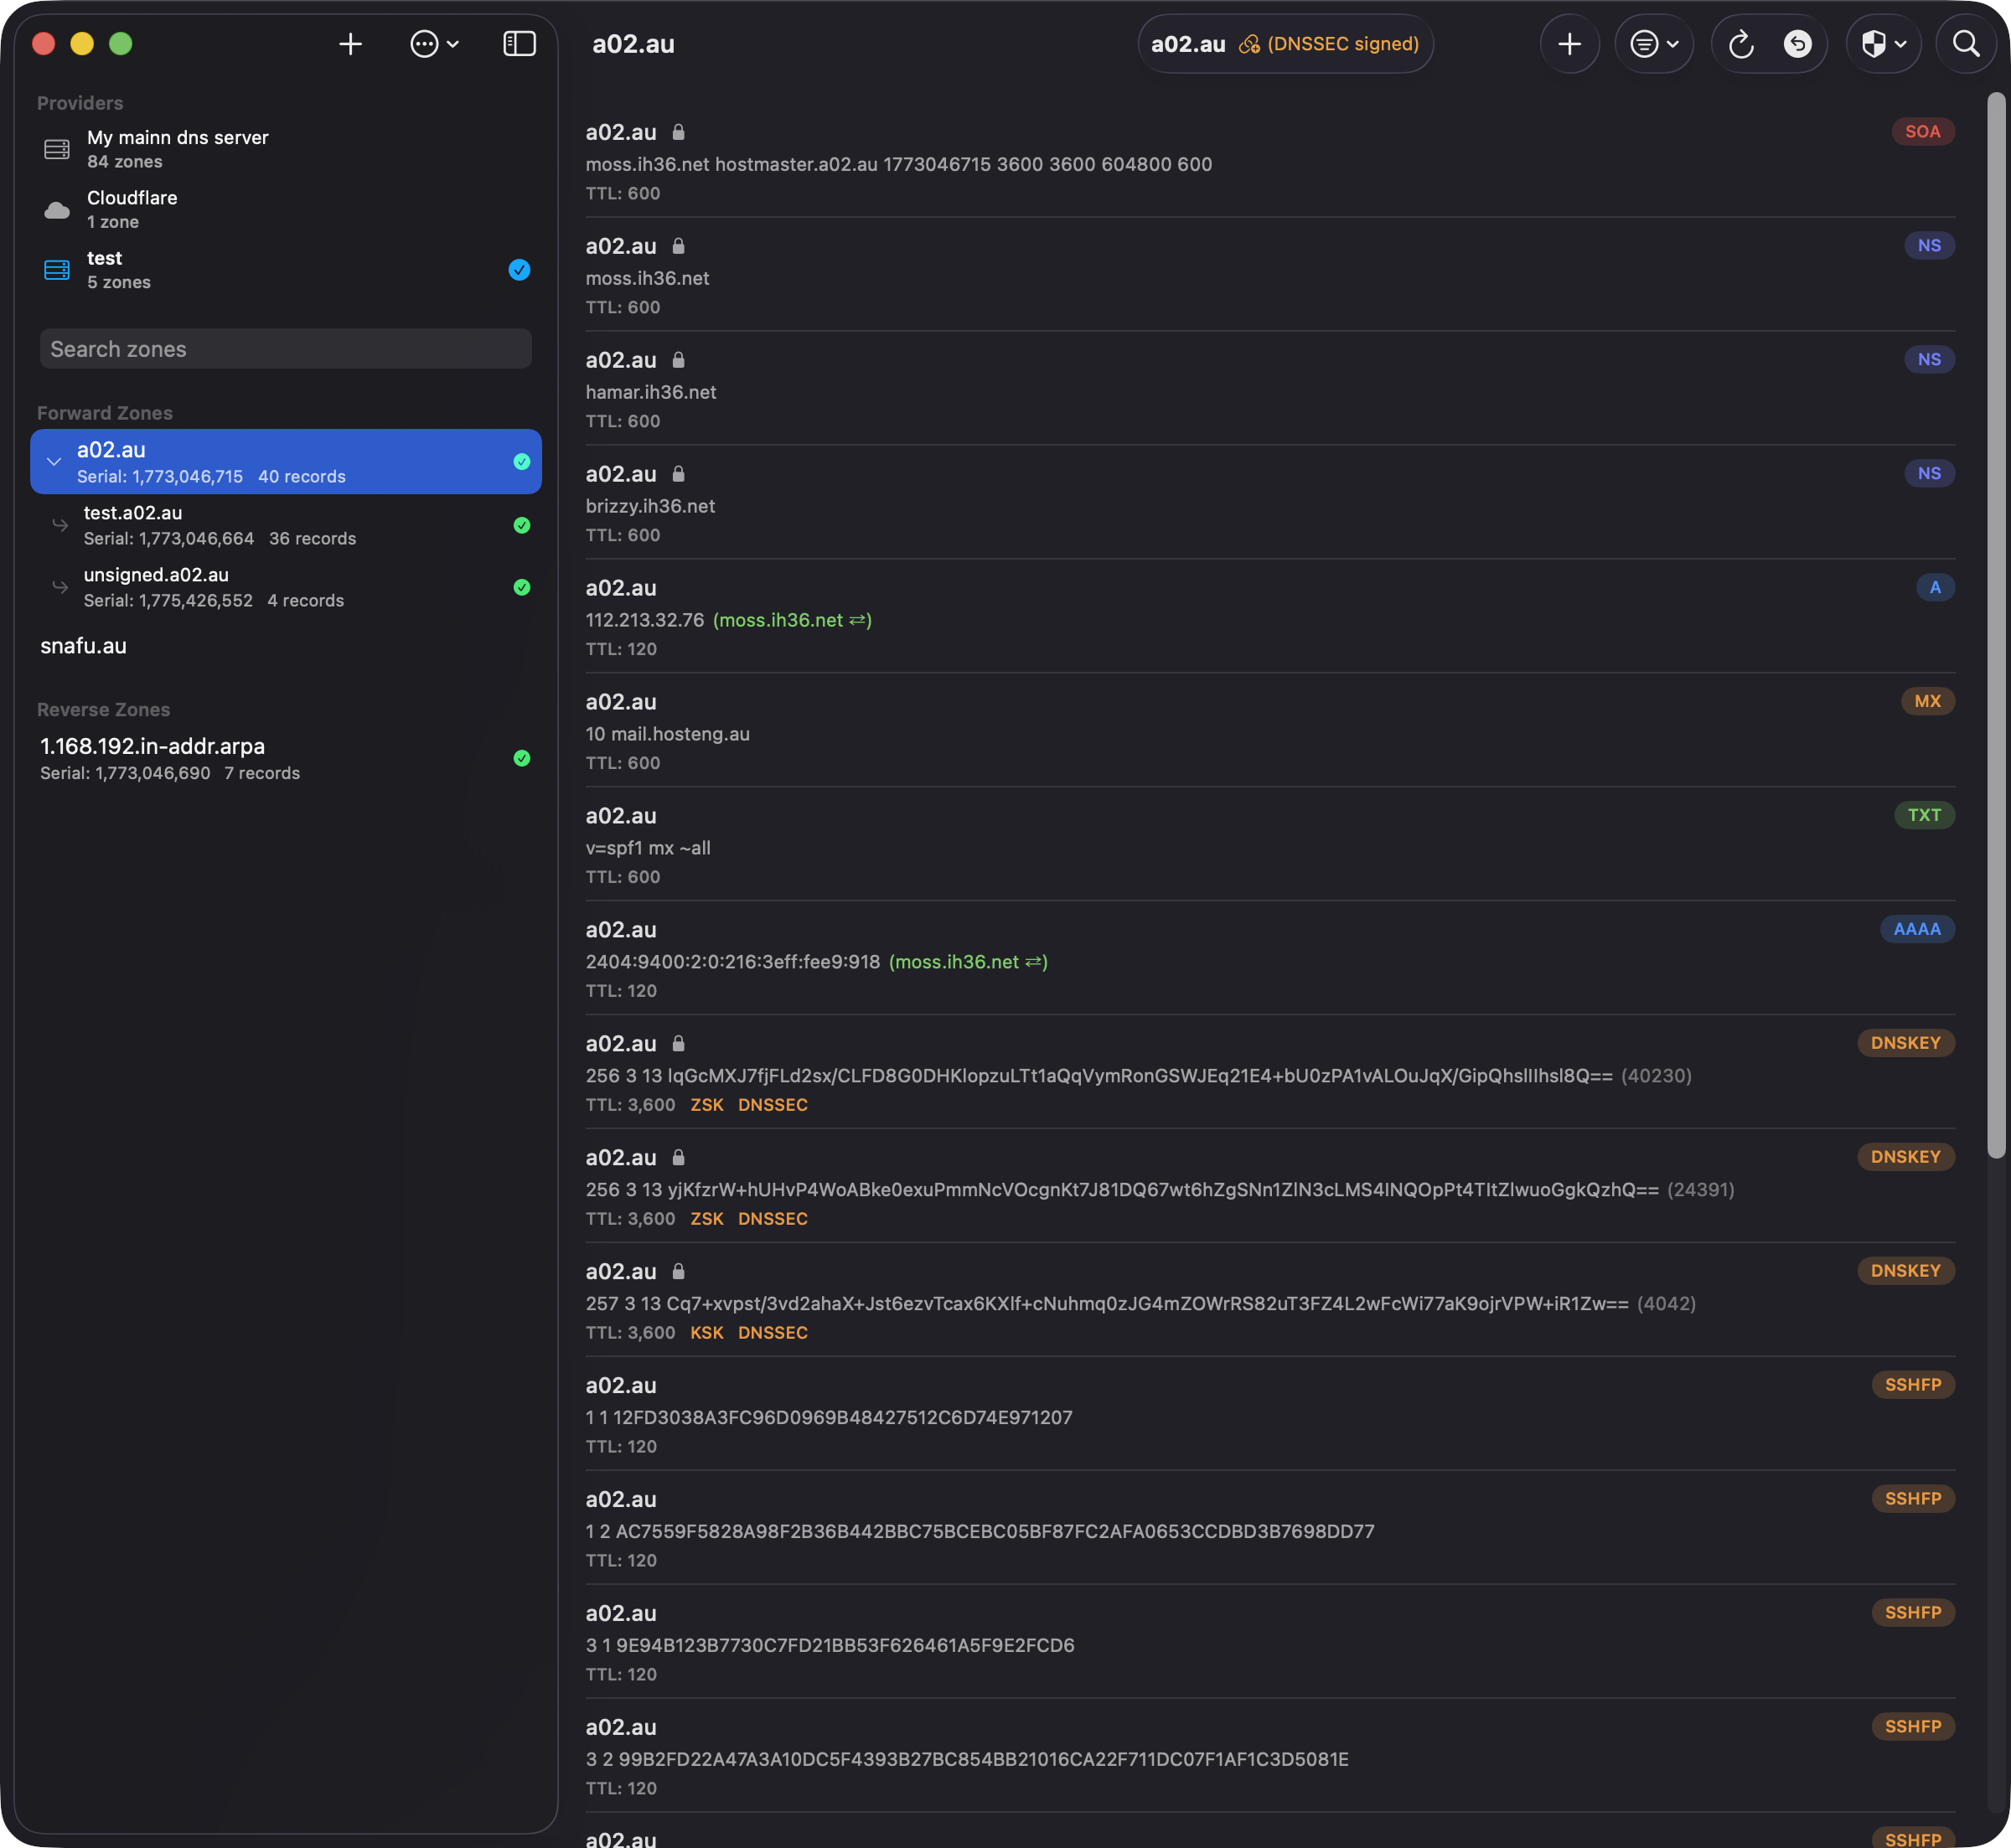
Zone List
The zone list displays all configured zones, organized into forward zones and reverse zones. Each zone shows its serial number and record count. A green checkmark indicates the zone loaded successfully.
- Select Zone — Click a zone to fetch and display its records
- Remove Zone — Swipe left or right-click to remove a zone from the list
Zone Hierarchy
Parent zones with subdomains display a disclosure chevron. Click to expand and reveal child zones indented beneath the parent. In the screenshot, a02.au contains two subdomains: test.a02.au and unsigned.a02.au.
Record List Toolbar
The toolbar above the record list provides these controls:
- Zone name — Shows the current zone with a lock icon and "DNSSEC signed" badge for signed zones
- + — Add a new DNS record
- Filter (⊖▾) — Filter records by type (A, AAAA, MX, etc.)
- Refresh (↻) — Reload the zone from the DNS server
- Zone Scanners — Scan all hosts for TLSA or SSHFP records (see Zone Scanners)
- Chain (🔗) — Validate DNSSEC DS chain (only shown for signed zones)
- Search (🔍) — Search records by name or value
iOS: On iPhone and iPad, less frequently used tools (refresh, undo history, zone scanners, DS chain validation) are grouped in the overflow menu (⋯) to keep the toolbar clean.
Working with Records
Viewing Records
Records are displayed with their name, type, value, and TTL. Use the filter menu to show specific record types, or search to find records by name or value. Click a record type below for details:
Provider Compatibility
Not all DNS providers support every record type. DnsManager automatically shows only the types available for your active provider. The table below shows which editable record types are supported by each provider:
| Record Type | BIND9 | Cloudflare | Route 53 | Google Cloud |
|---|---|---|---|---|
| A | ✓ | ✓ | ✓ | ✓ |
| AAAA | ✓ | ✓ | ✓ | ✓ |
| CAA | ✓ | ✓ | ✓ | ✓ |
| CNAME | ✓ | ✓ | ✓ | ✓ |
| DNAME | ✓ | — | — | — |
| DS | ✓ | ✓ | ✓ | ✓ |
| HINFO | ✓ | — | — | — |
| HTTPS | ✓ | ✓ | ✓ | ✓ |
| LOC | ✓ | ✓ | — | — |
| MX | ✓ | ✓ | ✓ | ✓ |
| NAPTR | ✓ | ✓ | ✓ | ✓ |
| NS | ✓ | ✓ | ✓ | ✓ |
| PTR | ✓ | ✓ | ✓ | ✓ |
| RP | ✓ | — | — | — |
| SRV | ✓ | ✓ | ✓ | ✓ |
| SSHFP | ✓ | ✓ | ✓ | ✓ |
| SVCB | ✓ | ✓ | ✓ | ✓ |
| TLSA | ✓ | ✓ | ✓ | ✓ |
| TXT | ✓ | ✓ | ✓ | ✓ |
BIND9 (RFC2136) supports all record types. DNAME, HINFO, and RP are only available with BIND9. LOC records are supported by BIND9 and Cloudflare.
Adding Records
- Tap the + button in the zone detail view
- Select the record type
- Enter the record name (use @ for the zone apex)
- Fill in the type-specific fields
- Set the TTL (time-to-live in seconds)
- Tap Save to push the change to your DNS server
Editing Records
Tap any record to open the editor. Modify the fields as needed and save. The original record is deleted and replaced with the updated version via DNS UPDATE.
SOA records and DNSSEC records (DNSKEY, RRSIG, NSEC) are read-only and cannot be edited directly.
Deleting Records
- Single record — Swipe left or use the context menu
- Multiple records — Enter selection mode, select records, then tap Delete
Deleted records can be restored from the Undo History.
Reverse/Forward DNS Verification
How It Works
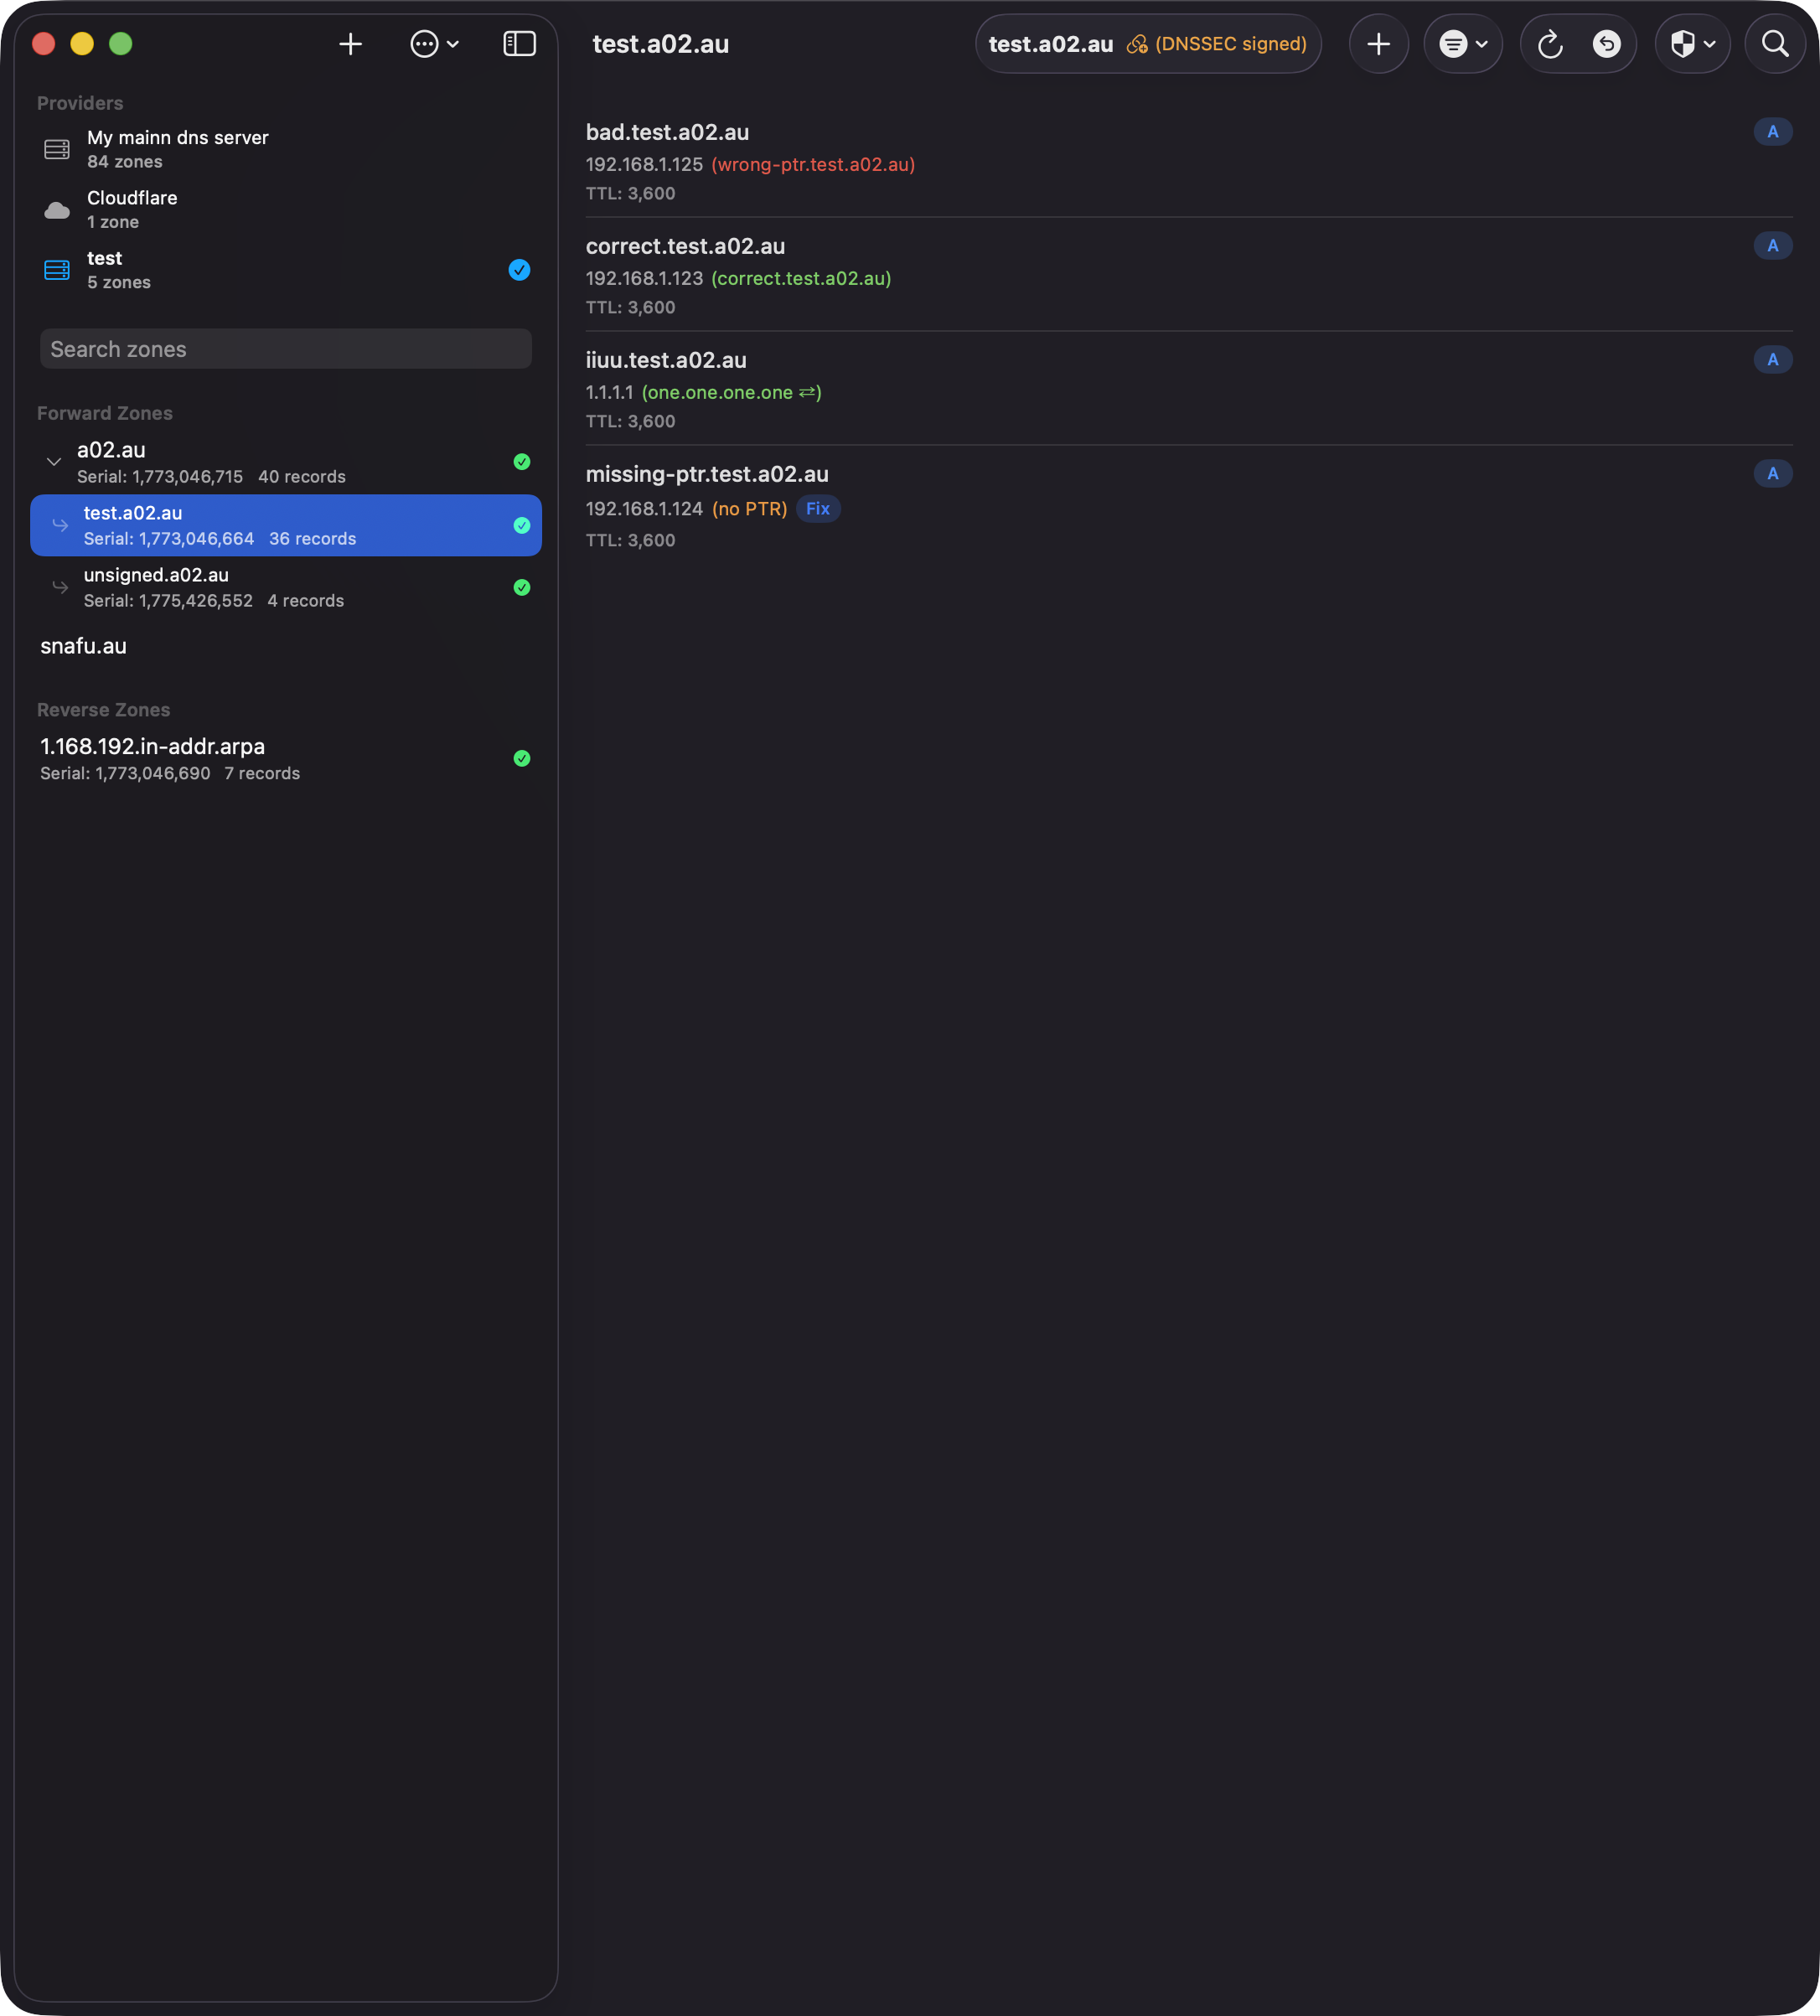
When enabled in Settings, DnsManager performs live DNS lookups for every A, AAAA, and PTR record in the zone and displays the result inline next to the record value:
- Green — The reverse (or forward) lookup matches. An A/AAAA record's PTR points back to the same hostname, or a PTR record's forward A/AAAA resolves to the same IP.
- Green with arrows (↔) — Forward-confirmed reverse DNS (FCrDNS). The PTR record points to a different hostname than the one in the zone, but that hostname resolves back to the same IP address. This is a valid circular match commonly seen in CDN, load-balanced, and shared hosting configurations.
- Red — A record exists but points elsewhere. The PTR for an A record resolves to a different hostname, or the forward record for a PTR resolves to a different IP.
- Orange — No matching record was found. Shown as "(no PTR)" for A/AAAA records, or as an orange IP for PTR records with no forward entry.
Results are cached for the duration of your session, so scrolling through large zones stays fast.
Private Networks (RFC 1918)
Public DNS resolvers cannot resolve reverse lookups for private IP ranges like 192.168.x.x, 10.x.x.x, or 172.16–31.x.x. When the app detects that a reverse or forward zone for a given IP is managed by one of your BIND9 (RFC 2136) providers, it queries that provider's nameserver directly instead of using public resolvers. This means verification works correctly for both public and private networks.
Fix Missing Records
When an A/AAAA record has no PTR, or a PTR record has no matching forward entry, a Fix button appears — but only if the target zone is managed by the app. Tapping Fix creates the missing record in the correct zone automatically:
- A/AAAA with no PTR — Creates a PTR record in the matching reverse zone (e.g., in-addr.arpa or ip6.arpa), pointing back to this hostname.
- PTR with no forward — Creates an A or AAAA record in the matching forward zone with the derived IP address.
The record is added through the provider that manages the target zone, even if it is a different provider than the one you are currently viewing.
Paired Deletion
When you delete an A, AAAA, or PTR record that has a confirmed bidirectional match (shown in green), the delete confirmation offers a Delete Both option. This removes the counterpart record from the other zone at the same time — for example, deleting an A record and its matching PTR, or a PTR and its matching A record. The option only appears when both records agree with each other (the match is green in both directions) and the other zone is managed by the app.
Toggling the Feature
Go to Settings → Display and toggle Reverse/Forward DNS Verification. When disabled, no additional DNS lookups are performed, no color-coded indicators are shown, and Fix buttons and paired deletion are hidden.
DNSSEC Support
Signed Zones
Zones signed with DNSSEC display an indicator in the toolbar showing a lock icon and "DNSSEC signed" badge. DnsManager automatically detects signed zones by the presence of DNSKEY or RRSIG records.
For zones hosted on cloud providers (Cloudflare, Route 53, Google Cloud DNS), DnsManager queries public DNS to detect DNSSEC status, ensuring the DNSSEC badge displays correctly even when provider APIs don't return DNSKEY records.
DS Chain Validation
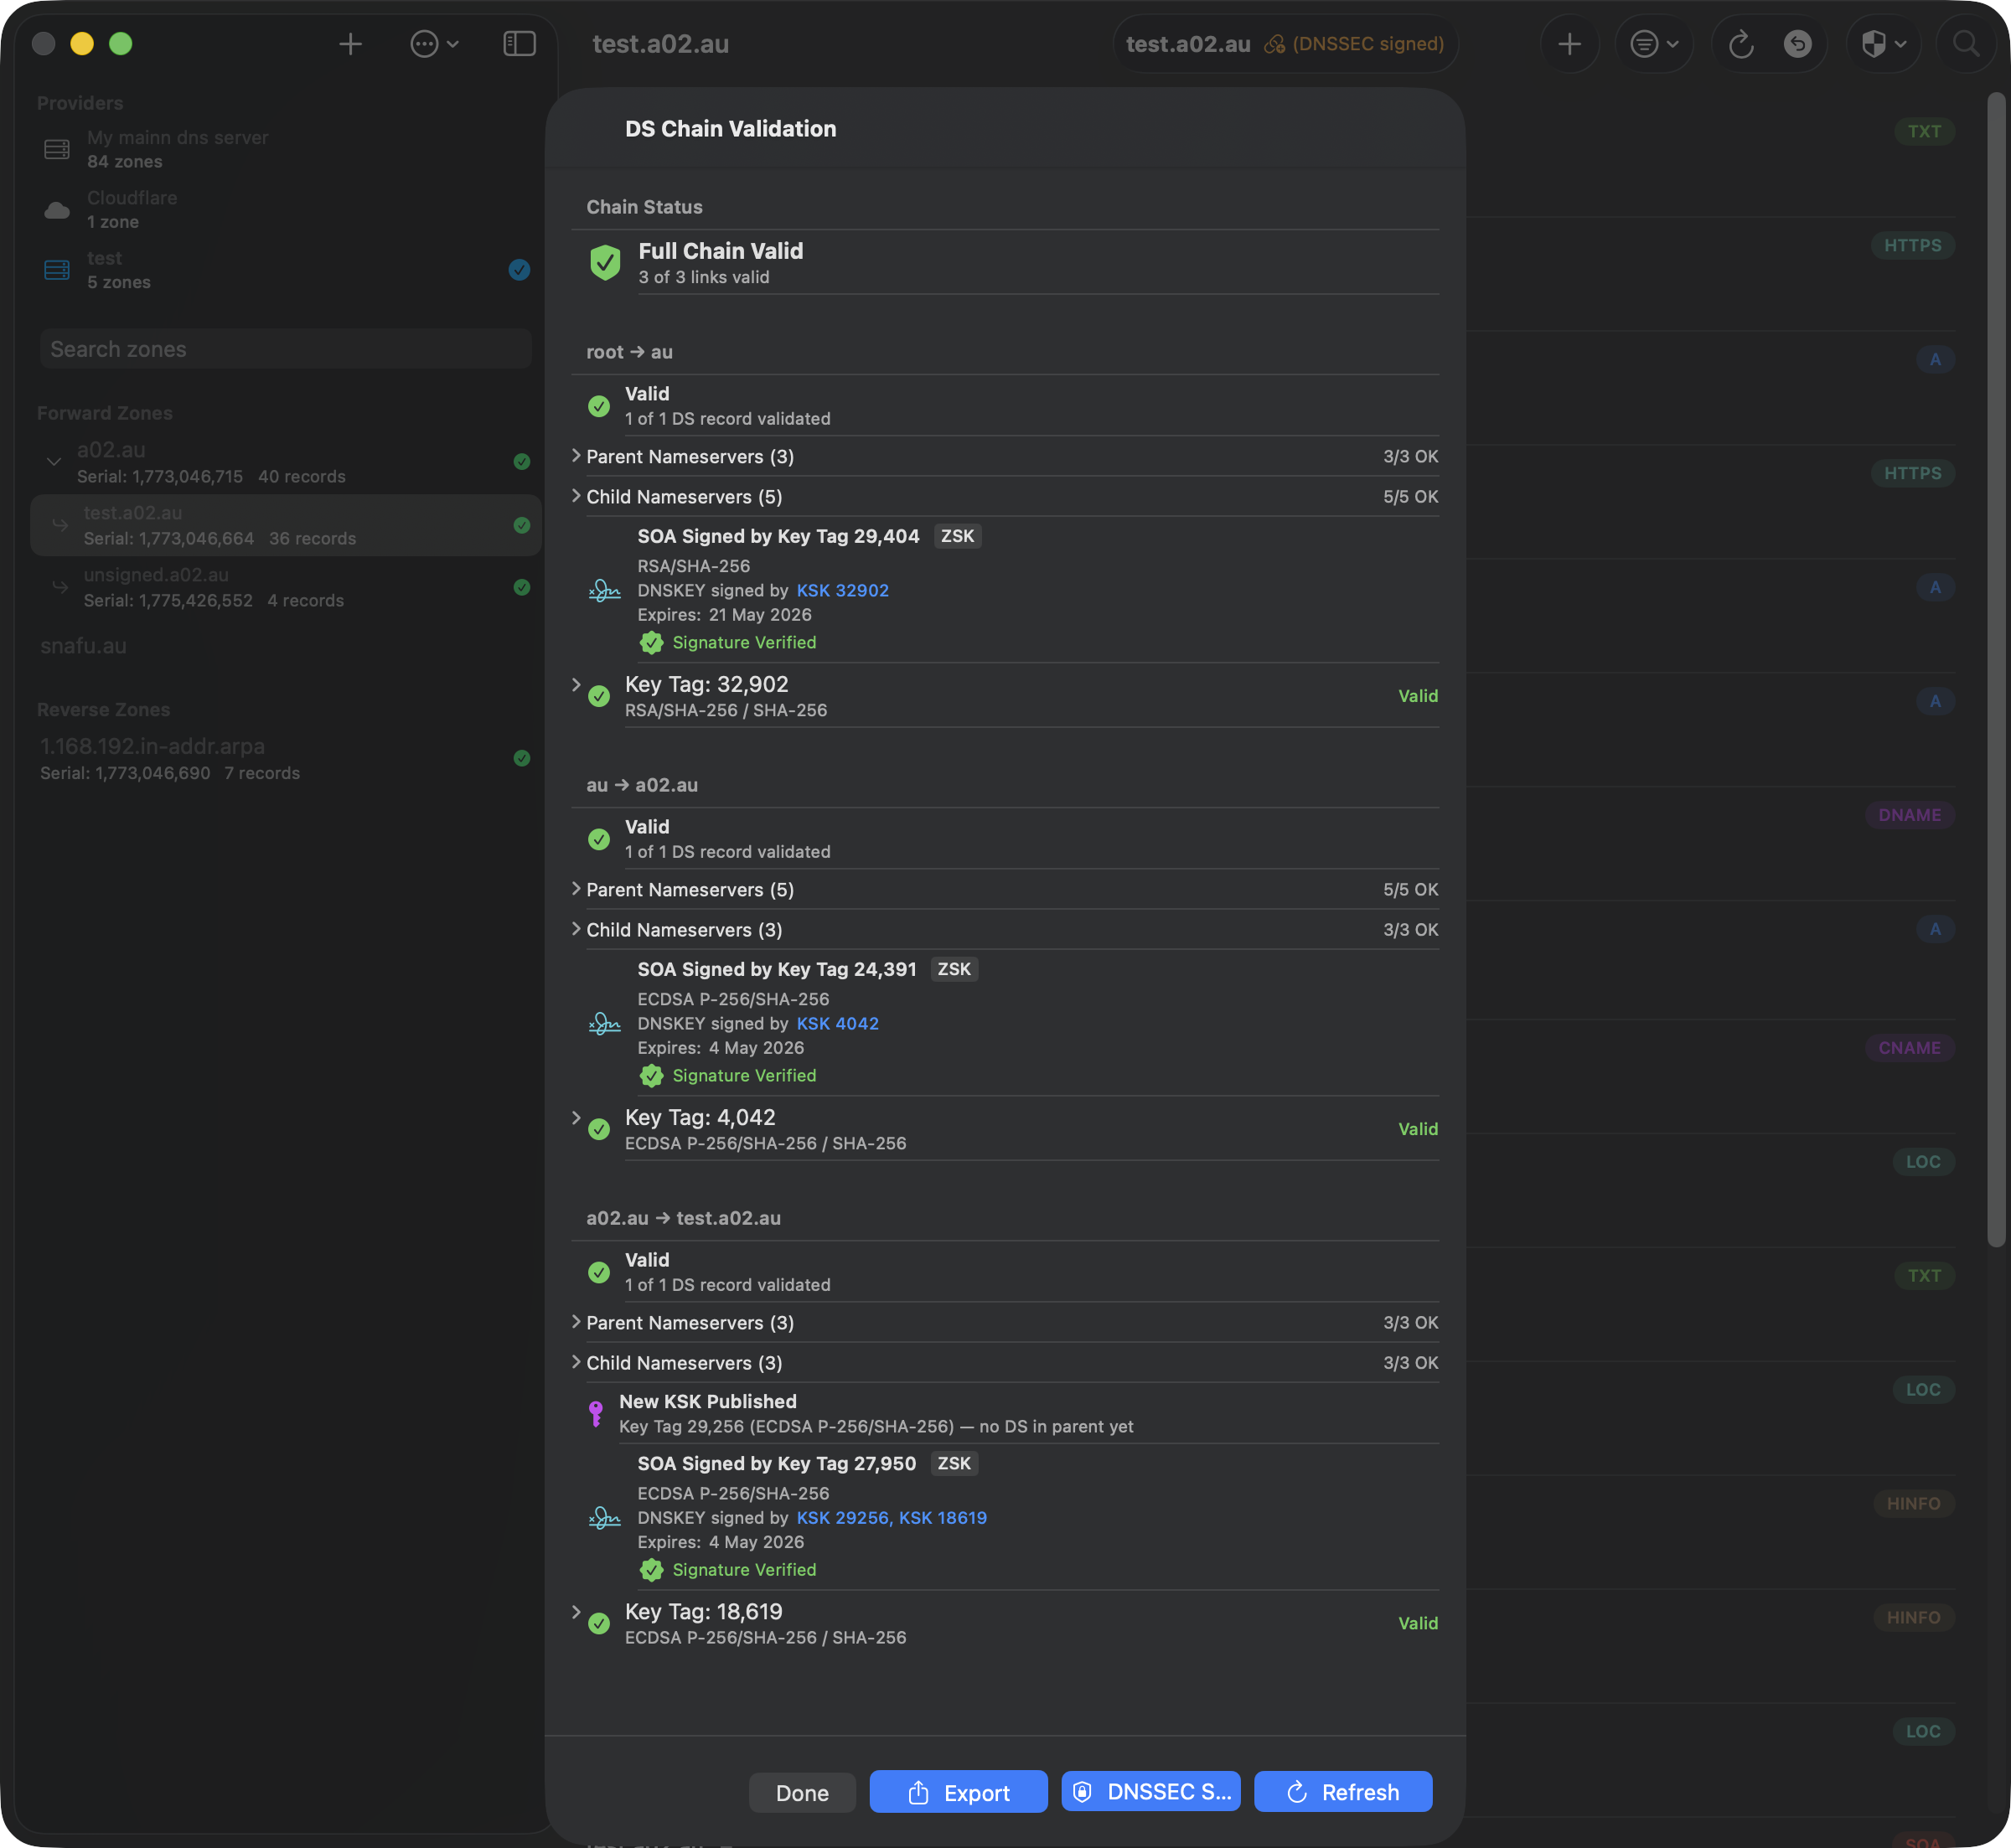
For DNSSEC-signed zones, tap the chain icon (🔗) to validate the DS record chain from your zone up to the root. This verifies that your zone's delegation signer records are correctly published in the parent zone.

The validation dialog shows:
- Chain Status — Overall validation result (e.g., "Full Chain Valid - 2 of 2 links valid")
- SOA Signing Key — Which DNSKEY (by key tag) signs the zone's SOA record, its algorithm, and signature validity window. If the signer is a ZSK, the KSK(s) that signed the DNSKEY RRset are also shown, displaying the full trust path from DS through KSK to ZSK
- KSK Rollover Detection — Alerts when CDS records differ from published DS records, indicating a key rollover is in progress. A separate "New KSK Published" indicator appears when a KSK exists in the DNSKEY set but has no matching DS in the parent zone — catching the earliest phase of a rollover
- Link Details — Each delegation link (e.g., test.a02.au → a02.au → au) with key tags, algorithm info, and TTL values for DS, CDS, DNSKEY, and CDNSKEY records
- Key Validation — Individual key status showing algorithm (e.g., ECDSA P-256/SHA-256) and validity
Read-Only DNSSEC Records
DNSSEC operational records are protected from editing:
- DNSKEY — Zone signing keys
- RRSIG — Record signatures
- NSEC/NSEC3 — Authenticated denial of existence
You can still manage DS, TLSA, and SSHFP records which are used for trust anchors and certificate pinning.
QuickLook Preview
QuickLook lets you quickly browse through records without opening the full editor. It's available for all records via the context menu and for read-only records (DNSSEC) via tap or click.
Opening QuickLook
- macOS — Select a record and press Space, or right-click and choose "View"
- iPad — Select a record and press Space on an external keyboard, or long press and choose "View"
- iPhone — Long press a record and choose "View", or tap a read-only record
Navigating Records
While QuickLook is open, you can move between records without closing and reopening:
- Arrow buttons — Use the up/down chevron buttons in the QuickLook toolbar (all platforms)
- Keyboard — Press ↑ and ↓ arrow keys (macOS and iPad with external keyboard)
The record list scrolls automatically to keep the selected record visible.
Closing QuickLook
- macOS — Press Space or Escape, or close the panel
- iPad — Press Space or Escape, or tap "Done"
- iPhone — Tap "Done" or swipe down
DS Record Generation
When viewing a KSK (Key Signing Key) DNSKEY record in QuickLook, a "Copy DS Record (SHA-256)" button appears. This computes the DS digest from the DNSKEY and copies it to your clipboard in standard format:
keyTag algorithm digestType HEXDIGEST
Paste this directly into your domain registrar's DNSSEC settings to establish the chain of trust for your zone.
Zone Scanners
Zone scanners automatically scan all A/AAAA hosts in your zone and generate or update security records. Access them from the toolbar: on macOS via the shield menu, on iOS via the overflow menu (⋯).
TLSA Scanner
The TLSA scanner connects to each host, fetches the TLS certificate, and computes DANE-EE (3 1 1) TLSA records using the SPKI SHA-256 hash. A port picker in the toolbar lets you select the target port: 443 (HTTPS), 25 (SMTP), 587 (Submission), 465 (SMTPS), 143 (IMAP), 993 (IMAPS), 110 (POP3), or 995 (POP3S). TLSA record names use the selected port prefix (e.g. _25._tcp. for SMTP).
For STARTTLS ports (25, 587, 143, 110), the scanner performs the protocol-specific plaintext handshake (SMTP EHLO/STARTTLS, IMAP STARTTLS, or POP3 STLS) before upgrading to TLS to fetch the certificate. Direct TLS ports (443, 465, 993, 995) connect with TLS immediately.
Results are categorized as:
- Add — New TLSA records for hosts without existing records
- Update — Existing TLSA records where the certificate hash has changed
- Unchanged — Existing TLSA records that match the current certificate
- Unreachable — Hosts that did not respond on the selected port
The scanner also checks Subject Alternative Names (SANs) and warns if the hostname is not covered by the certificate. Review the results and use the checkboxes to select which changes to apply.
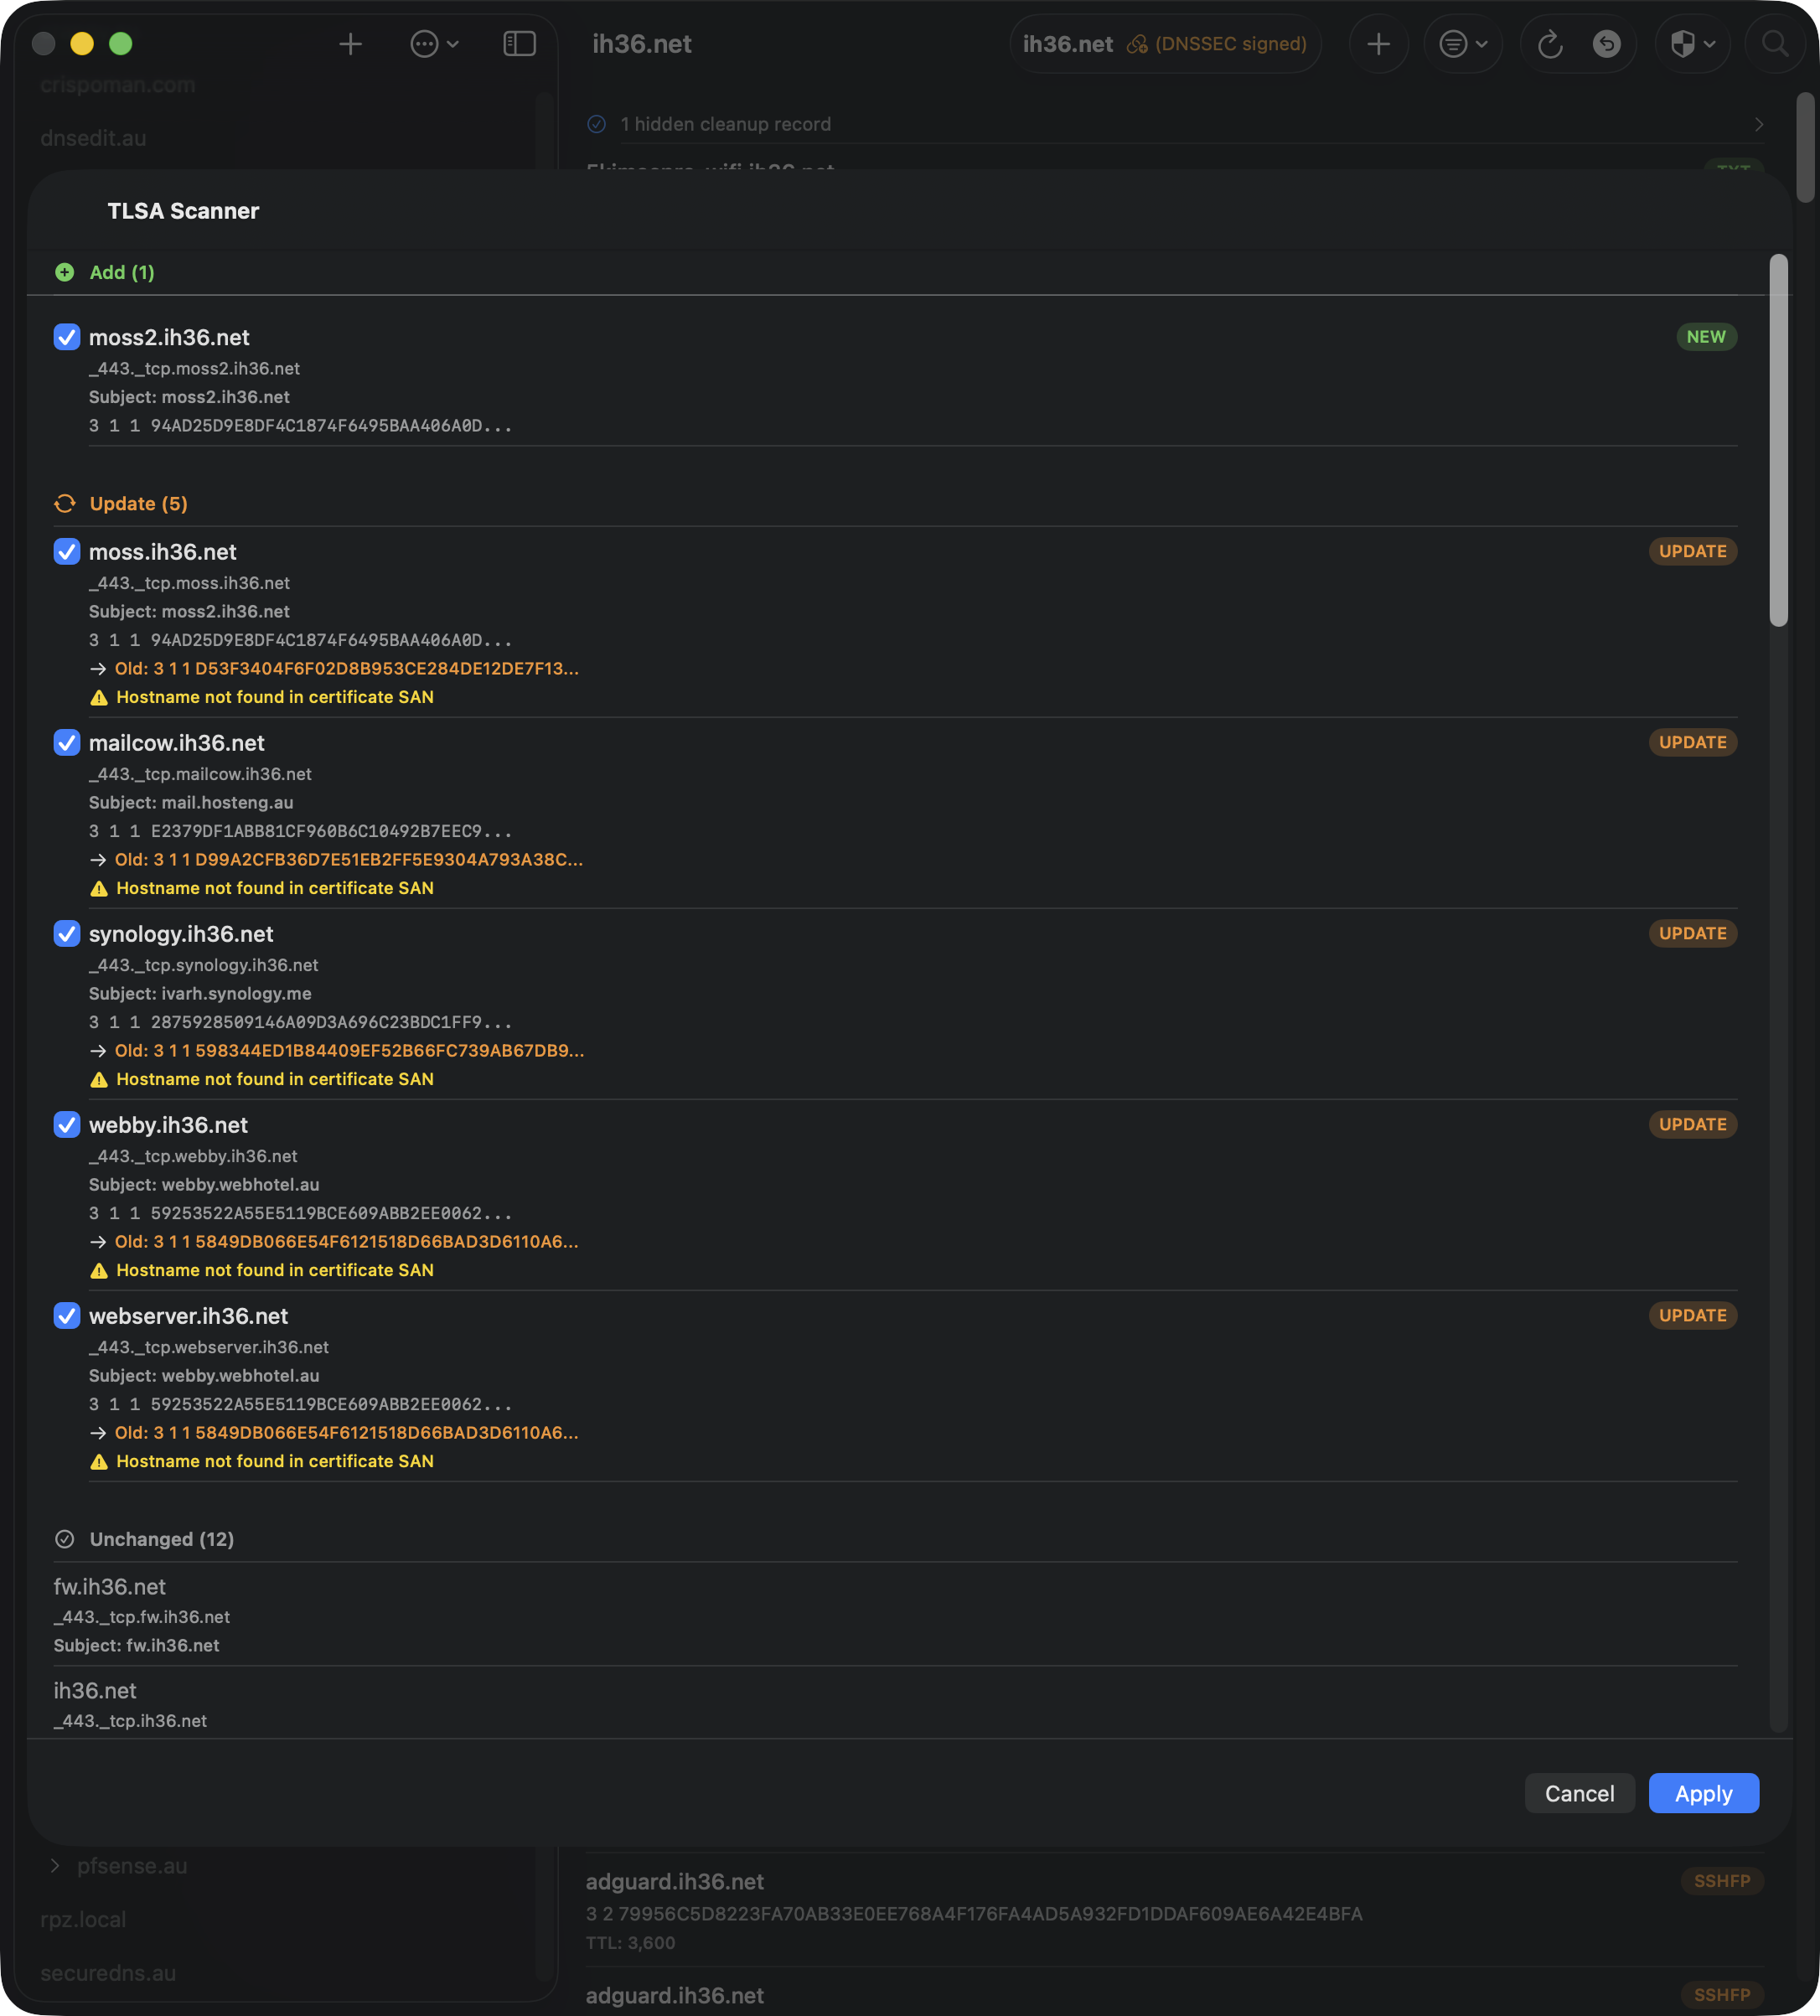
SSHFP Scanner
The SSHFP scanner connects to port 22 on each host, fetches all SSH host keys, and computes both SHA-1 and SHA-256 fingerprints for each key type. Results include:
- Add — New SSHFP records for hosts or key types not yet in DNS
- Fingerprint Changed — Existing SSHFP records where the fingerprint differs from the scanned key. These are highlighted in red with a man-in-the-middle warning. You must explicitly confirm the key change is intentional before the change can be selected for application
- Remove Orphaned — SSHFP records for hostnames that no longer have A/AAAA records in the zone
- Unchanged — Existing SSHFP records that match the current host keys
- Unreachable — Hosts that did not respond on port 22
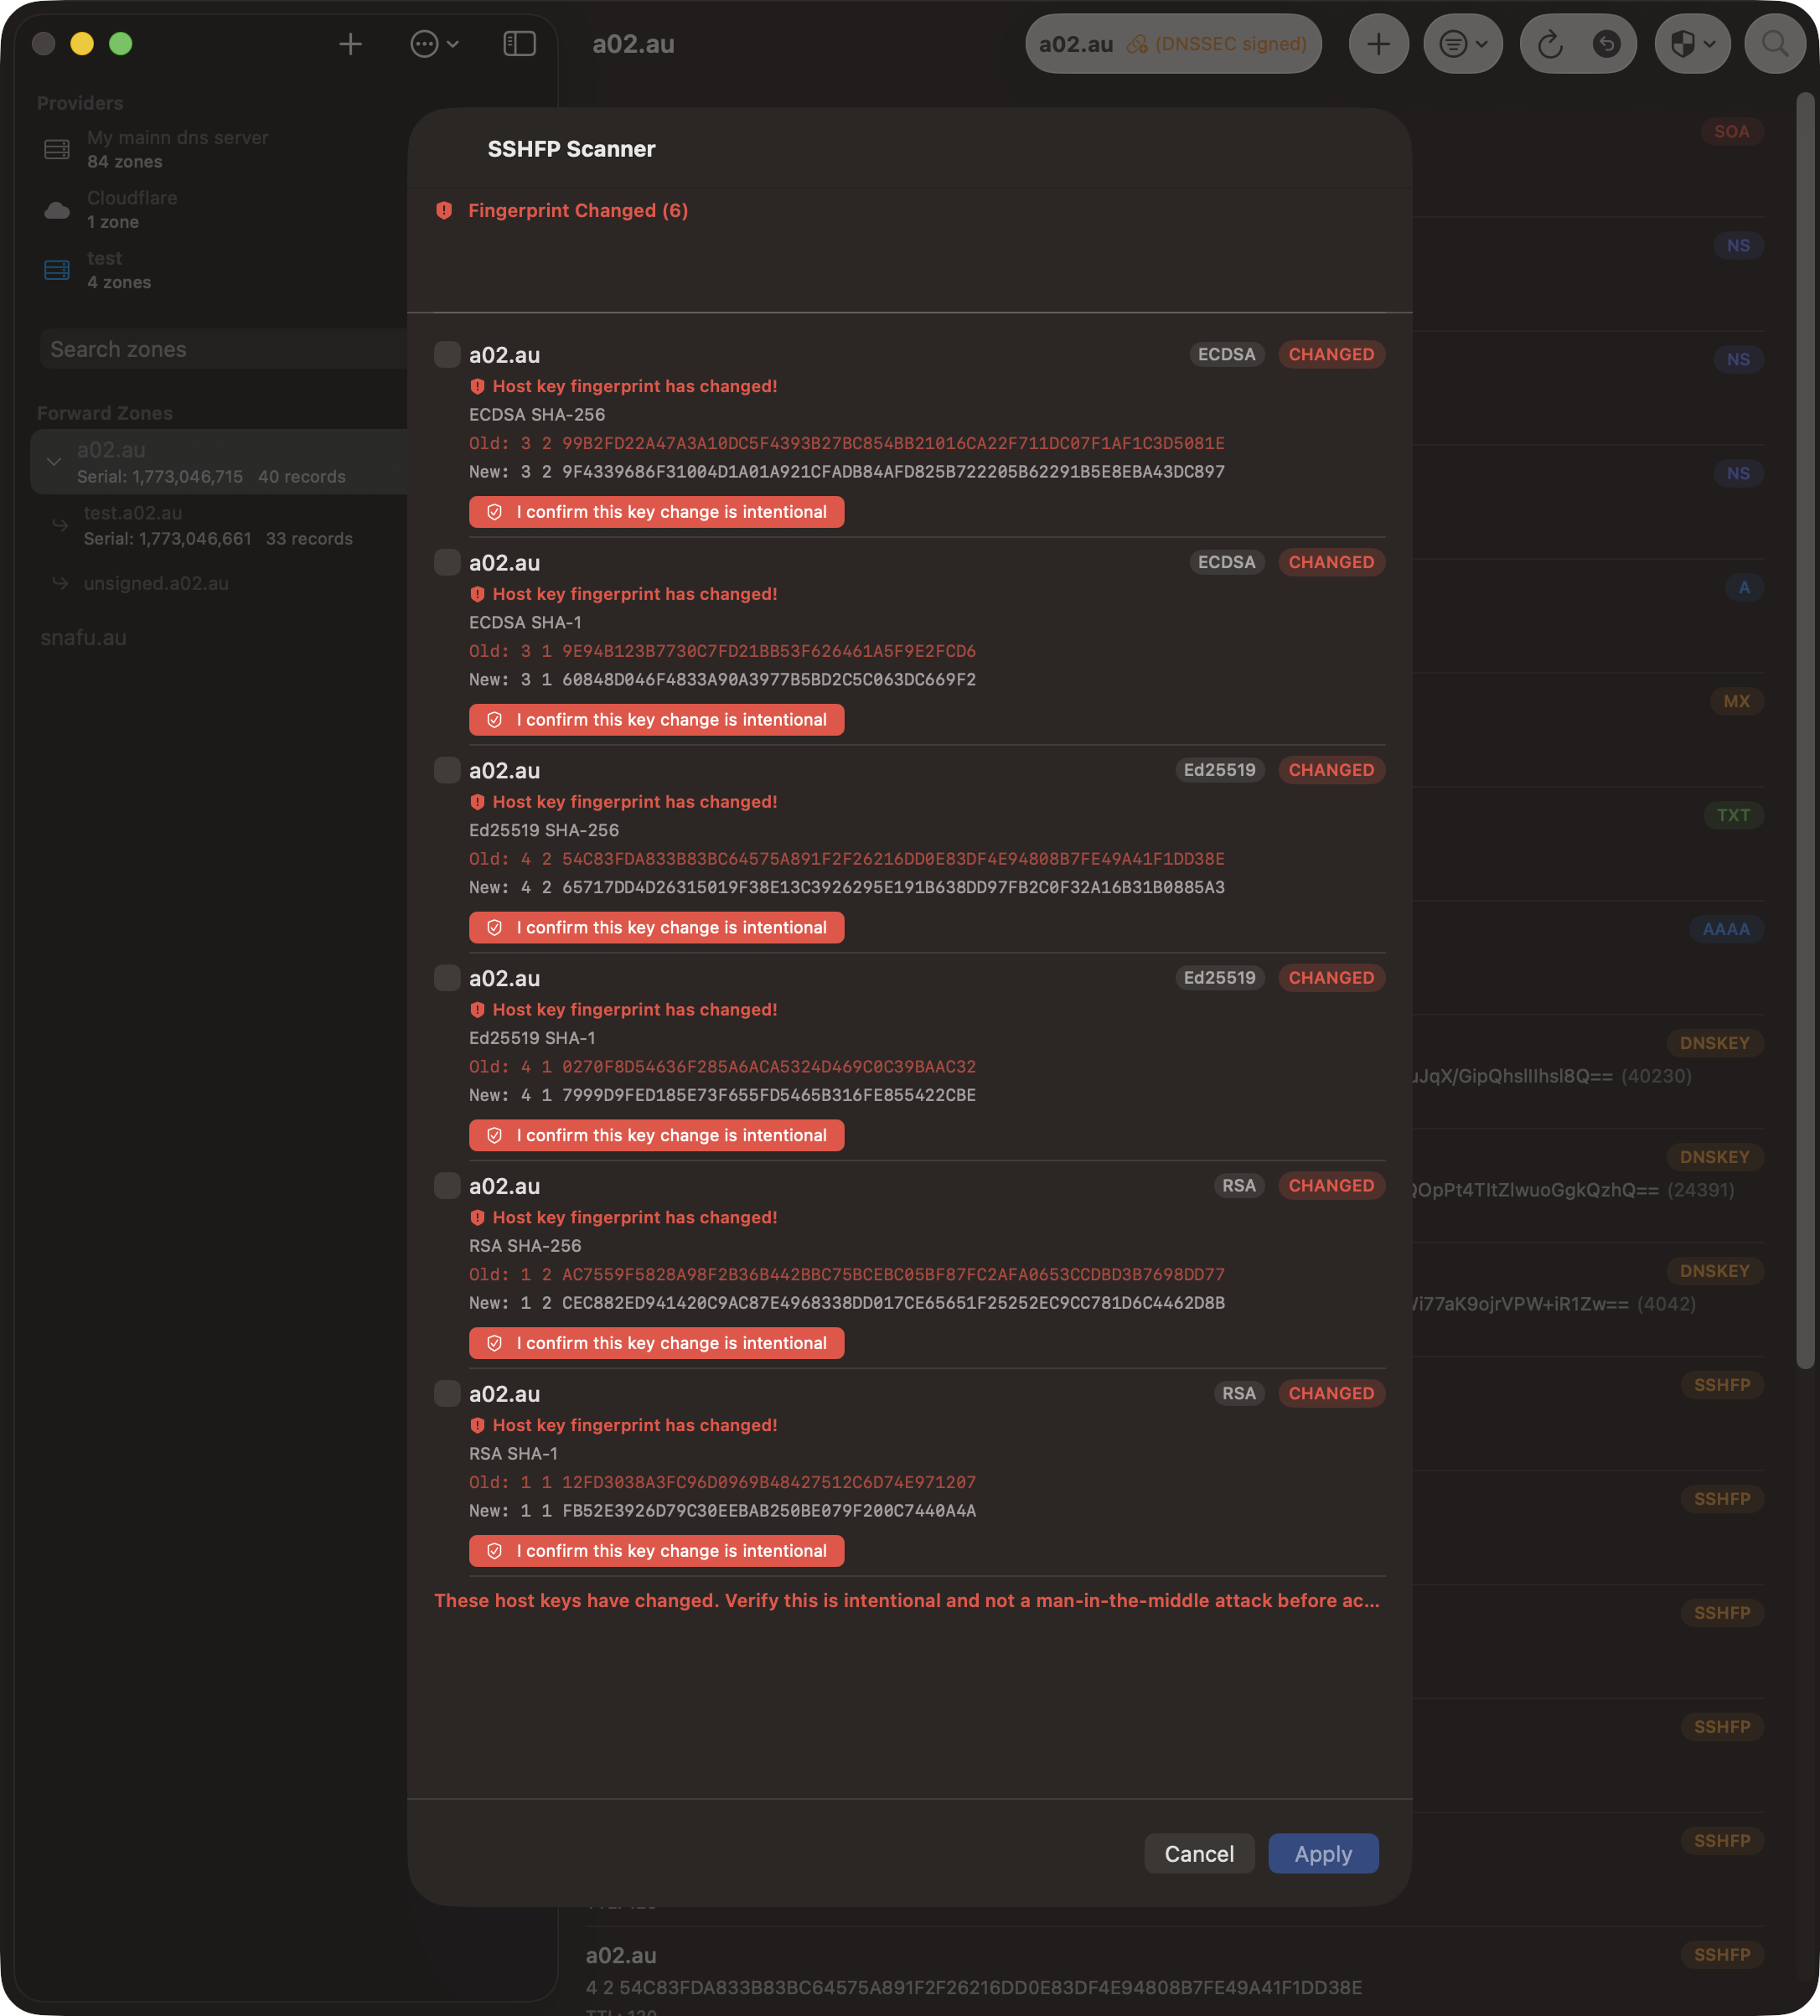
DNSSEC Signature Scanner
The DNSSEC signature scanner runs on the daemon and inspects the signed zone data for every configured zone. It AXFRs each zone (per view for split-horizon zones) and checks for:
- Expired signatures — RRSIG records past their validity window
- Expiring soon — signatures within the configurable warning window (default 7 days)
- Unsigned RRsets — authoritative records in a signed zone that have no covering RRSIG
- Missing or broken DNSKEY — zones where the apex DNSKEY set is absent or invalid
The scanner is delegation-cut-aware: glue records and NS records at child delegations are correctly excluded so they don't produce false positives. Results are available in the app under Zone Manager → DNSSEC Scan, with a text export for sharing.
Like the DS and TLSA scanners, the DNSSEC scanner runs on the daemon's per-provider schedule and sends state-change email alerts when new problems appear. Configure the scan interval and expiry warning window in the provider's daemon scan settings.
Using the Scanners
- Open a zone and tap the scanner button (shield icon on macOS, or via the ⋯ menu on iOS)
- Select "Scan TLSA Records" or "Scan SSHFP Records"
- Wait for the scan to complete — progress is shown for each host
- Review the results. Use the checkboxes to select or deselect individual changes
- Tap Apply to push the selected changes to your DNS server
Note: Wildcard records (*.example.com) are skipped during scanning. If both A and AAAA records exist for the same hostname, the host is scanned only once.
Zone Sanity Check
The Zone Sanity Check verifies that all your public authoritative nameservers are serving identical zone data. It queries each nameserver directly using non-recursive queries (RD=0) to test what each server actually serves, rather than what it can resolve via recursion.
Running a Sanity Check
- Open a zone in the record list
- On macOS, click the shield menu ("Zone Scanners") in the toolbar and select "Zone Sanity Check"
- On iOS, tap the overflow menu (⋯) and select "Zone Sanity Check"
- The check runs automatically when the sheet opens. A progress indicator shows the current stage
- When complete, results are displayed in a sectioned list
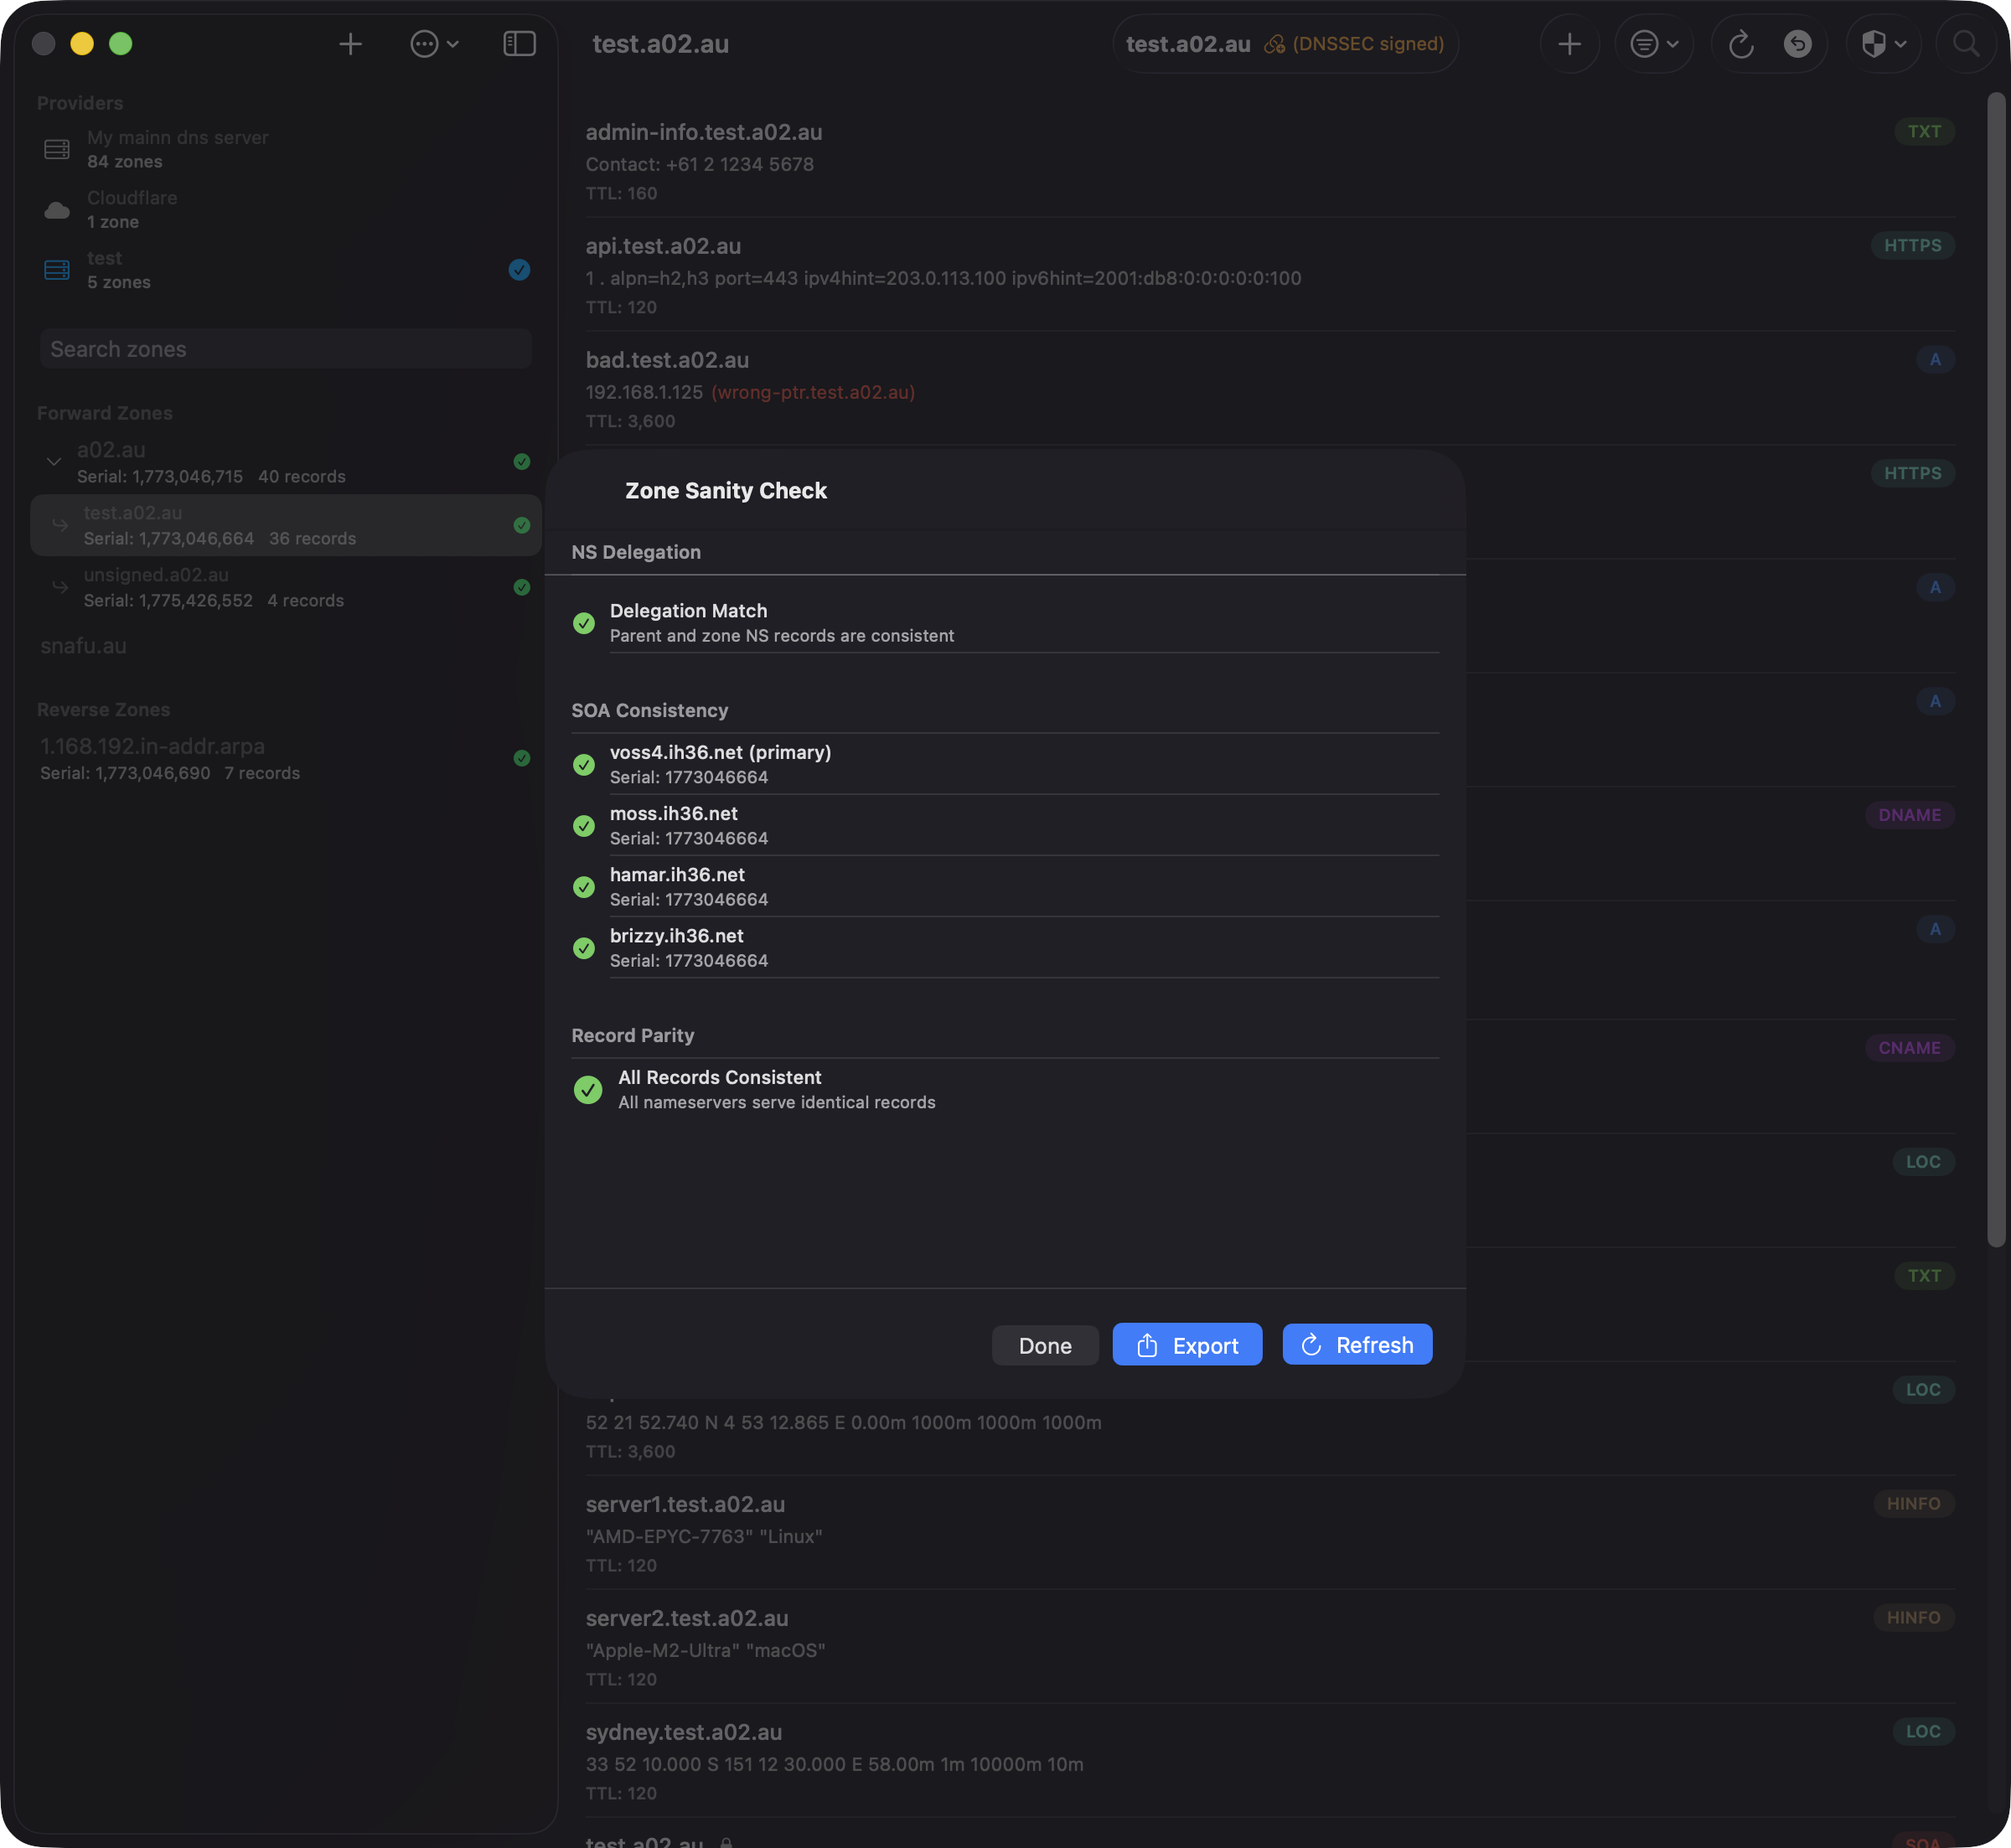
What It Checks
The sanity check performs three verifications against every nameserver listed in the zone's apex NS records:
- NS Delegation — Queries the parent zone's authoritative nameservers for the child zone's NS delegation and compares with the NS records in the zone itself. A mismatch means the parent zone and your zone disagree about which nameservers are authoritative.
- SOA Consistency — Queries the SOA record from each nameserver directly and compares serial numbers. Mismatched serials indicate a nameserver has not received the latest zone transfer.
- Record Parity — For every unique (name, type) pair in the zone, queries each nameserver and compares the returned values with the zone data. DNSSEC auto-generated records (RRSIG, NSEC, NSEC3, NSEC3PARAM, DNSKEY, CDNSKEY, DS, CDS) and SOA records are excluded from comparison since they may legitimately differ between servers.
Understanding Results
- NS Delegation — A green checkmark means the parent and zone NS records match. An orange warning lists nameservers that appear only in the parent or only in the zone.
- SOA Consistency — Each nameserver is listed with its serial number. Green means it matches the expected serial; red indicates a mismatch or unreachable server.
- Record Differences — If differences are found, they are grouped by record (name and type). Each row shows the record value and which nameservers are affected. Records are categorised as:
- Missing (red) — The record exists in the zone but is not served by the listed nameservers
- Extra (orange) — The nameservers return a record that is not in the zone
- Value differs (yellow) — The record exists on both sides but with different values
- All Records Consistent — A green checkmark confirms all nameservers serve identical records.
TCP Fallback
DNS queries over UDP are limited in response size. When a response is truncated (TC bit set), the sanity check automatically retries the query over TCP to get the complete response. This is important for records with large values, such as DKIM TXT records that can exceed 512 bytes.
Exporting Results
After a check completes, tap the share button in the toolbar to export the results as a plain-text report. The report includes:
- Zone name and check date
- NS delegation status
- SOA serial for each nameserver
- All record differences with affected nameservers
Use this to save a record of zone health, share with colleagues, or track issues over time.
Tips
- The check refreshes the zone from your DNS server before running, so results always reflect the latest zone data
- If a nameserver is unreachable, it is reported in the SOA section and its records are not compared
- IPv6 addresses are normalised to canonical form before comparison, so equivalent representations (e.g.,
::1vs0:0:0:0:0:0:0:1) are correctly identified as matching - Use the refresh button to re-run the check after making changes to your zone
Zone Cleanup
The Zone Cleanup tool scans your zone to identify and fix forward/reverse DNS mapping inconsistencies across all your managed reverse zones. It detects dangling PTR records (PTRs without corresponding A/AAAA records), missing PTR records, and incorrect mappings where the forward and reverse records don't match.
Opening Zone Cleanup
- Open a zone in the record list (typically a forward zone like
example.com) - On macOS, click the shield menu ("Zone Scanners") in the toolbar and select "Zone Cleanup"
- On iOS, tap the overflow menu (⋯) and select "Zone Cleanup"
- The scan runs automatically when the sheet opens and checks all A/AAAA records in the zone against their reverse mappings
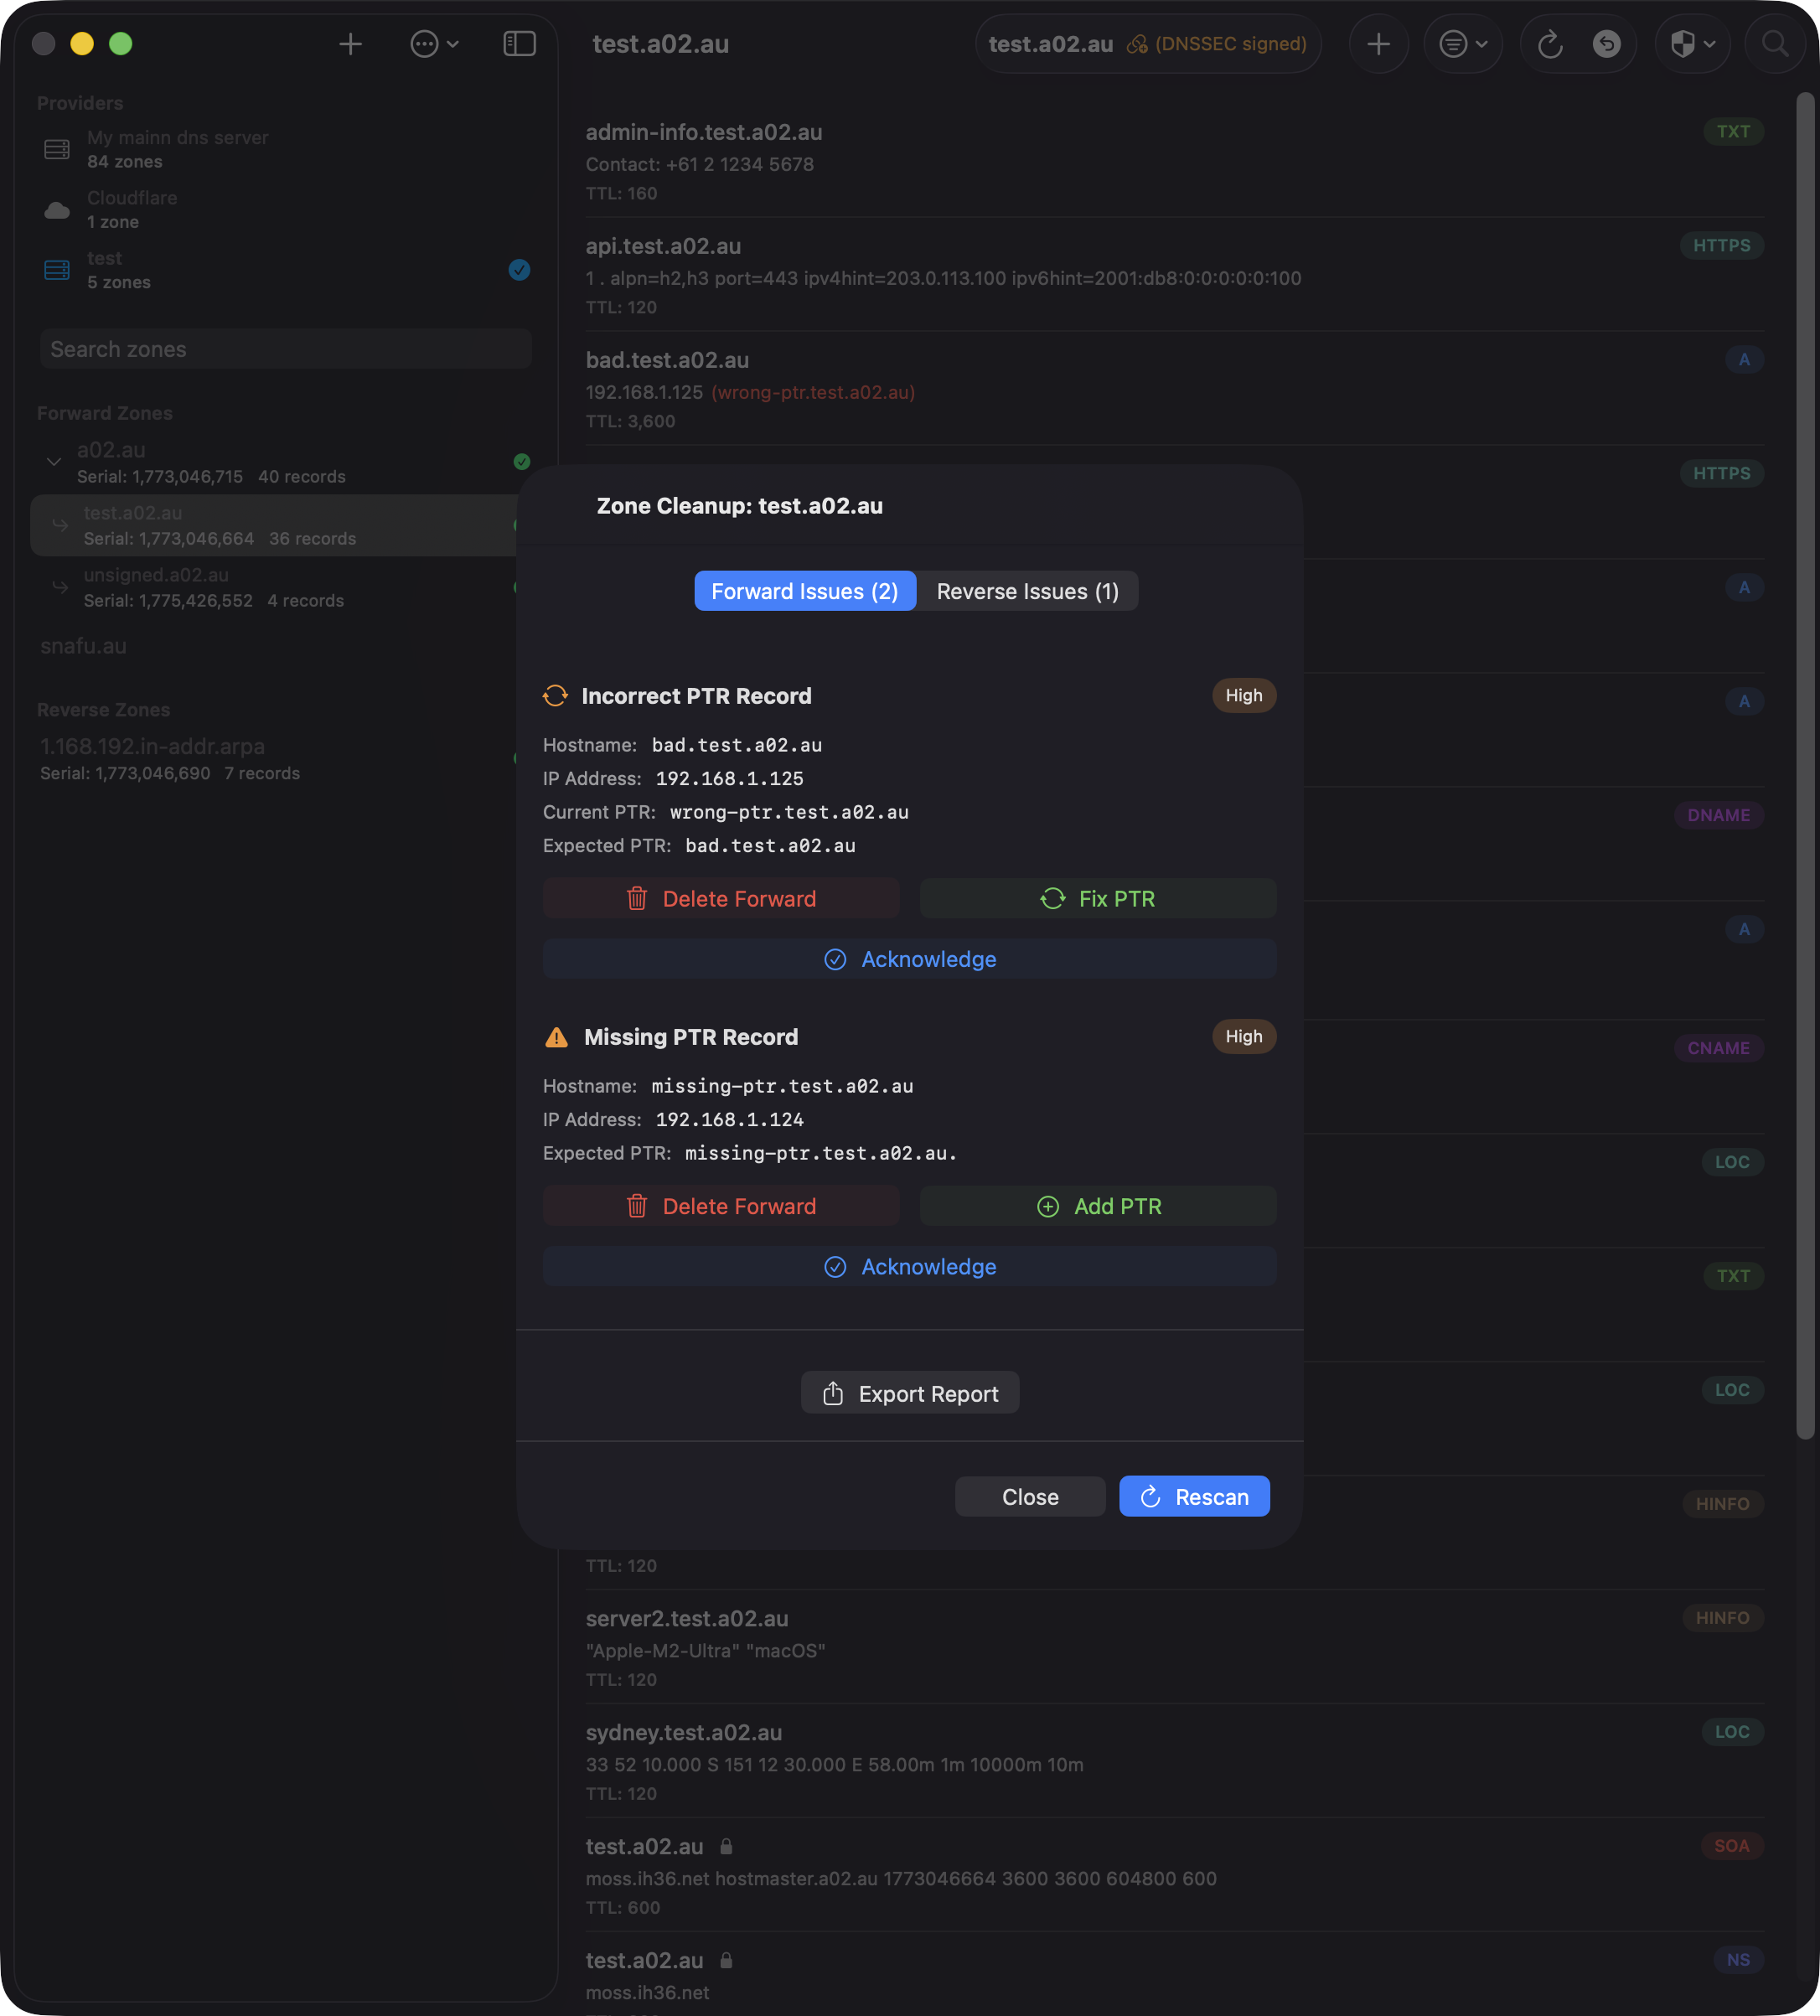
What It Checks
Zone Cleanup performs two types of scans:
- Forward Mapping Issues — For each A/AAAA record in your zone, the tool checks if a matching PTR record exists in the appropriate reverse zone. Issues include:
- Missing PTR — The A/AAAA record exists but there's no corresponding PTR record
- Incorrect PTR — A PTR record exists but points to the wrong hostname
- Circular Reference — Both hostnames point to the same IP (informational only)
- Reverse Mapping Issues — Scans all managed reverse zones for PTR records that point to hostnames in the current zone. Issues include:
- Dangling PTR — A PTR record points to a hostname that has no A/AAAA record in the forward zone
Note: The scan only checks reverse zones that are managed by the same provider and listed in your zone configuration.
Viewing Results
Results are split into two tabs: Forward Issues and Reverse Issues. Each issue shows:
- Issue type with a color-coded severity badge (High for missing/incorrect, Medium for dangling)
- Hostname and IP address
- Current PTR value (if it exists) and expected PTR value
- Reverse zone location (for dangling PTRs)
- Fix buttons for actionable issues
Fixing Issues
For most issues, you can fix them directly from the cleanup view:
- Missing PTR — Tap "Fix Issue" to create the PTR record in the correct reverse zone
- Incorrect PTR — Tap "Fix Issue" to update the PTR to point to the correct hostname
- Dangling PTR — Choose between:
- Delete PTR — Remove the dangling PTR record from the reverse zone
- Add A/AAAA — Create the missing forward record in the current zone
After applying fixes, the scan automatically reruns to refresh the results.
Bulk Delete Dangling PTRs
When multiple dangling PTR records are detected, a "Delete All Dangling PTR Records" button appears in the Reverse Issues tab. This operation:
- Deletes all dangling PTRs in a single optimized batch operation
- Groups deletions by reverse zone for efficiency
- Creates a single consolidated undo entry for all deletions (not separate entries per zone)
- Works across multiple reverse zones, including IPv6 zones
The bulk delete is much faster than deleting records individually, reloading each zone only once instead of after every deletion.
Undo Support
All fixes and deletions are tracked in the undo history. Bulk operations create a single undo entry labeled "Multiple Reverse Zones (N)" if records span multiple zones. To view what's in a bulk operation:
- Open the undo history (toolbar → overflow menu → "Undo History")
- Tap the disclosure chevron on the bulk delete entry to expand it inline and see all records
- Alternatively, right-click (or long-press on iOS) and select "View Records" for a full-screen detail view
When restoring a bulk deletion, records are automatically restored to their correct zones, even across multiple IPv4 and IPv6 reverse zones.
Export Report
Tap the "Export Report" button to generate a plain-text summary of all issues found. The report includes:
- Zone name and scan date
- Total issue count
- Detailed list of forward issues (missing/incorrect PTRs)
- Detailed list of reverse issues (dangling PTRs)
- Reverse zone locations and severity levels
Use the report for documentation, sharing with team members, or tracking cleanup progress.
Tips
- Run Zone Cleanup regularly to keep forward and reverse DNS synchronized
- Use the bulk delete feature for large-scale cleanups to save time
- The scan automatically excludes reverse zones that are not managed by your provider
- For non-routable networks (RFC 1918), the scan queries your BIND9 provider's nameserver directly
- Use the export feature to create an audit trail before making bulk changes
DS Update Scanner
The DS Update Scanner detects KSK (Key Signing Key) rollovers across all zones in a BIND9 provider. When BIND9's dnssec-policy rotates a KSK, it publishes CDS records that differ from the parent zone's DS records, signalling that the parent needs to be updated. This scanner automates the detection of that state.
BIND9 only: The DS Update Scanner is only available for RFC 2136 (BIND9) providers. Cloud providers (Cloudflare, Route 53, Google Cloud DNS) manage DNSSEC internally and do not require manual DS updates.
Opening the Scanner
The DS Update Scanner lives in the zone list toolbar (not the zone detail toolbar) because it operates across all zones in the provider:
- On macOS and iOS, click the rotation icon (↺) in the zone list toolbar
The button only appears when the active provider is RFC 2136 (BIND9).
Pre-Scan Configuration

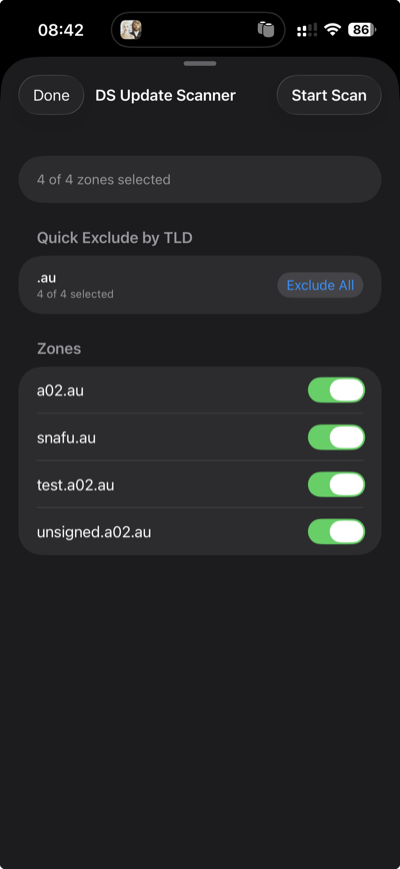
Before scanning, a configuration screen lets you choose which zones to include:
- TLD quick-exclude — At the top, detected TLDs are listed with "Exclude" buttons. Some TLDs (e.g., .cz, .se, .ch, .nu) support automated CDS/CDNSKEY scanning per RFC 7344/8078, meaning DS updates happen automatically at the registry. These TLDs are excluded by default on first use. Reverse zones (in-addr.arpa, ip6.arpa) are also listed for quick exclusion.
- Per-zone toggles — Below the TLD buttons, each zone has a checkbox. Zones under auto-CDS TLDs are labelled "(auto-CDS)" for reference.
- Persistence — Your exclusion choices are saved per provider, so you only need to configure them once.
Tap Start Scan in the toolbar to begin scanning the selected zones.
Understanding Results
After scanning, zones are grouped into sections:
- DS Update Needed — Zones where the CDS records differ from the parent DS records, indicating a KSK rollover is in progress. Each record on the report carries an action label: keep (DS at parent matches a published CDS), remove (DS at parent has no matching CDS), add (CDS not yet at parent), or already in parent (CDS already represented). A one-line
Action:summary at the top of each zone tells you exactly which DS records to change at the registrar — e.g. "remove DS 53049, 26682; add DS 30327". - Up to Date — Zones where the parent DS already covers every published CDS. No action needed.
- Not DNSSEC Signed — Zones with no DS record in the parent zone.
- Excluded (Auto-CDS TLDs) — Zones that were skipped because they are under a TLD that handles CDS updates automatically.
- Errors — Zones where the DNS query failed (timeout, server error, etc.).
Daemon-authoritative classification (4.5.4+). When the daemon is connected, the scanner reads each KSK's DS lifecycle state directly from dnssec -status (hidden / rumoured / omnipresent / unretentive) instead of inferring it from the DS↔CDS diff. Split-horizon zones whose two parent DS records correctly cover the two views' KSKs no longer false-flag, and the action labels reflect what BIND actually wants the parent to look like — not what the heuristic sees.
Subset-semantics fallback (4.5.5+). Without a daemon connection, the scanner uses a more conservative rollover detector that only flags zones whose CDS publishes a key tag not yet at the parent. CDS that's a subset of the parent DS is treated as up to date — this matches the registrar reality where stale extras at the parent are common and rarely problematic.
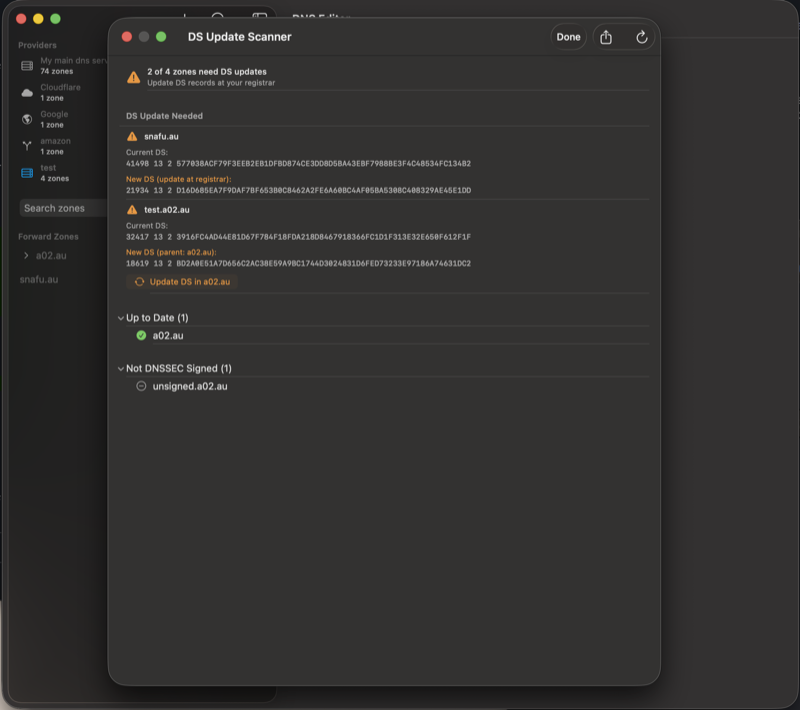
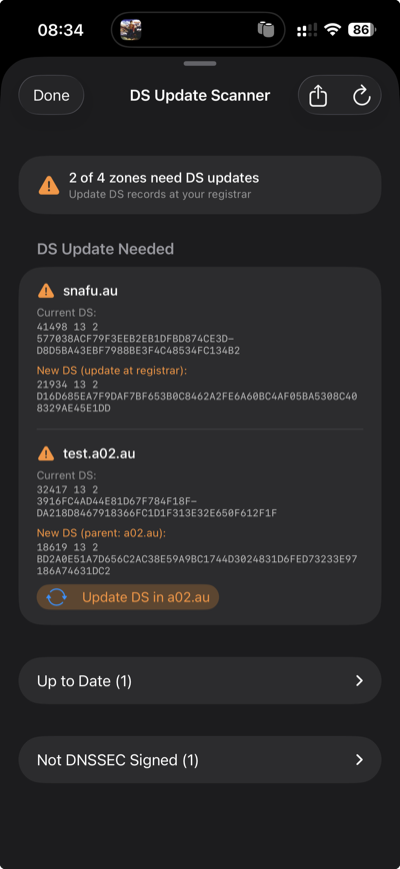
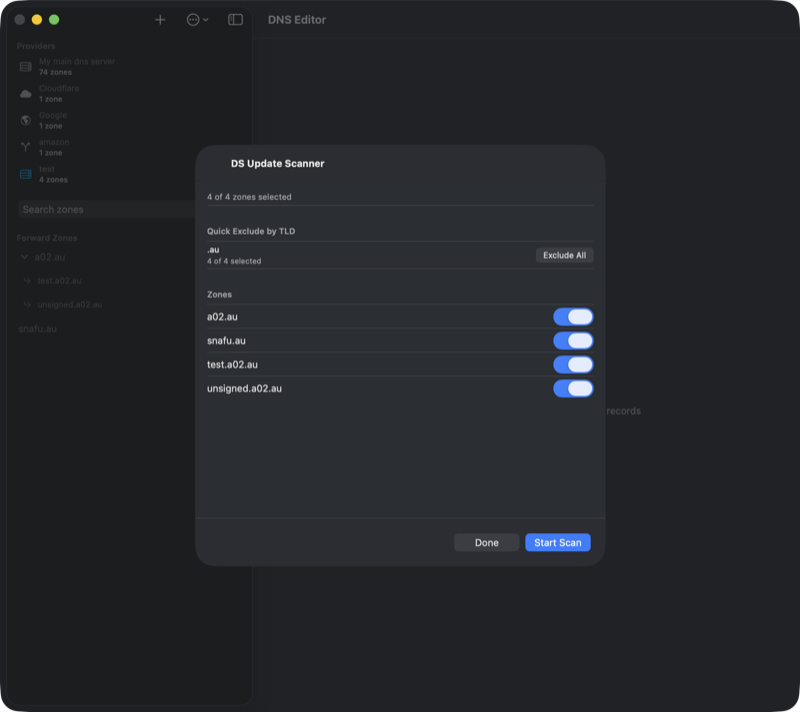

Direct DS Updates
If a zone's parent is also managed by the same BIND9 provider (e.g., test.a02.au under a02.au), the scanner shows an "Update DS in [parent]" button. This applies the DS change directly via RFC 2136 Dynamic DNS Update.
The update uses a safe two-phase approach to maintain the chain of trust:
- Phase 1: Add the new DS record (from CDS) to the parent zone
- Phase 2: Remove the old DS record(s) from the parent zone
If phase 1 succeeds but phase 2 fails, the chain of trust remains intact (both old and new DS are valid). An error message will instruct you to manually remove the old DS record so the KSK rollover can complete.
For zones whose parent is a public TLD (e.g., .com, .au), you will need to update the DS record at your domain registrar manually. The report shows the new DS data to enter.
Exporting the Report
When zones need DS updates, a share button appears in the toolbar. The plain-text report includes:
- Provider name and scan date
- Summary (zones scanned, signed, needing updates)
- Current DS and new CDS for each zone needing an update
- Lists of up-to-date, unsigned, excluded, and errored zones
- Zones updated directly are marked with
[UPDATED]
When to Use
Run the DS Update Scanner periodically or after initiating a KSK rollover. If you use a DNSSEC policy with ksk lifetime unlimited, you will never need this scanner since the KSK never rotates. It is useful when:
- You use a DNSSEC policy with a finite KSK lifetime
- You manually initiate a KSK rollover with
rndc dnssec -rollover -key <id> <zone> - You want to verify that all DS records are current across your infrastructure
Timing: After initiating a KSK rollover, BIND9 takes several hours (depending on your DNSSEC policy timers) before publishing the new CDS record. Run the scanner after the CDS has been updated — check your zone's CDS records to confirm.
Background Scanning
Instead of manually running the DS Update Scanner, you can enable automatic background scanning for each BIND9 provider. When enabled, the app periodically checks all included zones for KSK rollovers and sends a local notification if DS updates are needed.
To enable background scanning:
- Open Settings and edit your BIND9 provider
- In the Background DS Scanning section, toggle on Automatic DS Scanning
- Choose the check interval — Daily or Weekly
- Grant notification permission when prompted
When the scan detects zones needing DS updates:
- A local notification is posted with the zone names or count
- A red warning indicator appears in the zone list sidebar
- Tapping the notification or the red indicator opens the scan results directly — no need to re-run the scan
While a background scan is in progress, a spinning indicator with "Checking DS records..." appears at the bottom of the zone list. The indicator clears automatically when the scan completes without finding issues, or turns red if updates are needed.
Platform details: On iOS/iPadOS, background scanning uses BGAppRefreshTask which runs periodically when the system allows. On macOS, it uses NSBackgroundActivityScheduler which runs while the app is open. An immediate scan also runs each time the app launches.
Serial Sync Scanner
The Serial Sync Scanner checks every forward zone on the active provider and fixes any zone where the primary's SOA serial is behind one of its secondaries. This is the bulk-recovery tool for a very specific but nasty situation: rolling back the primary nameserver to an older snapshot.
The Problem It Fixes
When you restore the primary nameserver from a snapshot, its SOA serials travel back in time with it. The secondaries, however, are still running from their current state with the newer serials. From BIND's perspective, the primary now has a lower serial than the secondaries — which means:
- Secondaries will not accept new NOTIFYs from the primary because they already have a "newer" version
- Any edits you make on the primary never propagate because the serial stays below the secondary's cache
- Public resolvers eventually refresh from the secondaries, serving the old pre-rollback data
The only way out is to bump the primary's serial above the highest secondary serial, which triggers a fresh NOTIFY and forces the secondaries to re-transfer.
How It Works
The scanner iterates over every forward zone in the active provider (reverse zones are skipped) and for each one:
- Queries the provider's primary for the zone's NS records to discover the authoritative secondaries.
- Queries the SOA serial from the primary and from every secondary in parallel.
- Compares them. If the primary's serial is already the highest, the zone is flagged as in sync and no change is made.
- If a secondary has a higher serial, the scanner builds a new SOA record with
max(secondary serials) + 1and sends a DNS UPDATE to the primary using the standard DnsManager TSIG key path — the same flow used when editing any other record. - BIND's inline-signing handles the update, increments the serial, re-signs the SOA, and sends a NOTIFY to the secondaries — which now see a higher serial and transfer the current state from the primary.
The scan is idempotent and safe. Zones already in sync are untouched. The TSIG key used for the primary query matches whatever you've configured for the "external" view, so split-horizon zones are handled correctly.
Running the Scanner
Open the overflow menu (⋯) in the zone list toolbar and choose Serial Sync Scanner. The scanner is available whenever the active provider is RFC2136 / BIND9.
- Click Start Scan. A progress bar shows which zone is currently being scanned and how many remain.
- When the scan finishes, results appear as a grouped list with a summary at the top (in sync, fixed, failed, errors).
- Each row shows the zone name, current status, the primary's old serial → new serial transition (if fixed), and a per-nameserver breakdown of what serial each server reported.
- Use the toolbar Export button to save a text report of the scan, or Rescan to re-run after making changes.

When to Use It
- After a snapshot rollback of the primary nameserver — the classic "primary serial is behind" case this tool solves in one click.
- After testing / experimenting with zones — if you accidentally reverted a zone file while secondaries kept the newer state.
- As a health check — running it on a cleanly-synced provider reports every zone as "in sync" and takes only a few seconds.
The per-zone Fix button in the Zone Sanity Check does the same thing for a single zone. Use it when you only need to fix one specific zone and want to see the detailed per-NS record comparison alongside the serial mismatch.
SSHFP Client Setup
Once you have SSHFP records published in a DNSSEC-signed zone, you can configure OpenSSH to verify host keys via DNS instead of relying on the ~/.ssh/known_hosts file. This eliminates "trust on first use" prompts and detects host key changes through DNSSEC validation.
Enable DNS Verification (All Hosts)
Create a global SSH config snippet that enables SSHFP lookups for every host you connect to. On macOS, drop-in config files go in /etc/ssh/ssh_config.d/:
# /etc/ssh/ssh_config.d/10-dns-verify.conf
# Enable DNSSEC-based SSHFP host key verification
Host *
    VerifyHostKeyDNS yes
With this setting, OpenSSH will look up SSHFP records for every host you connect to. If a matching DNSSEC-validated record is found, the host key is accepted automatically. If no SSHFP record exists or DNSSEC validation fails, SSH falls back to normal known_hosts behaviour — so this is safe to enable globally.
Skip known_hosts for Your Domains
For domains you control and have fully deployed SSHFP records on, you can go a step further and disable known_hosts entirely. This means DNSSEC becomes the sole source of trust for host key verification — there is no stale known_hosts entry to conflict when you rotate keys or rebuild a server:
# /etc/ssh/ssh_config.d/90-owned-domains.conf
# Domains with SSHFP records: trust DNS, skip known_hosts
Host *.example.com *.example.org
    VerifyHostKeyDNS yes
    StrictHostKeyChecking yes
    UserKnownHostsFile /dev/null
    GlobalKnownHostsFile /dev/null
Replace the host patterns with your own domains. You can list multiple patterns separated by spaces.
- VerifyHostKeyDNS yes — Look up SSHFP records in DNS and verify via DNSSEC
- StrictHostKeyChecking yes — Reject the connection if the host key does not match (no interactive prompt)
- UserKnownHostsFile /dev/null — Do not read or write the per-user known_hosts file
- GlobalKnownHostsFile /dev/null — Do not read the system-wide known_hosts file
Important: Only use this configuration for domains where every SSH host has SSHFP records published in a DNSSEC-signed zone. If SSHFP records are missing or the zone is not signed, connections to those hosts will be rejected.
Prerequisites
- Your zone must be DNSSEC-signed — SSHFP records without DNSSEC offer no security benefit, and OpenSSH will only trust DNSSEC-validated responses
- Your local DNS resolver must support DNSSEC validation (e.g., Unbound, systemd-resolved with DNSSEC=yes, or a validating forwarder like Cloudflare 1.1.1.1 or Google 8.8.8.8)
- SSHFP records must be published for all key types offered by the server — use the SSHFP Scanner in DnsManager to generate them automatically
- macOS users: You must install OpenSSH from Homebrew (see the known issue below)
macOS Known Issue
The version of OpenSSH bundled with macOS does not perform DNSSEC validation, even when your DNS resolver supports it. When VerifyHostKeyDNS is set to yes, Apple's SSH will find SSHFP records in DNS but treat them as unverified — it will prompt you to confirm the fingerprint manually rather than accepting it automatically. This defeats the purpose of SSHFP.
The workaround is to install OpenSSH via Homebrew, which builds against a DNS library that performs proper DNSSEC validation:
brew install openssh
After installation, Homebrew's ssh is placed in /opt/homebrew/bin/ssh (Apple Silicon) or /usr/local/bin/ssh (Intel). Make sure this path appears before /usr/bin in your $PATH, or invoke it explicitly:
# Verify you're using Homebrew's version
which ssh        # should show /opt/homebrew/bin/ssh
ssh -V            # should show a newer version than Apple's
Homebrew's OpenSSH uses its own config file at /opt/homebrew/etc/ssh/ssh_config and does not read the system drop-in directory by default. To pick up the config files described above, add an Include directive at the top of Homebrew's config:
# /opt/homebrew/etc/ssh/ssh_config — add this line at the top
Include /etc/ssh/ssh_config.d/*.conf
How to tell: Run ssh -v server.example.com and look at the fingerprint line. Apple's SSH will say "found 6 insecure fingerprints in DNS" and reject the connection. Homebrew's SSH will say "found 6 secure fingerprints in DNS" and connect successfully.
Verifying It Works
Connect with verbose output to confirm SSHFP verification:
ssh -v server.example.com 2>&1 | grep -i dns
A working setup (Homebrew's OpenSSH) will show:
debug1: found 6 secure fingerprints in DNS
debug1: verify_host_key_dns: matched SSHFP type 4 fptype 1
debug1: verify_host_key_dns: matched SSHFP type 4 fptype 2
debug1: matching host key fingerprint found in DNS
A broken setup (Apple's built-in SSH) will show insecure instead of secure and fail with "Host key verification failed":
debug1: found 6 insecure fingerprints in DNS
debug1: verify_host_key_dns: matched SSHFP type 4 fptype 1
debug1: verify_host_key_dns: matched SSHFP type 4 fptype 2
debug1: matching host key fingerprint found in DNS
No ED25519 host key is known for server.example.com and you have requested strict checking.
Host key verification failed.
If you see "No matching host key found in DNS", check that the SSHFP records are published and your resolver validates DNSSEC.
Features
Internationalized Domain Names (IDN)
DnsManager fully supports Internationalized Domain Names with automatic Punycode encoding and decoding:
- Unicode display — Punycode domains like "xn--hsteng-bya.no" are displayed as "høsteng.no" throughout the interface
- Automatic encoding — Enter domain names in your native language; DnsManager automatically encodes them to Punycode for DNS operations
- Copy Punycode — The record editor shows the encoded DNS name for easy copy/paste into configuration files like named.conf
- Proper sorting — Zones and records are sorted by their Unicode names, not their Punycode representation
- Unicode search — Search works with both Unicode characters and Punycode strings
Example: Add a zone "høsteng.no" or "xn--hsteng-bya.no" — both will display as "høsteng.no" and work identically. When editing records, the Punycode version is shown below the input field for reference.
Undo History
Every record deletion and modification is logged to the undo history. Access it from the toolbar to review and restore accidentally deleted or changed records. Bulk operations (such as zone cleanup) create a single consolidated entry that can be expanded inline to see all individual records.
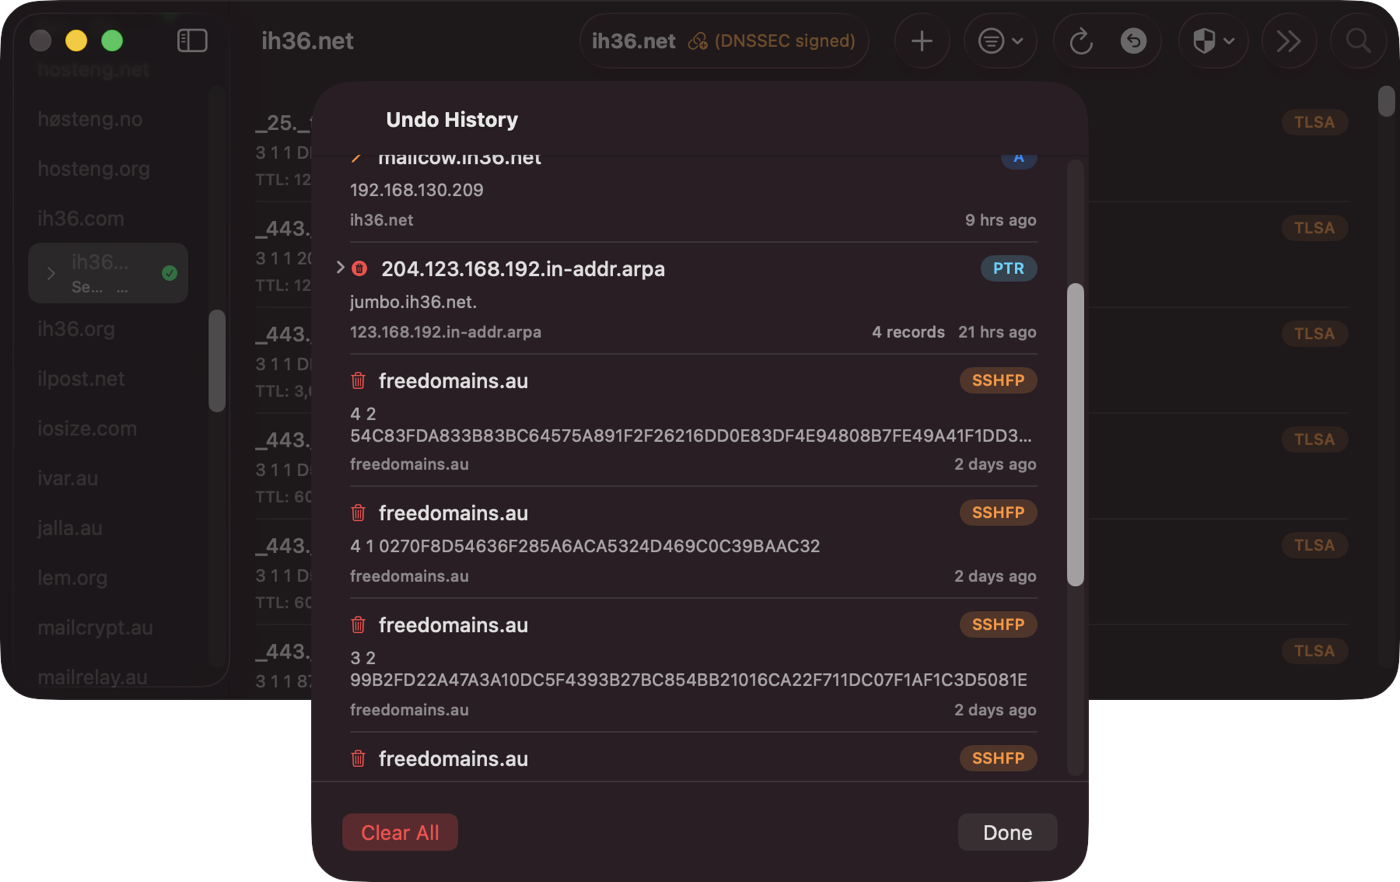
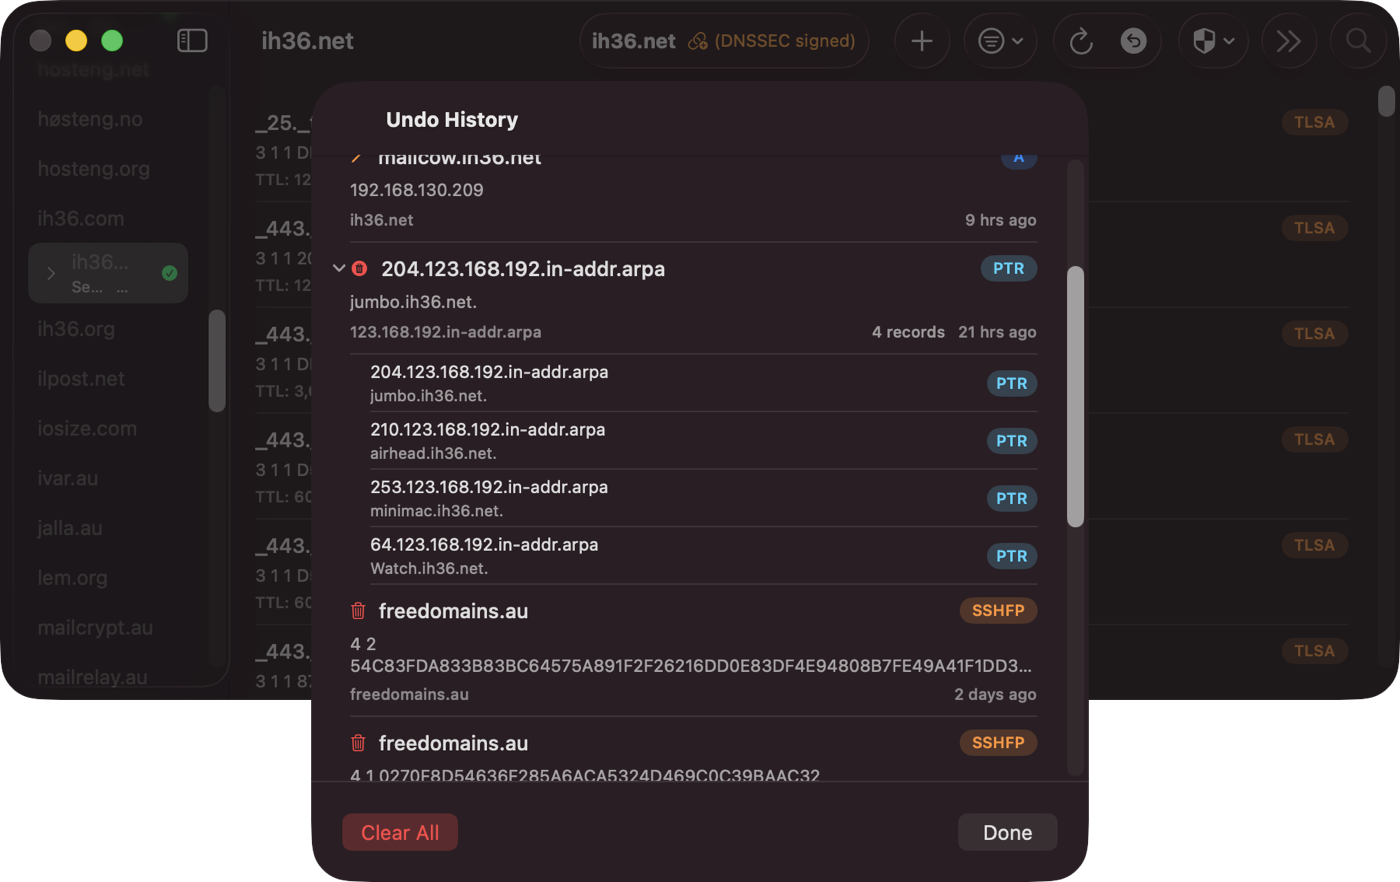
Bulk Operations
Select multiple records for batch deletion. On iOS, tap Select to enter edit mode. On macOS, use Command-click or Shift-click.
Search and Filter
Find records by name or value using search. Filter by record type using the filter menu. Filters can be combined.
Cross-Platform
DnsManager runs natively on macOS and iOS with a consistent interface. Your settings sync across devices via iCloud.
iPad Interface
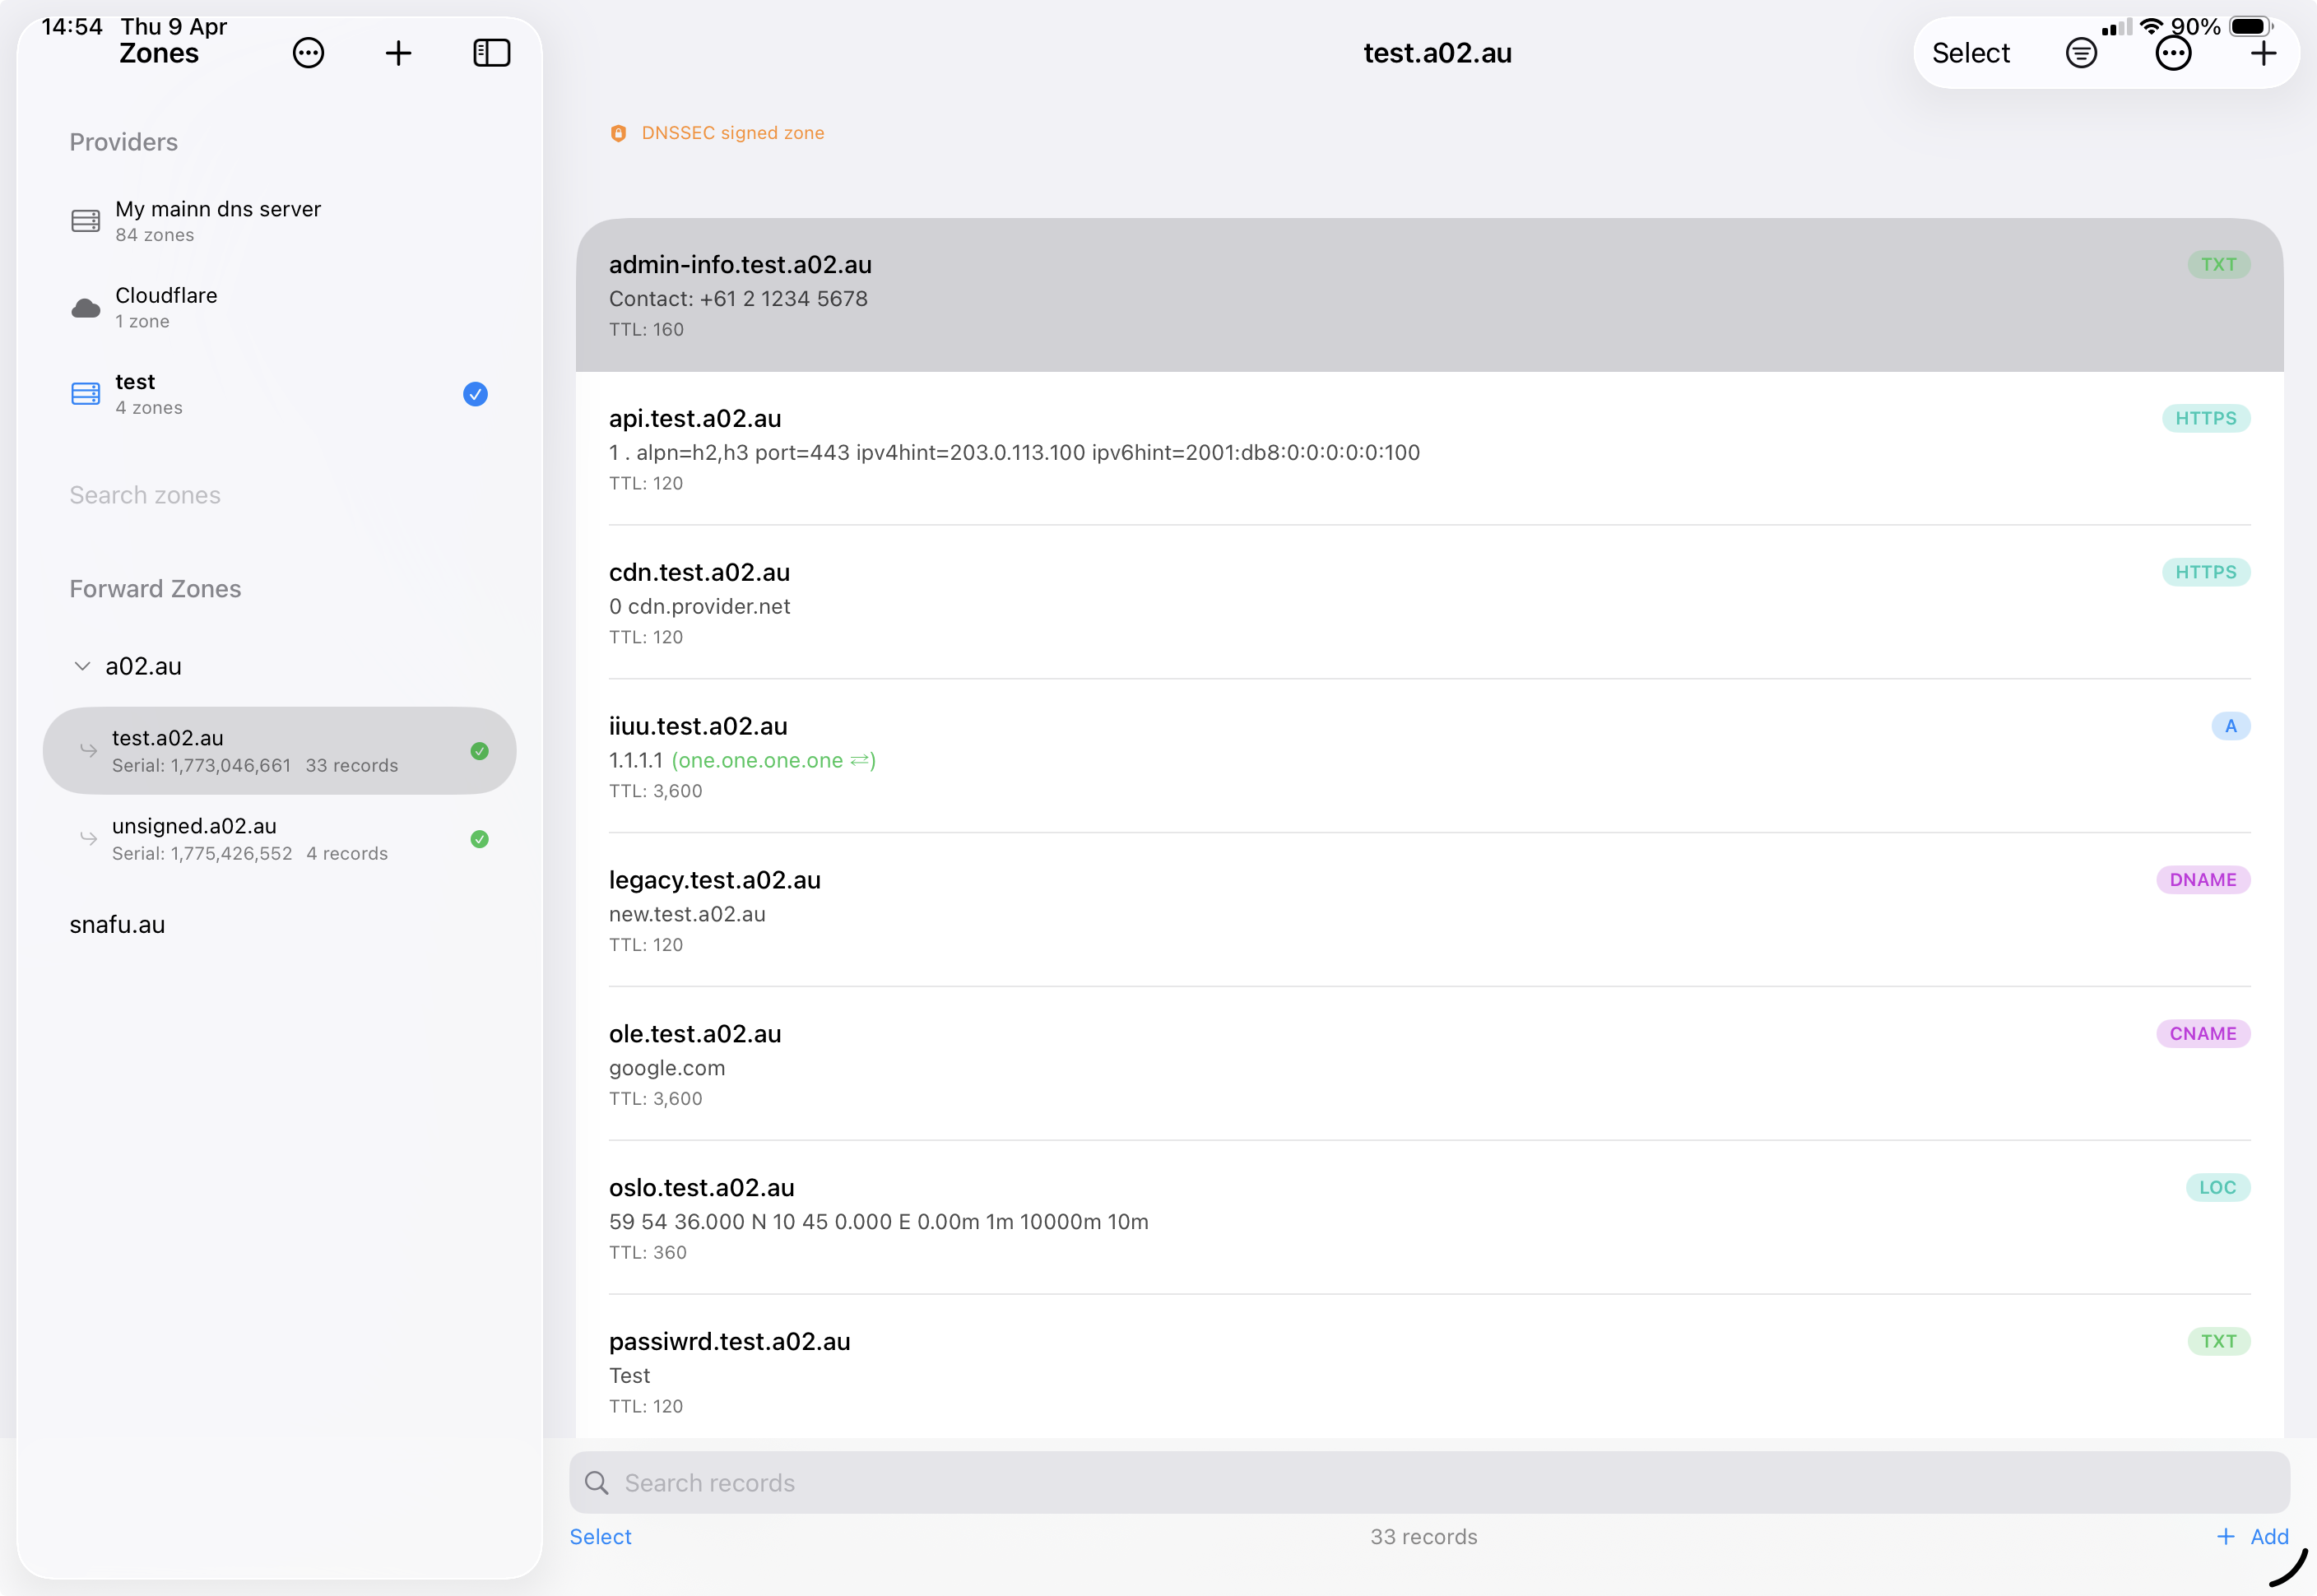
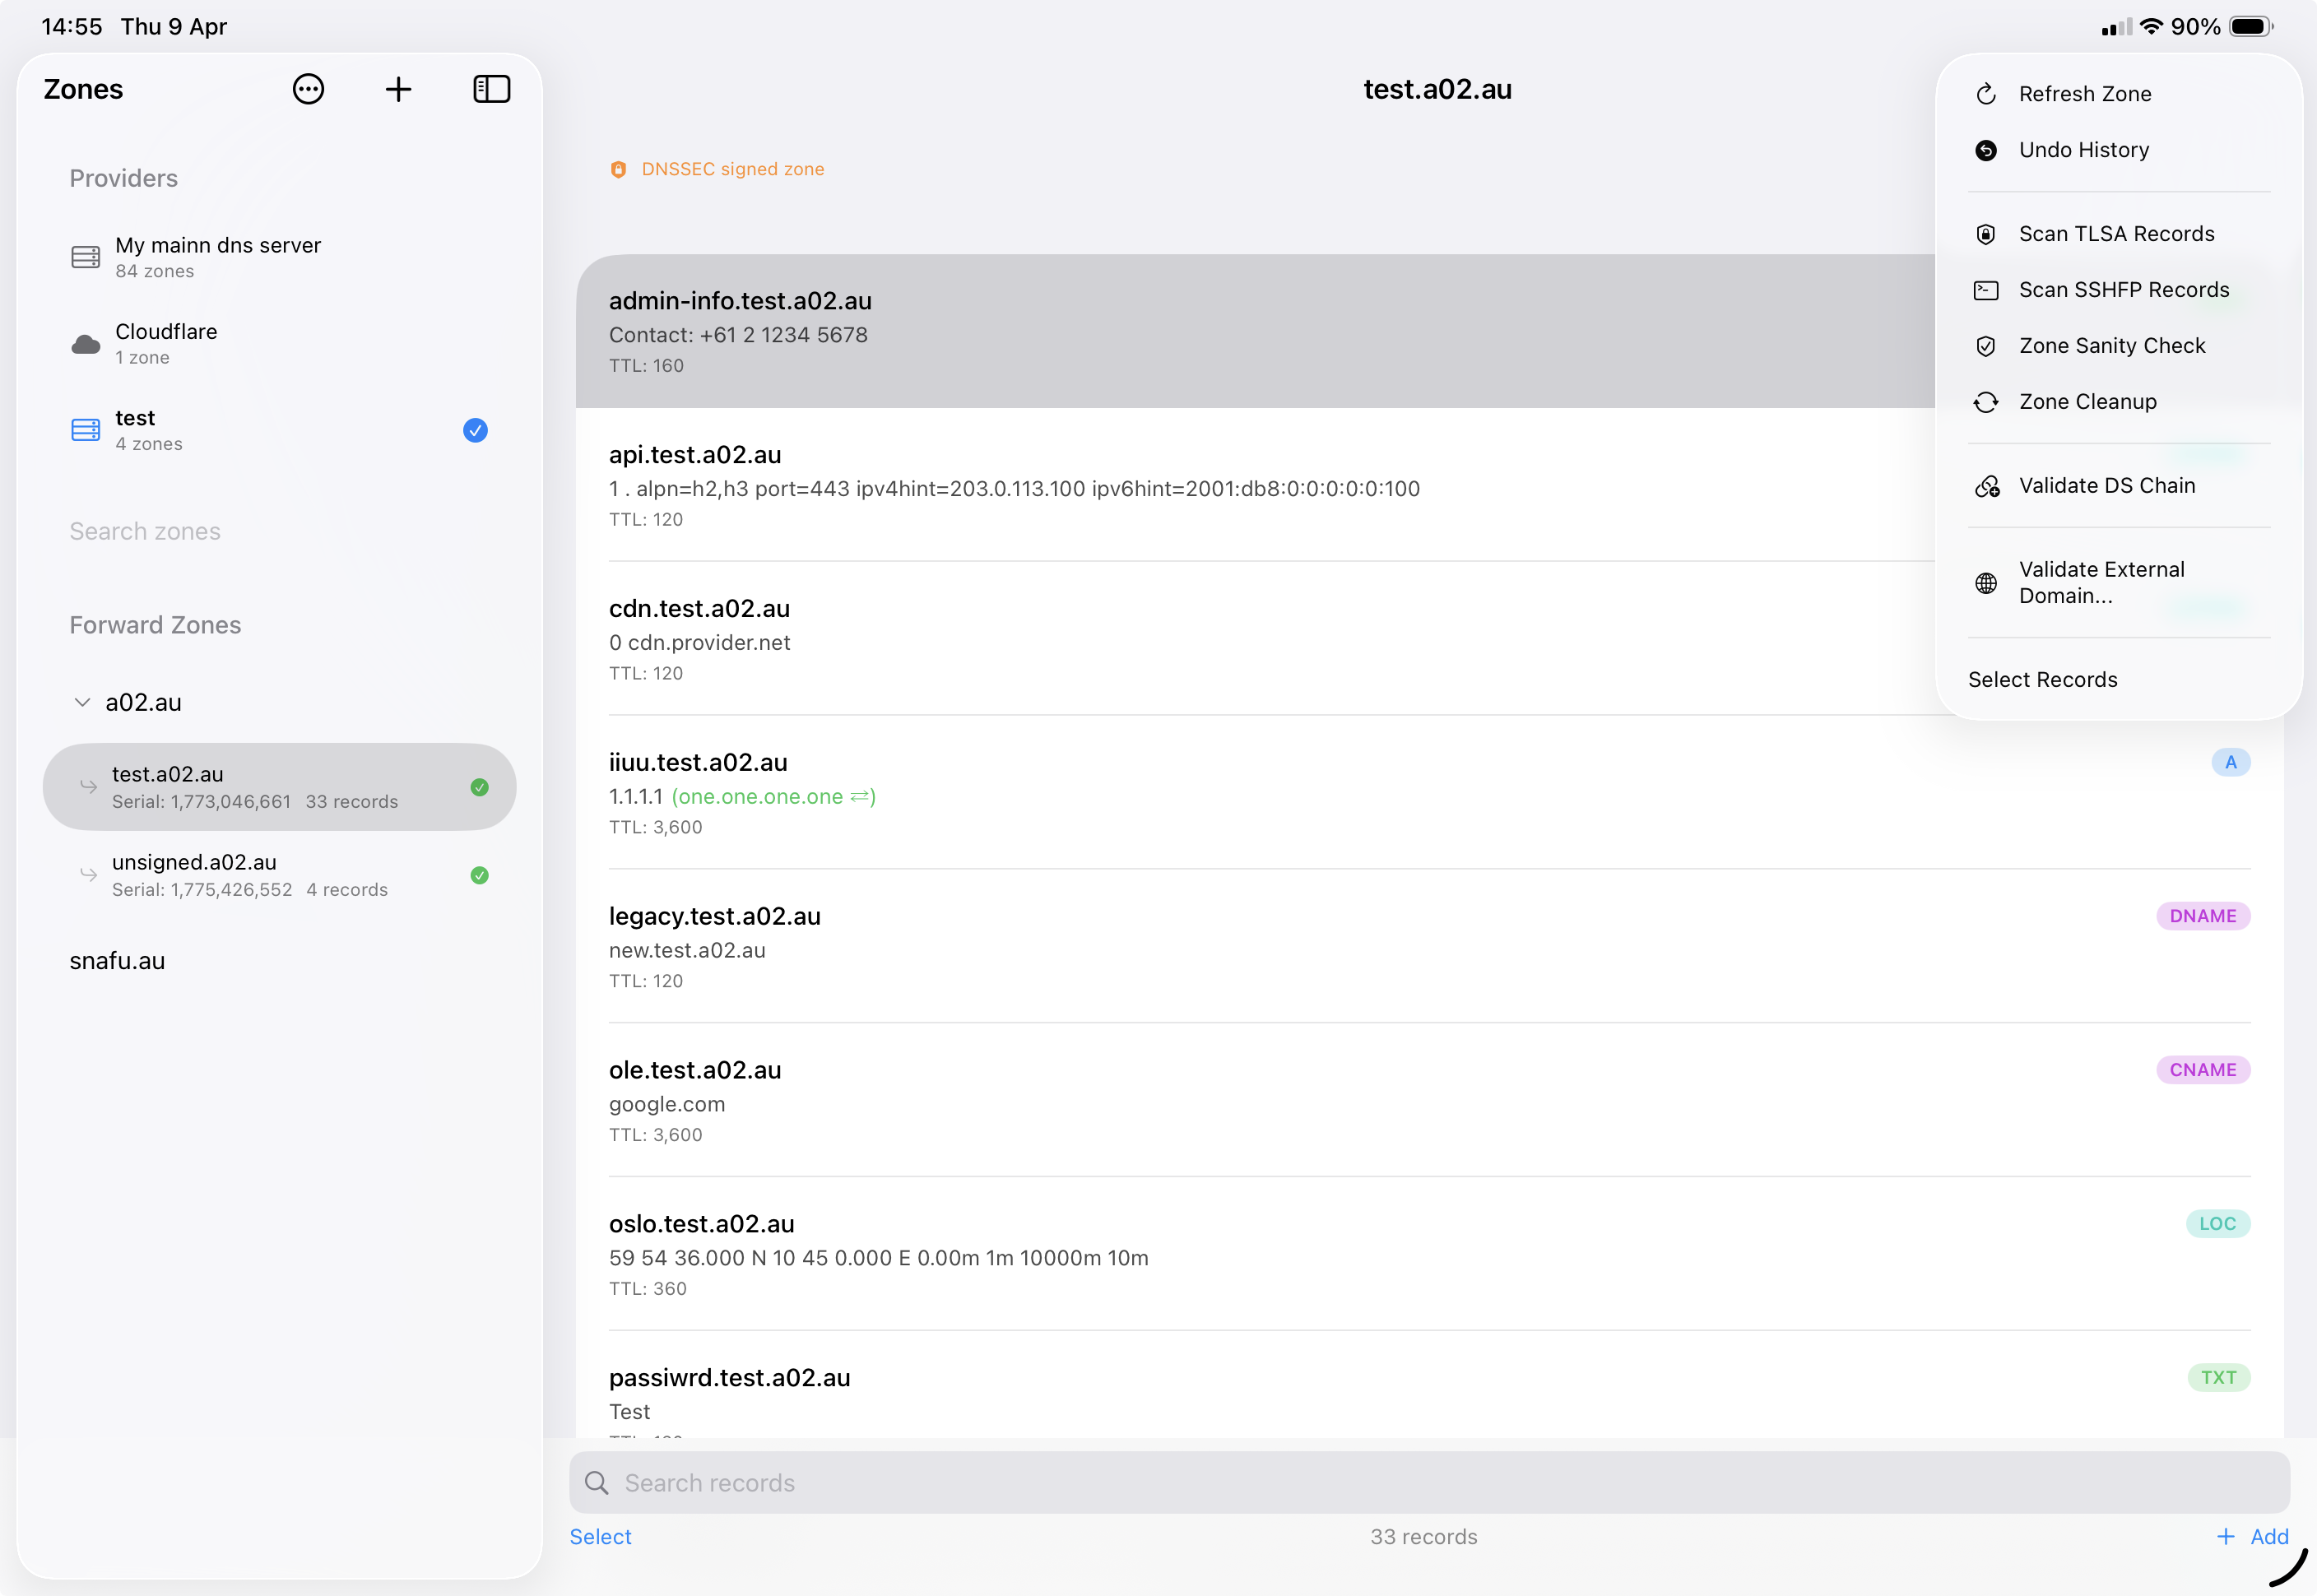
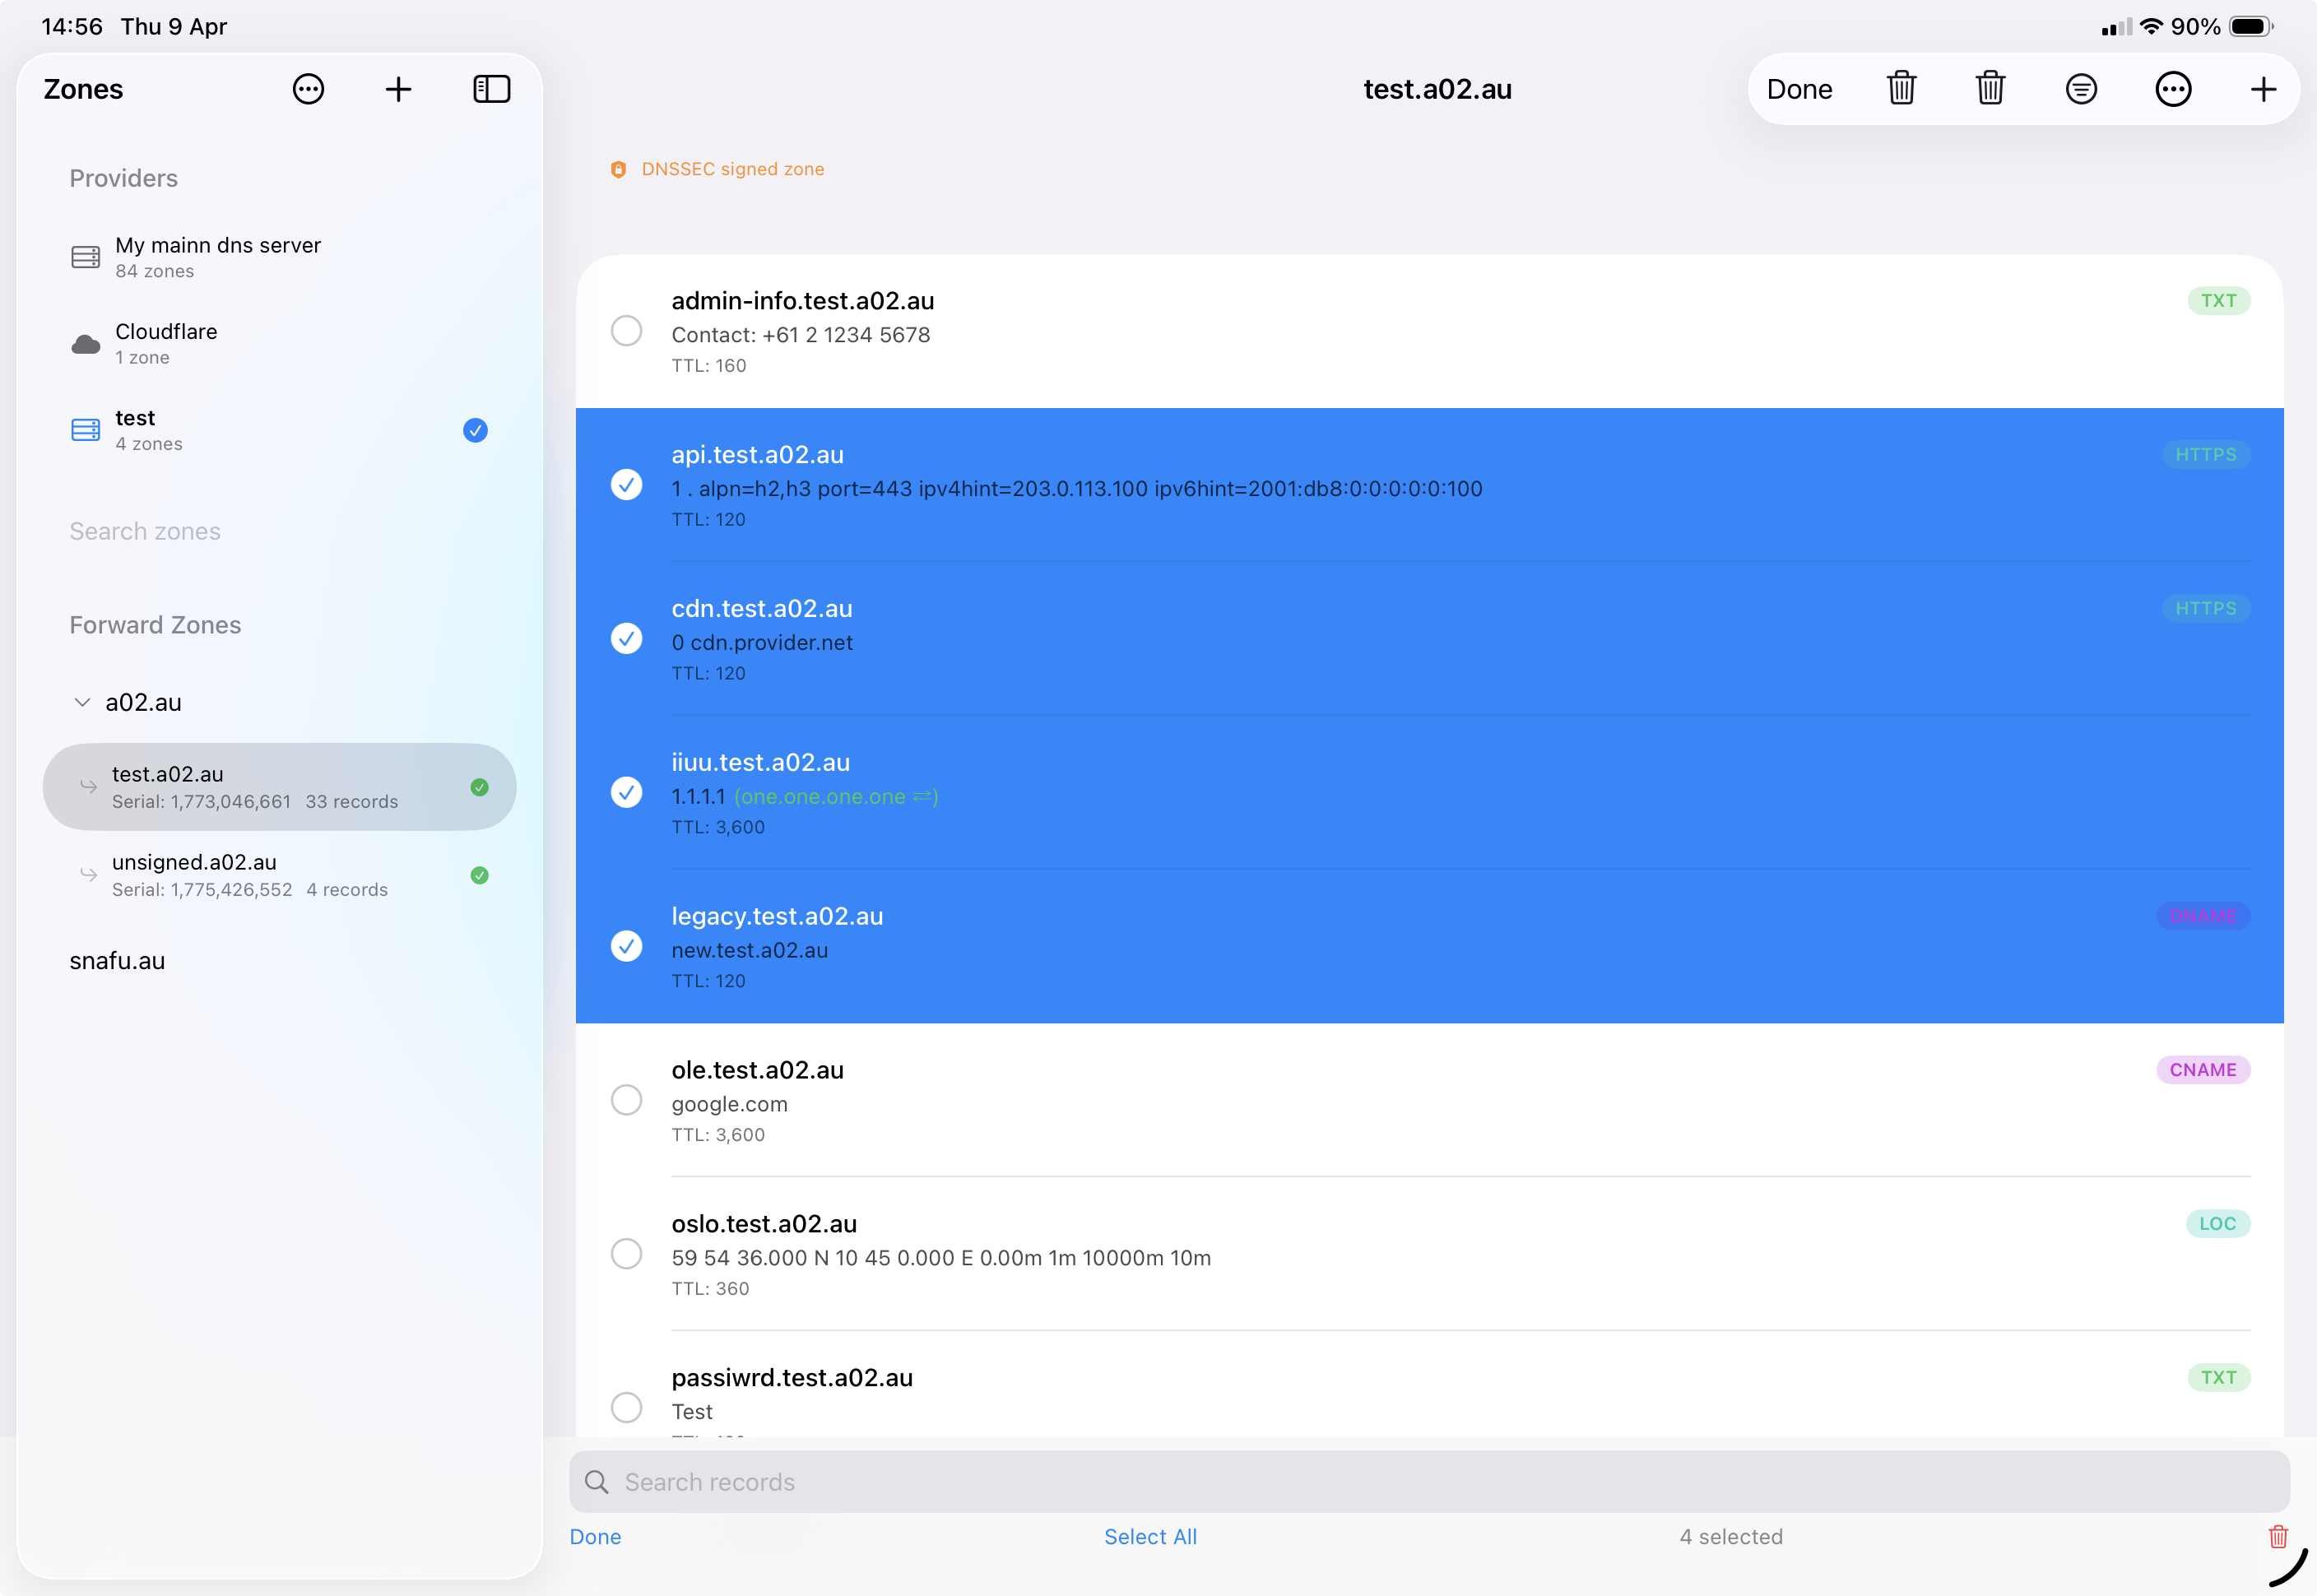
Troubleshooting
General
Records Not Loading
- Ensure the zone name is correct and exists on the provider
- Try refreshing the zone using the reload button in the toolbar
- Check for network connectivity issues
- Verify your credentials have not expired or been revoked
Cloudflare
Authentication Failed
- Verify your API token is correct and has not expired
- Ensure the token has
Zone → DNS → Editpermissions - Check that the token's zone resources include the zones you want to manage
- If using a restricted token, ensure it covers all required zones
Cloudflare Update Errors
- Cloudflare does not allow CNAME records at the zone apex unless "CNAME Flattening" is enabled
- Proxied records (orange cloud) may have restrictions on TTL values
- Some record types (e.g., SOA, NS at apex) are managed by Cloudflare and cannot be modified via the API
AWS Route 53
Access Denied
- Verify your Access Key ID and Secret Access Key are correct
- Ensure the IAM user/role has the required Route 53 permissions (
route53:ListHostedZones,route53:ListResourceRecordSets,route53:ChangeResourceRecordSets) - Check the AWS region setting matches your account configuration
- If using temporary credentials (STS), ensure they have not expired
Route 53 Update Errors
- Route 53 requires record changes to be submitted as change batches — DnsManager handles this automatically, but conflicts can occur if the zone was modified externally between loading and saving
- Alias records are specific to Route 53 and may not appear as expected when viewed as standard DNS records
- NS and SOA records at the zone apex cannot be deleted
- If you get a "PriorRequestNotComplete" error, wait a moment and try again — Route 53 processes changes sequentially
Google Cloud DNS
Permission Denied
- Verify the Project ID matches the project containing your DNS zones
- Ensure the service account JSON key is complete and valid (it should start with
{"type": "service_account") - Check that the service account has the DNS Administrator role or equivalent custom permissions
- The Cloud DNS API must be enabled in your Google Cloud project
Google Cloud DNS Update Errors
- Google Cloud DNS uses a Changes API that requires specifying both the old and new record values — if the zone was modified externally, reload the zone before making changes
- Record sets with the same name and type are grouped — adding a duplicate may result in an error
- SOA and NS records at the zone apex are managed by Google and have restrictions on modification
RFC2136 (BIND9)
Connection Failed
- Verify the DNS server address and port (default: 53) are correct
- Check that the DNS port is accessible from your network (not blocked by a firewall)
- Ensure your TSIG key name and secret match the server's
named.confconfiguration exactly - Confirm the TSIG algorithm matches (HMAC-SHA256 is recommended)
Zone Not Loading
- DnsManager loads zones via AXFR (zone transfer). If a zone appears in the list but fails to load its records, check that
allow-transferinnamed.confincludes your TSIG key:zone "example.com" { type master; allow-transfer { key "keyname"; }; allow-update { key "keyname"; }; }; - Without the TSIG key in
allow-transfer, BIND9 will silently refuse the zone transfer and DnsManager will show an empty or failed zone - If you have secondary nameservers, list both the TSIG key and the secondary IPs in
allow-transfer
Update Refused
- Verify your TSIG key has update permissions for the zone
- Check the BIND9
allow-updatedirective includes your TSIG key:zone "example.com" { type master; allow-update { key "keyname"; }; }; - Some record types (SOA, DNSSEC operational records) may be restricted by server policy
- If the server log shows "update denied", check the BIND9 logs for the specific reason:
journalctl -u named
TSIG Key Issues
- The key must be in BIND format:
key "keyname" { algorithm hmac-sha256; secret "base64..."; }; - Ensure there are no extra whitespace or line break issues when pasting the key
- After pasting, click "Parse Key" to validate — a green indicator confirms the key was parsed successfully
- The key name in DnsManager must match the key name configured on the server exactly (case-sensitive)
Concurrent Update Errors
Starting in version 2.4.0, DnsManager adds RFC 2136 prerequisites to every update and delete operation. These prerequisites verify that the record on the server still matches what was loaded in the app before applying the change. If the record was modified or deleted by another client (e.g., DHCPD, an ACME client, or another DNS editor), the server rejects the update atomically.
- "Record was modified or deleted by another client" — The record you are editing or deleting has changed on the server since the zone was loaded. Reload the zone and try again.
- "A conflicting record already exists" — A prerequisite check for record absence failed because a matching record already exists. This is less common and typically indicates a race condition with another client creating the same record.
- Both errors are safe — no partial changes are applied. The server evaluates prerequisites while holding the zone lock, so the zone is never left in an inconsistent state.
- For bulk delete operations (e.g., zone cleanup "Delete All"), individual records are sent as separate updates through the provider. If one record was changed, only that specific delete fails — other records in the batch may still succeed.
Debug Logging
DnsManager includes a debug logging system that records DNS wire data, decision points, and key events to a log file. This is available on all platforms (iOS, iPadOS, and macOS) and is useful for diagnosing update failures, prerequisite rejections, and TSIG authentication issues.
- Enable debug logging in the app: open Settings and toggle Write debug log to file under Debug Logging
- Optionally enable Obfuscate hostnames in logs to replace real hostnames with hashed values before sharing
- Use Configure Categories to select which log categories to record — enable only what you need to keep log files focused
- Use Manage Log Files to view, share, reveal in Finder, or delete log files
- Logs include wire-level DNS UPDATE messages, prerequisite sections, server response codes, and TSIG signing details
- When reporting an issue, attach the debug log — it contains all the information needed to diagnose the problem
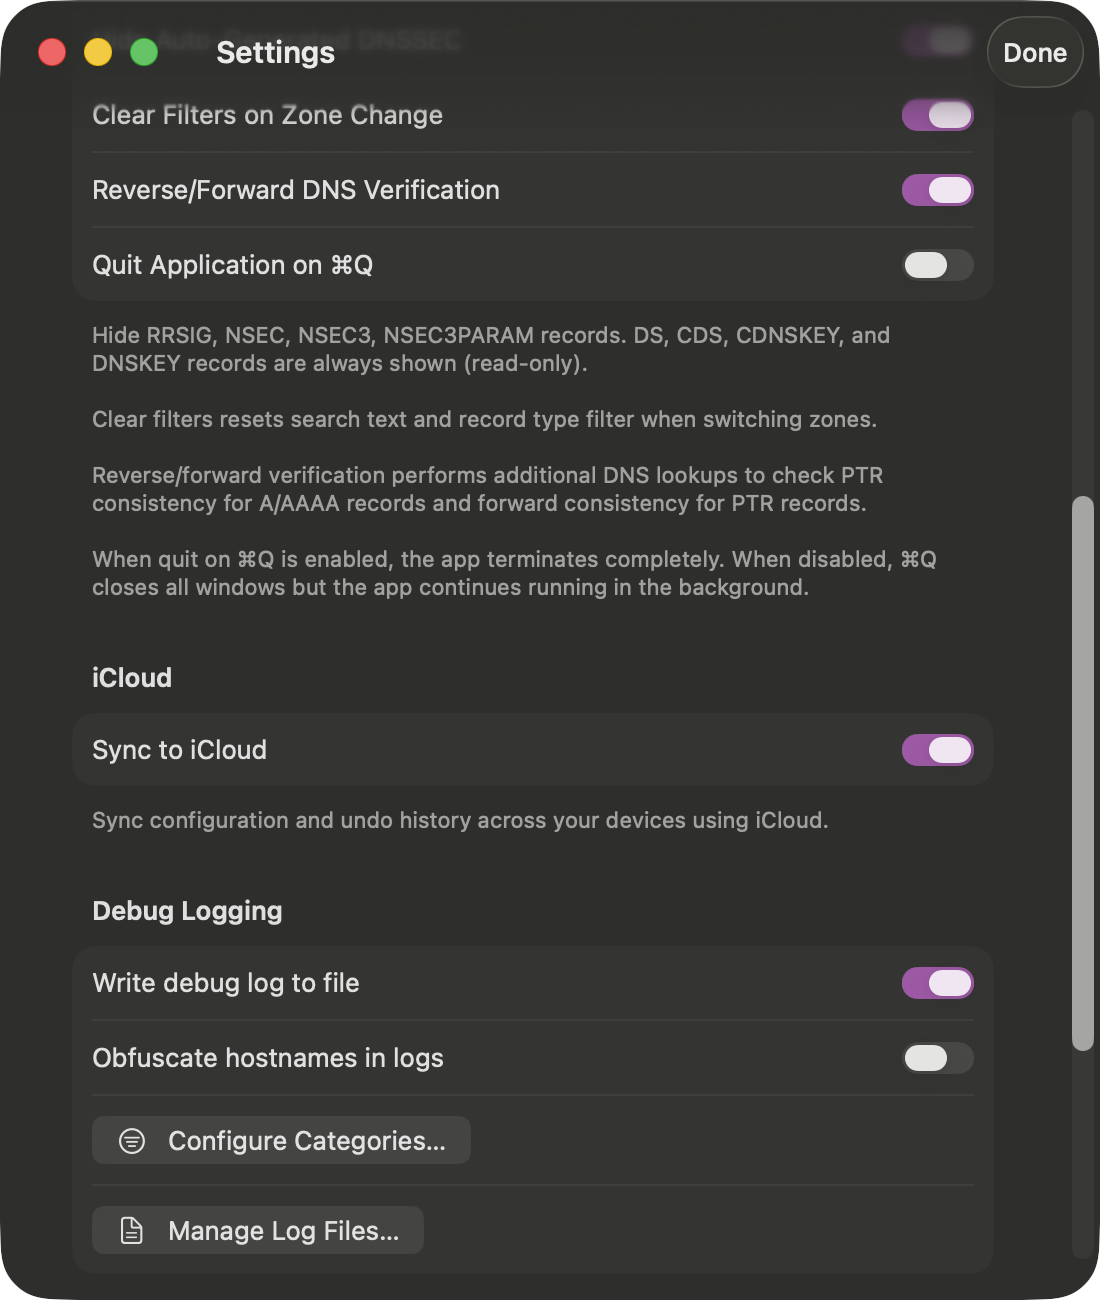
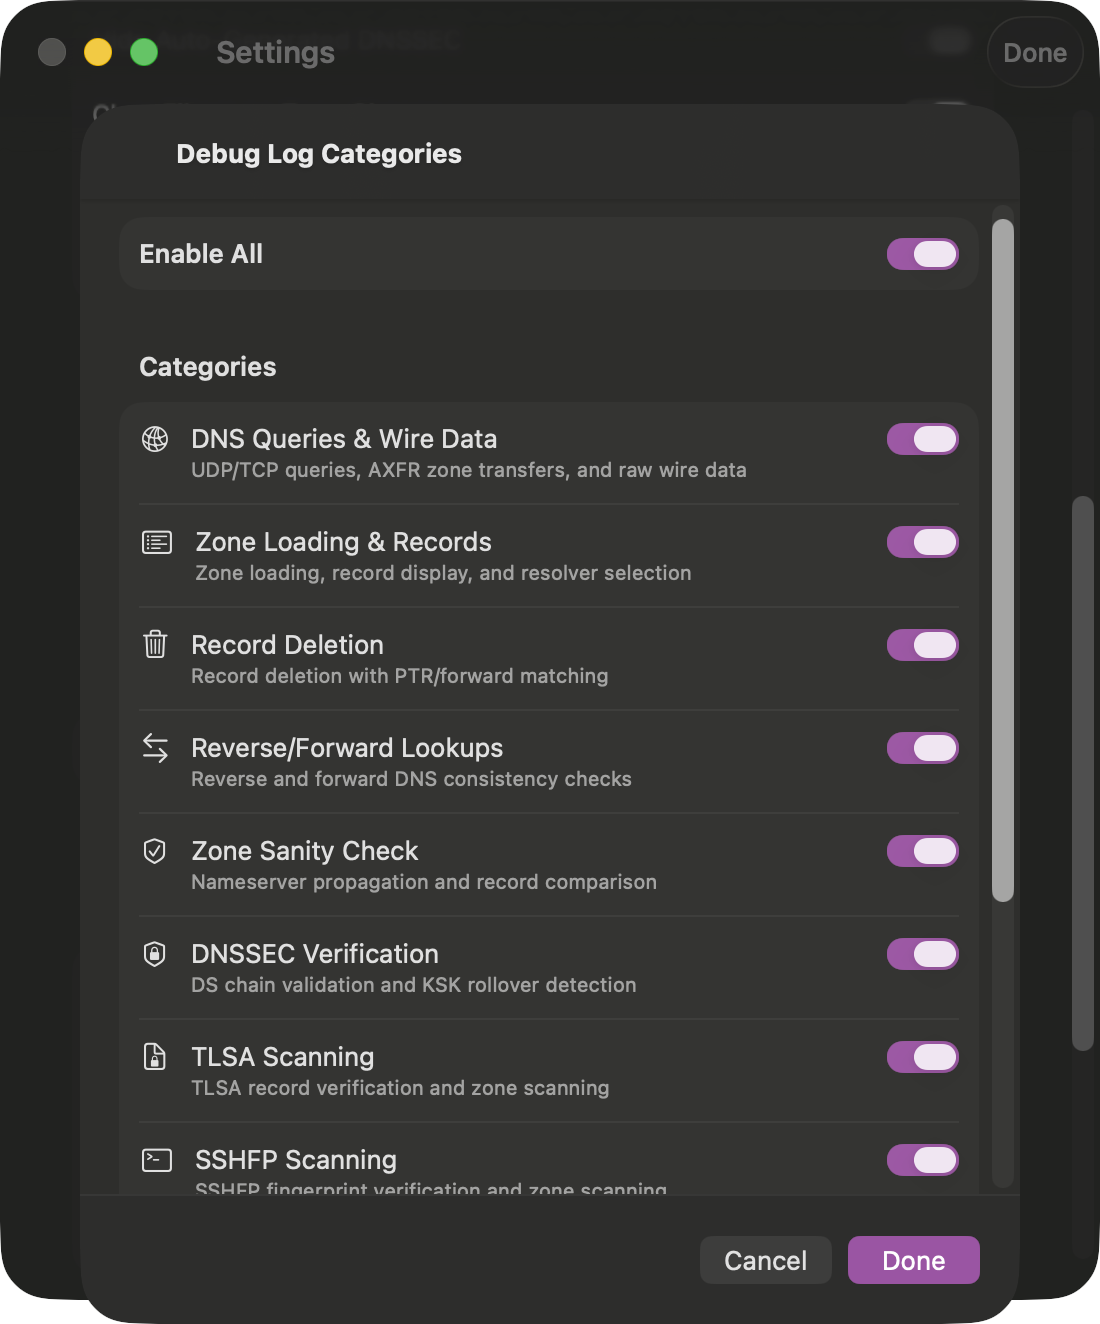
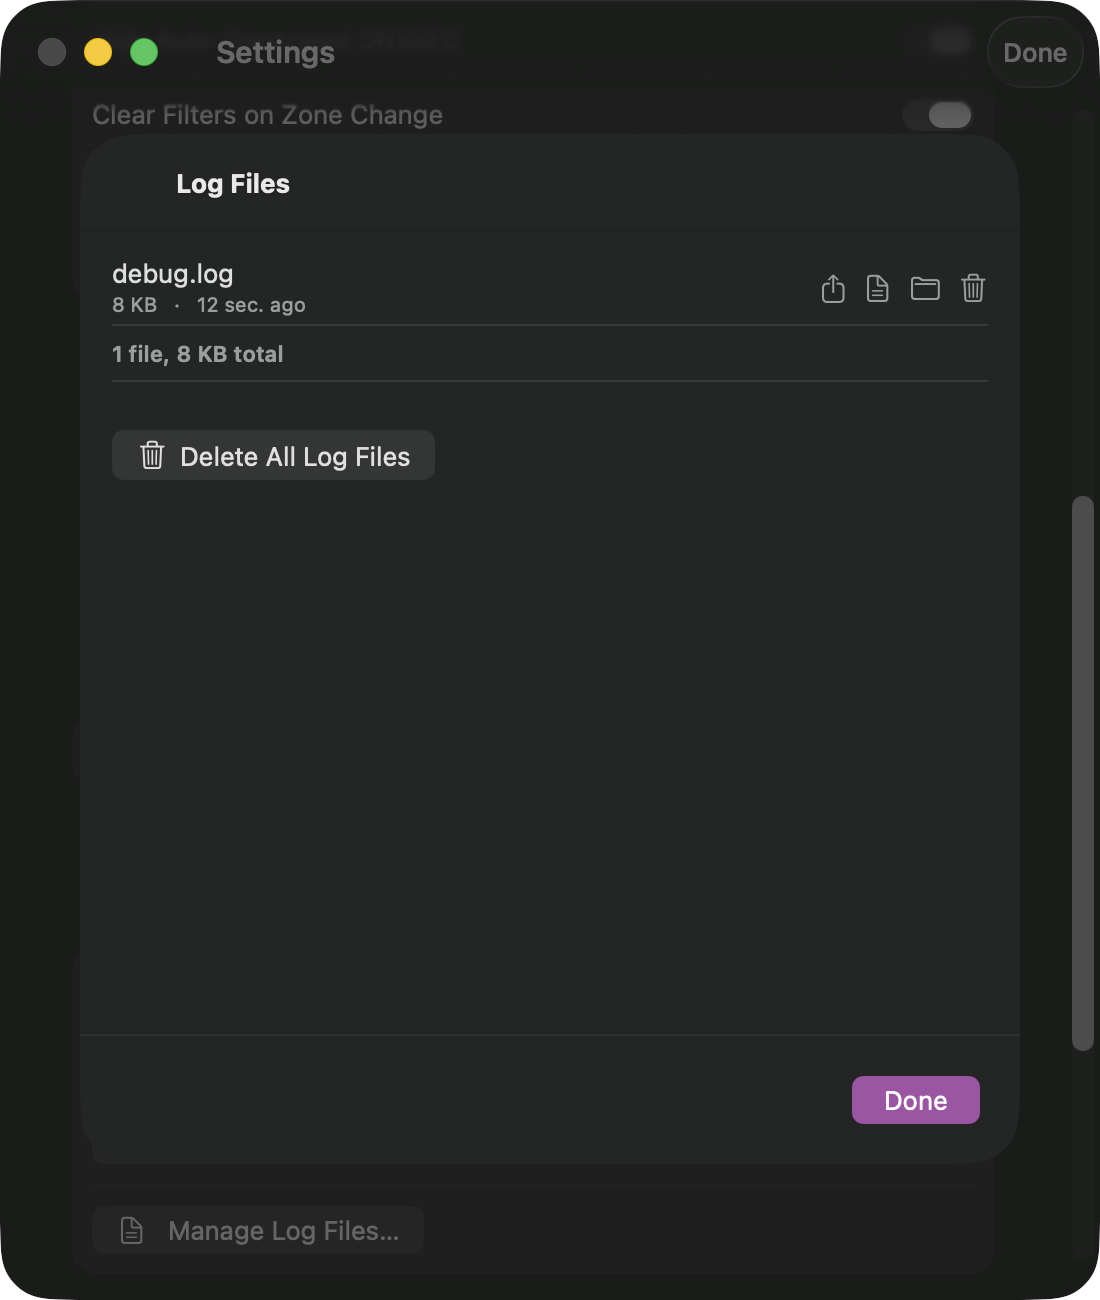
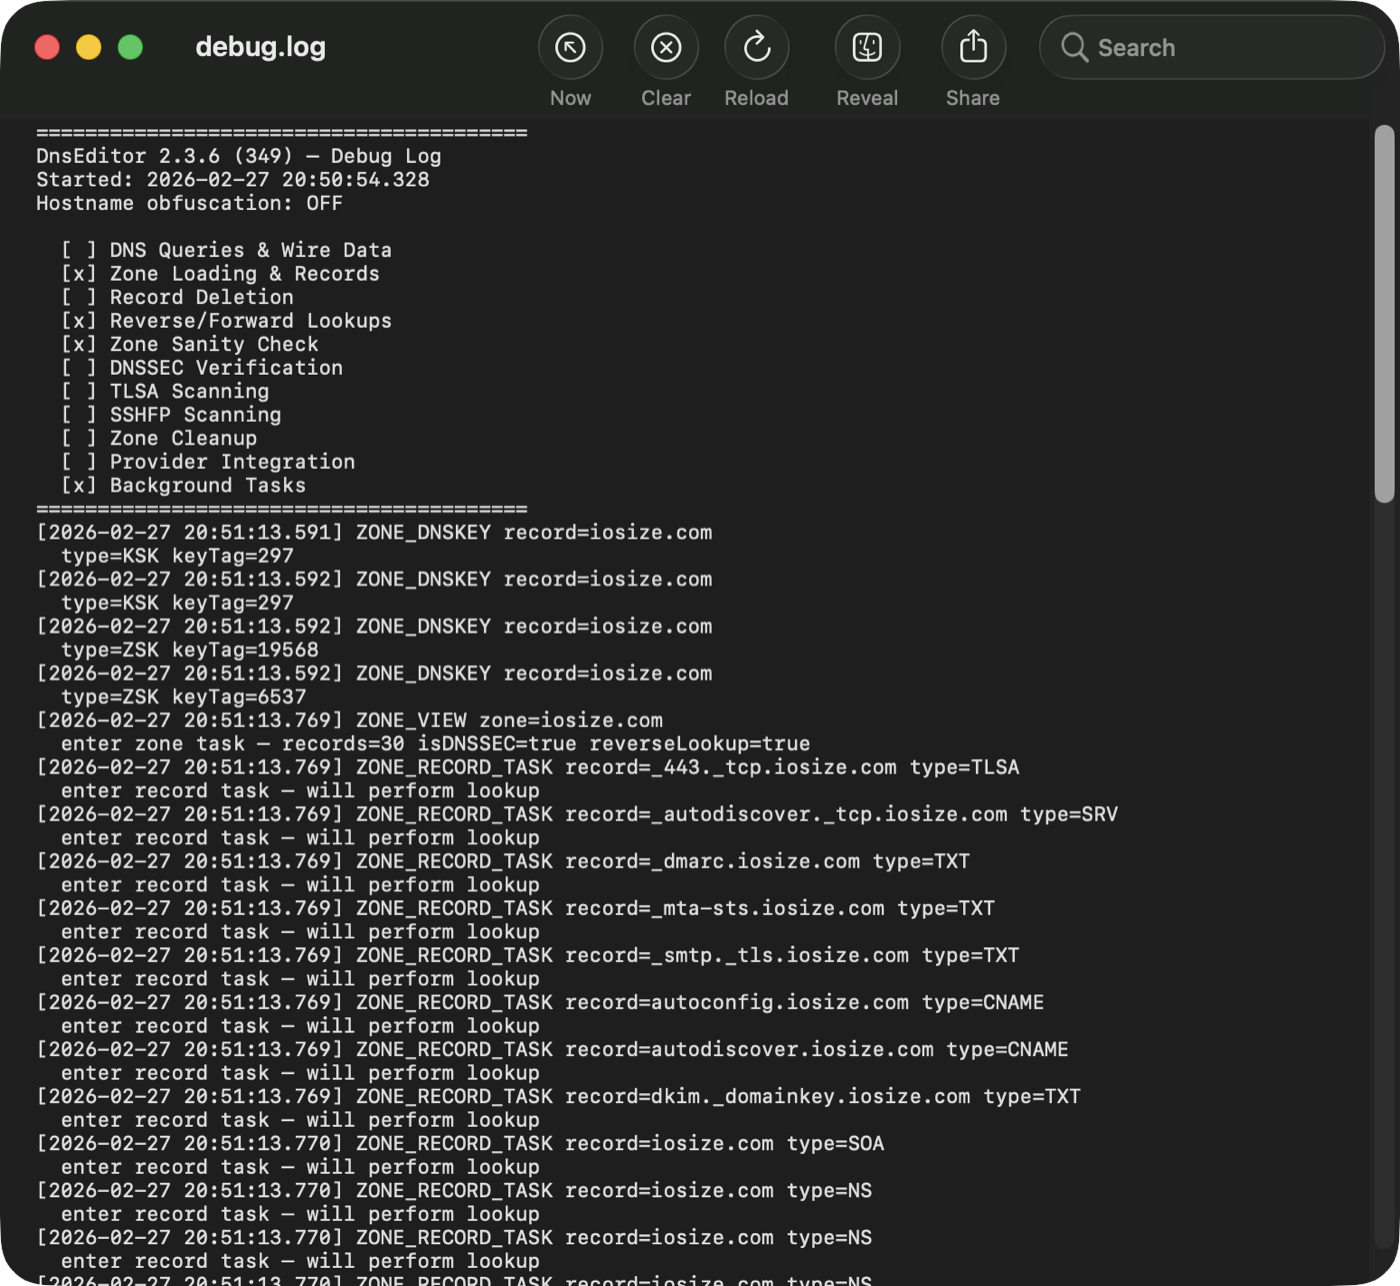
A Record
AMaps a hostname to an IPv4 address. This is the most common record type, used to point domain names to web servers, mail servers, and other services.
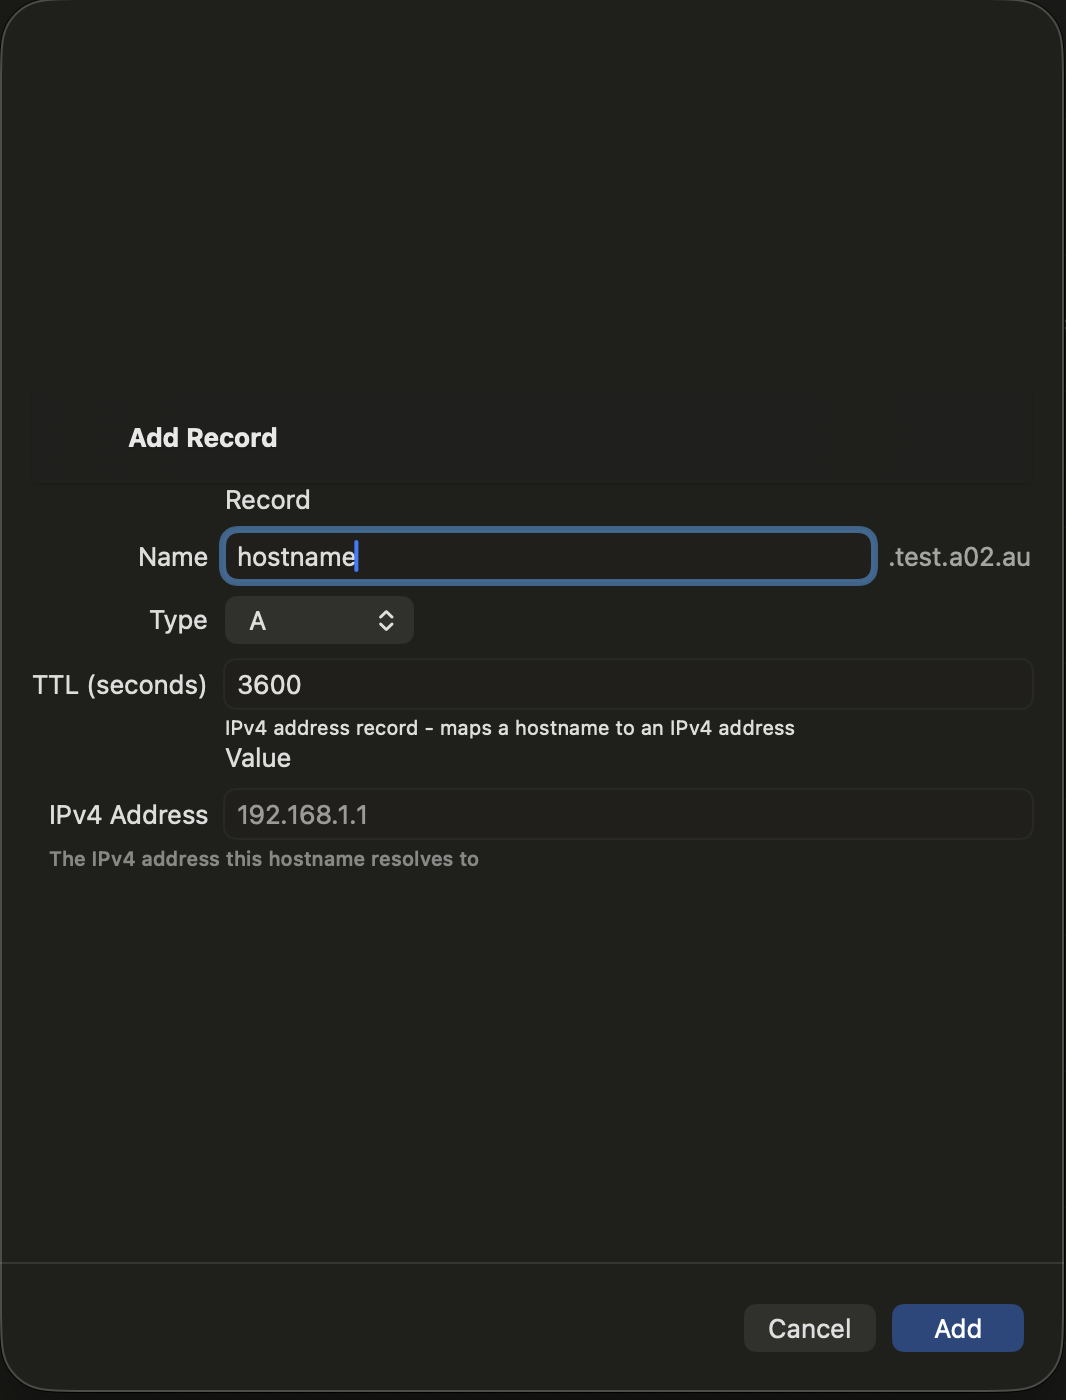
Fields
- Name — The hostname (e.g., "www" or "mail"). The zone suffix is shown to the right. Use "@" or leave empty for the zone apex.
- TTL — Time-to-live in seconds (e.g., 3600 = 1 hour)
- IPv4 Address — The target IP address (e.g., 192.168.1.1)
AAAA Record
AAAAMaps a hostname to an IPv6 address. The IPv6 equivalent of an A record.
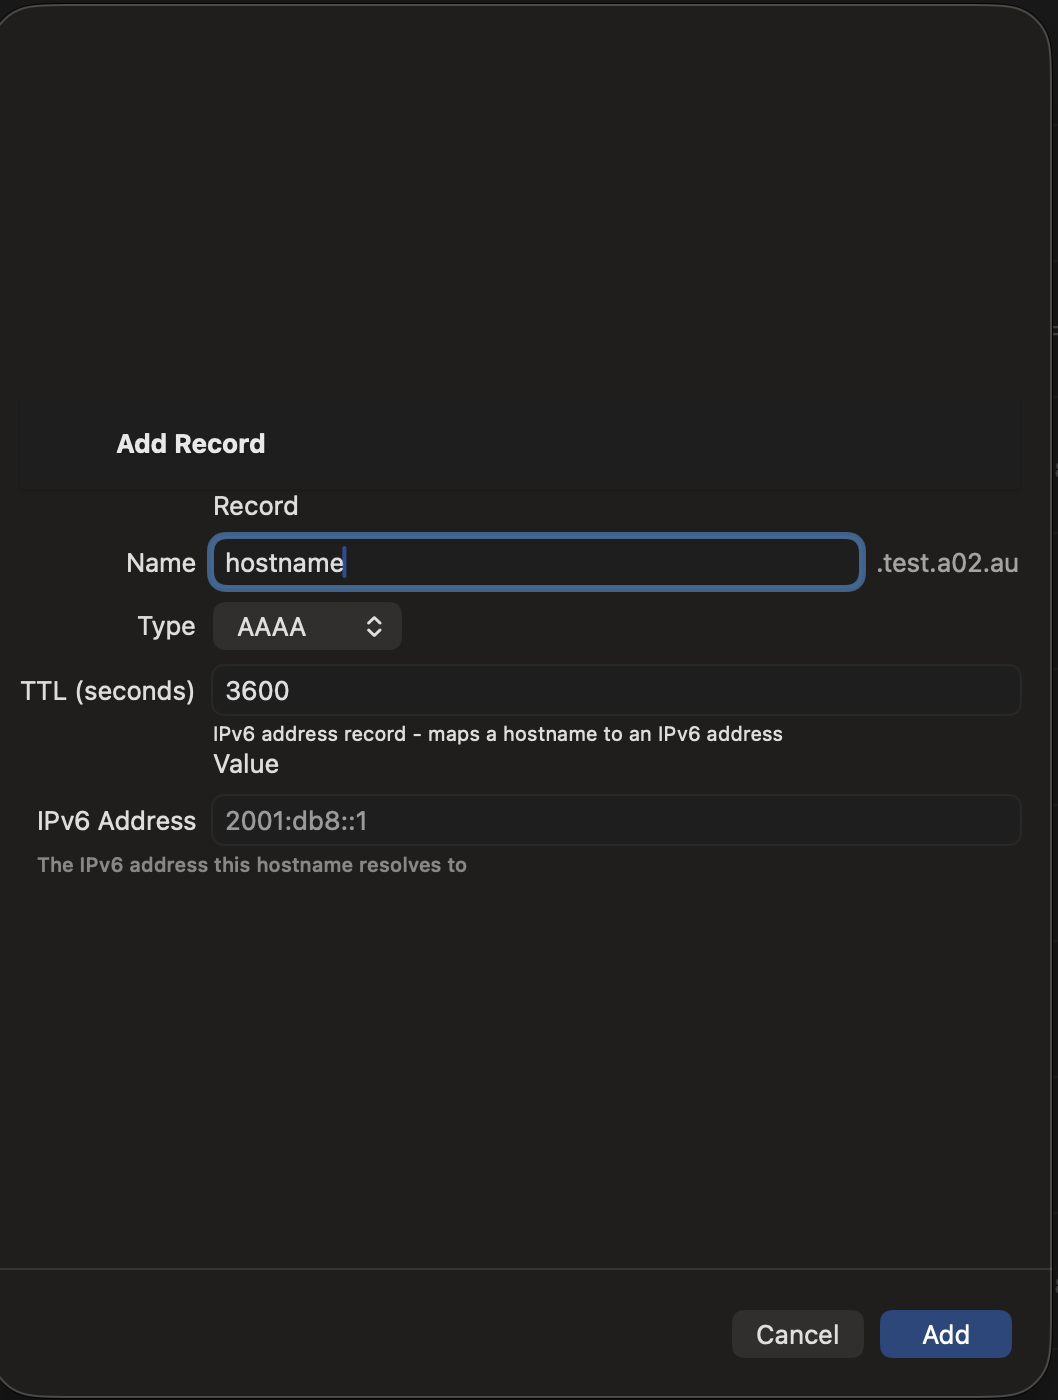
Fields
- Name — The hostname. Use "@" for the zone apex.
- TTL — Time-to-live in seconds
- IPv6 Address — The target IPv6 address (e.g., 2001:db8::1)
Display format: IPv6 addresses are displayed in compressed notation (e.g., ::1 instead of 0:0:0:0:0:0:0:1) following RFC 5952 for easier reading.
CNAME Record
CNAMECreates an alias from one hostname to another. When a resolver looks up the alias, it follows the CNAME to the target hostname.
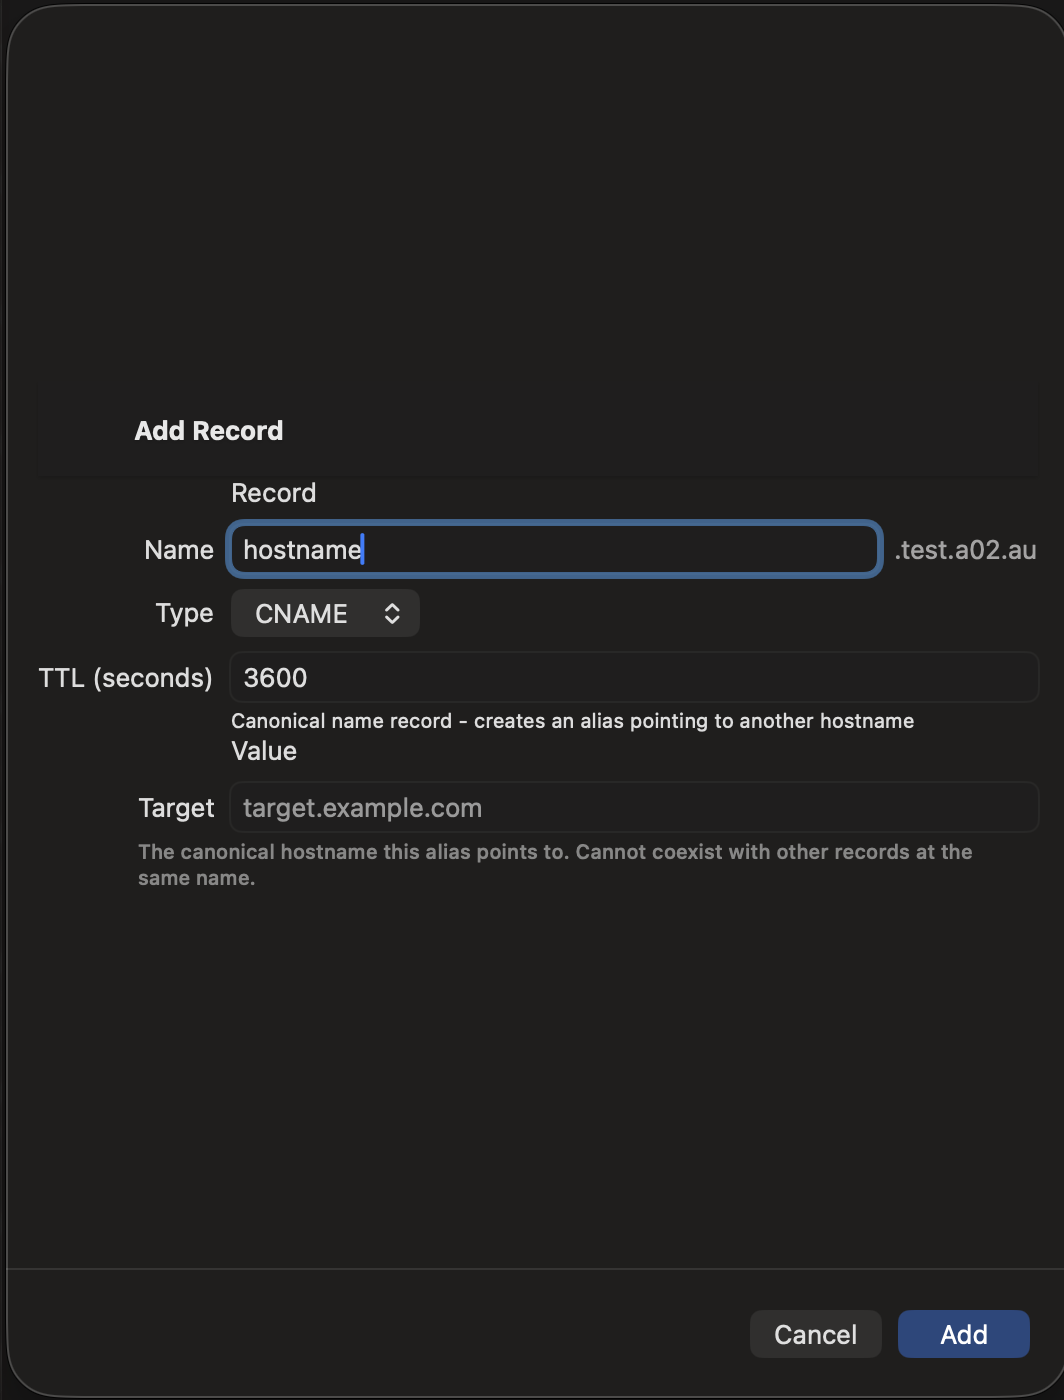
Fields
- Name — The alias hostname
- TTL — Time-to-live in seconds
- Target — The canonical hostname this alias points to. Cannot coexist with other records at the same name.
DNAME Record
DNAMERedirects an entire subtree of the DNS namespace to another domain. Unlike CNAME which aliases a single name, DNAME aliases all names below it.
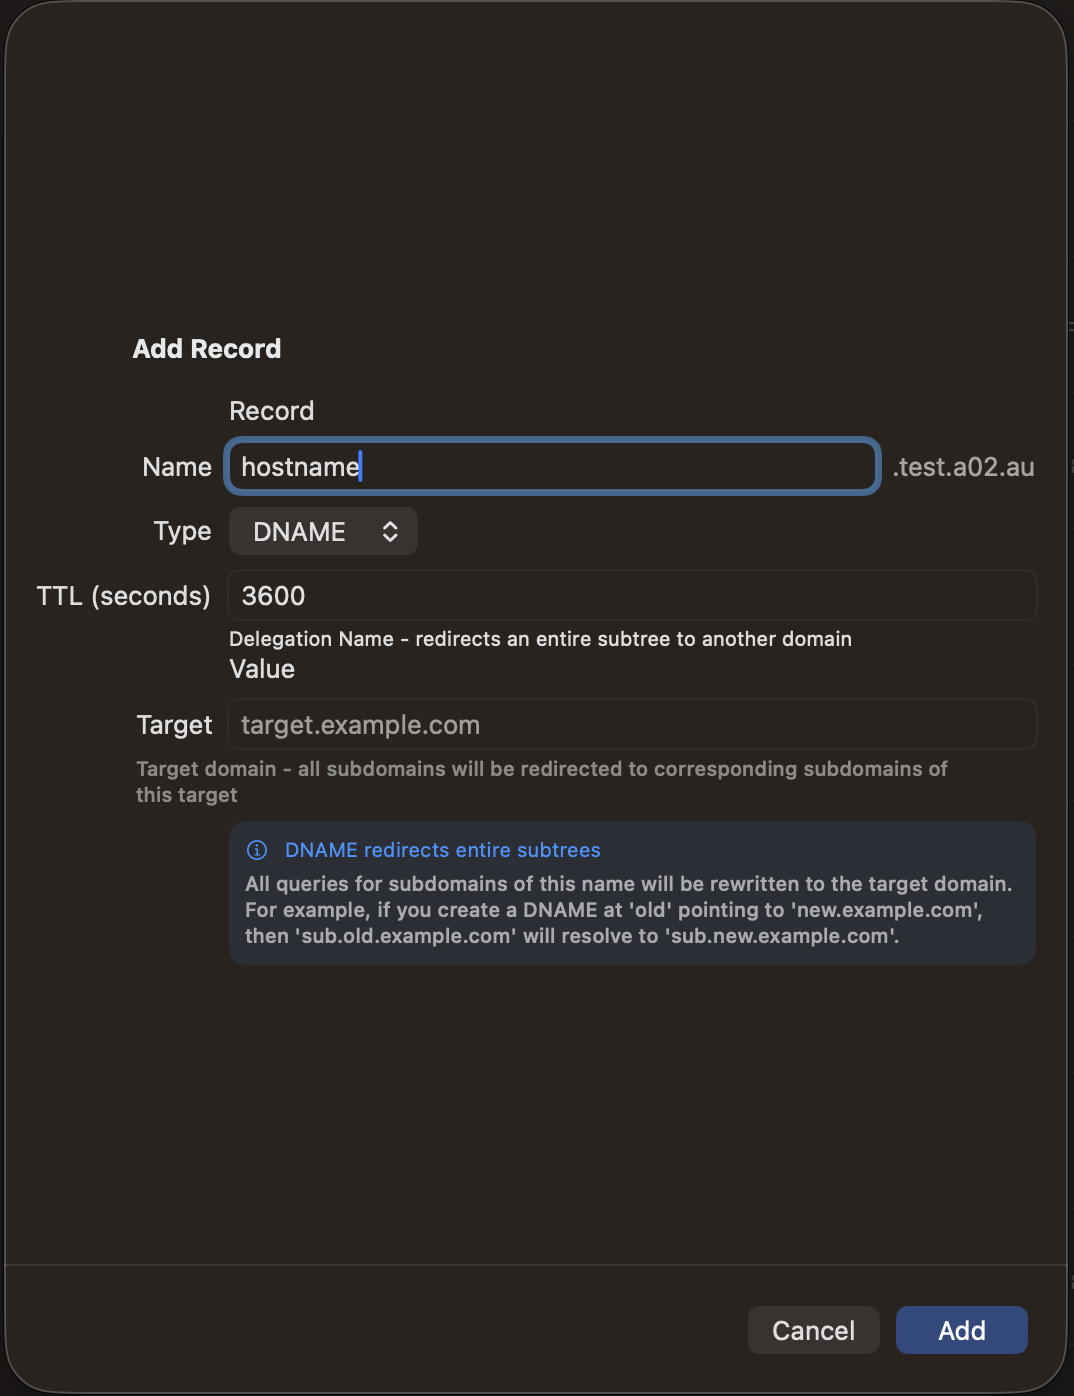
Fields
- Name — The subtree to redirect
- TTL — Time-to-live in seconds
- Target — The target domain. All subdomains of the name will be rewritten to corresponding subdomains of this target.
Example: A DNAME at "old" pointing to "new.example.com" means "sub.old.yourdomain.com" resolves to "sub.new.example.com".
MX Record
MXSpecifies mail servers responsible for receiving email for the domain. Multiple MX records with different priorities provide failover.
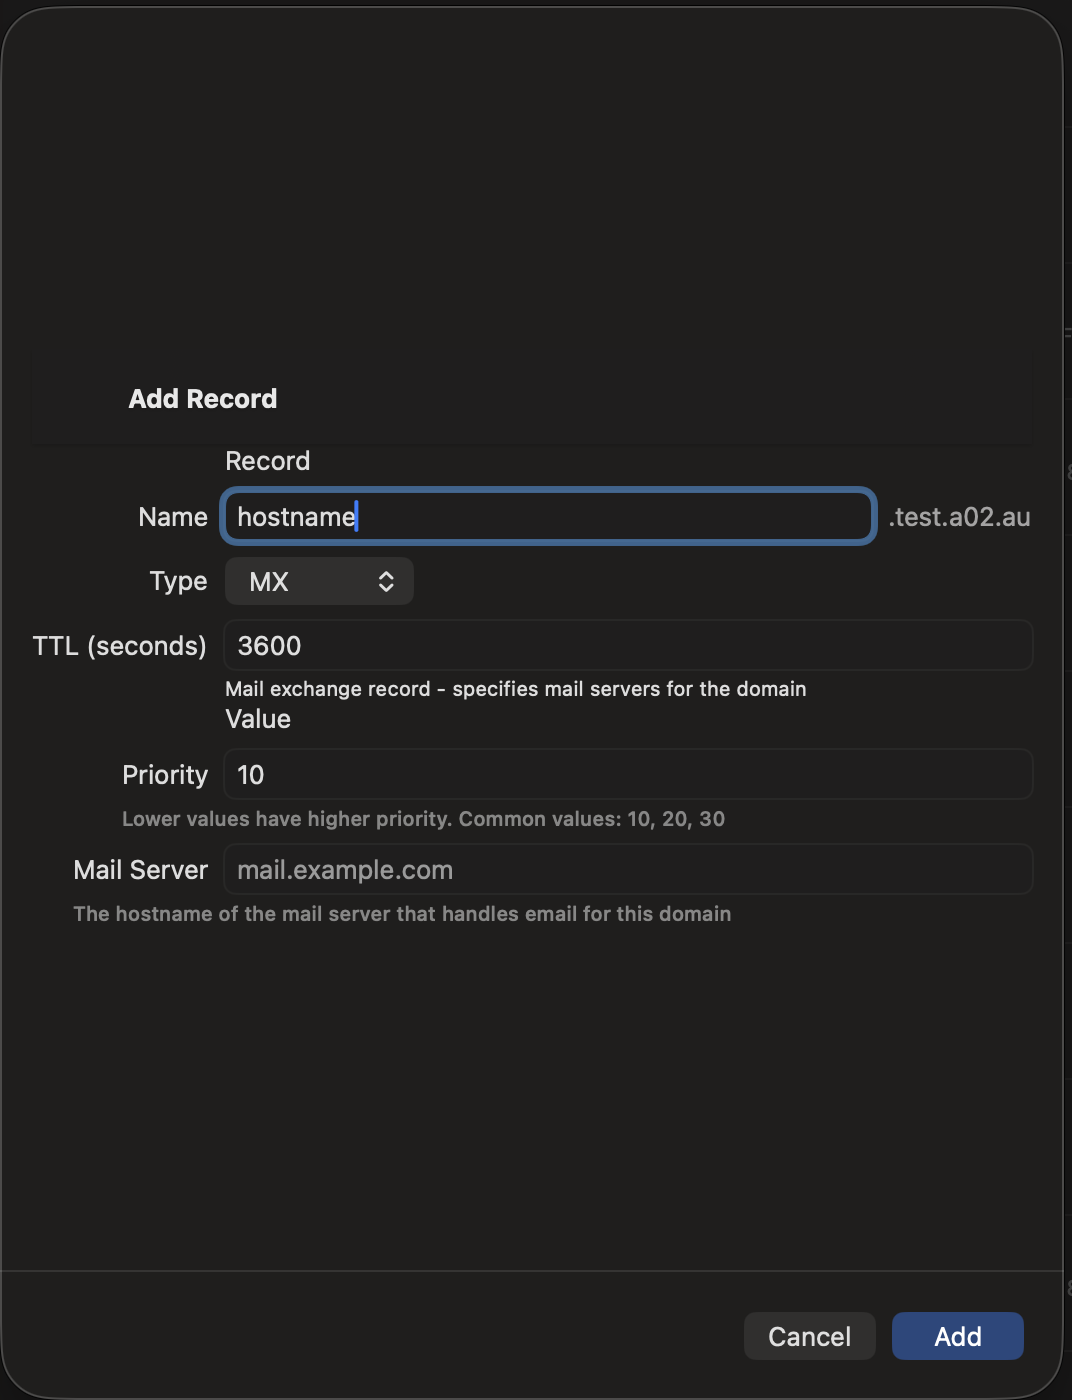
Fields
- Name — Usually "@" for the zone apex, or a subdomain
- TTL — Time-to-live in seconds
- Priority — Lower values have higher priority. Common values: 10, 20, 30
- Mail Server — The hostname of the mail server (must be a hostname, not an IP)
TXT Record
TXTHolds arbitrary text data. Commonly used for SPF (email authentication), DKIM signatures, domain verification, and other purposes.
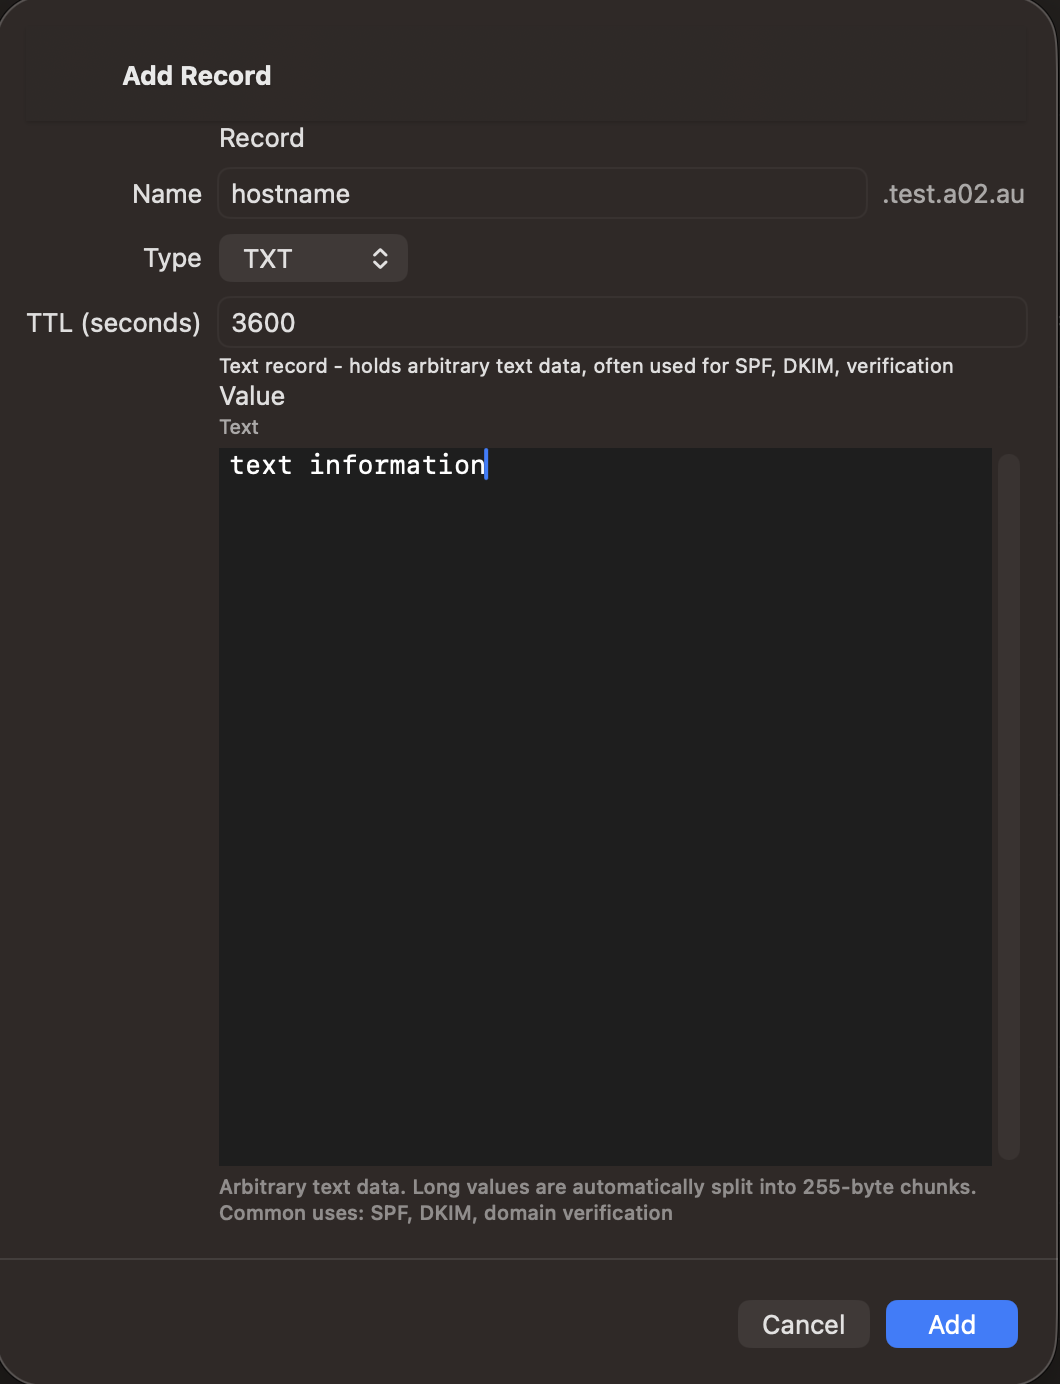
Fields
- Name — The hostname (often "@" for SPF, or "_dmarc" for DMARC)
- TTL — Time-to-live in seconds
- Text — The text content. Long values are automatically split into 255-byte chunks as required by DNS.
NS Record
NSDelegates a zone or subdomain to an authoritative nameserver. NS records at the zone apex define the nameservers for the entire zone.
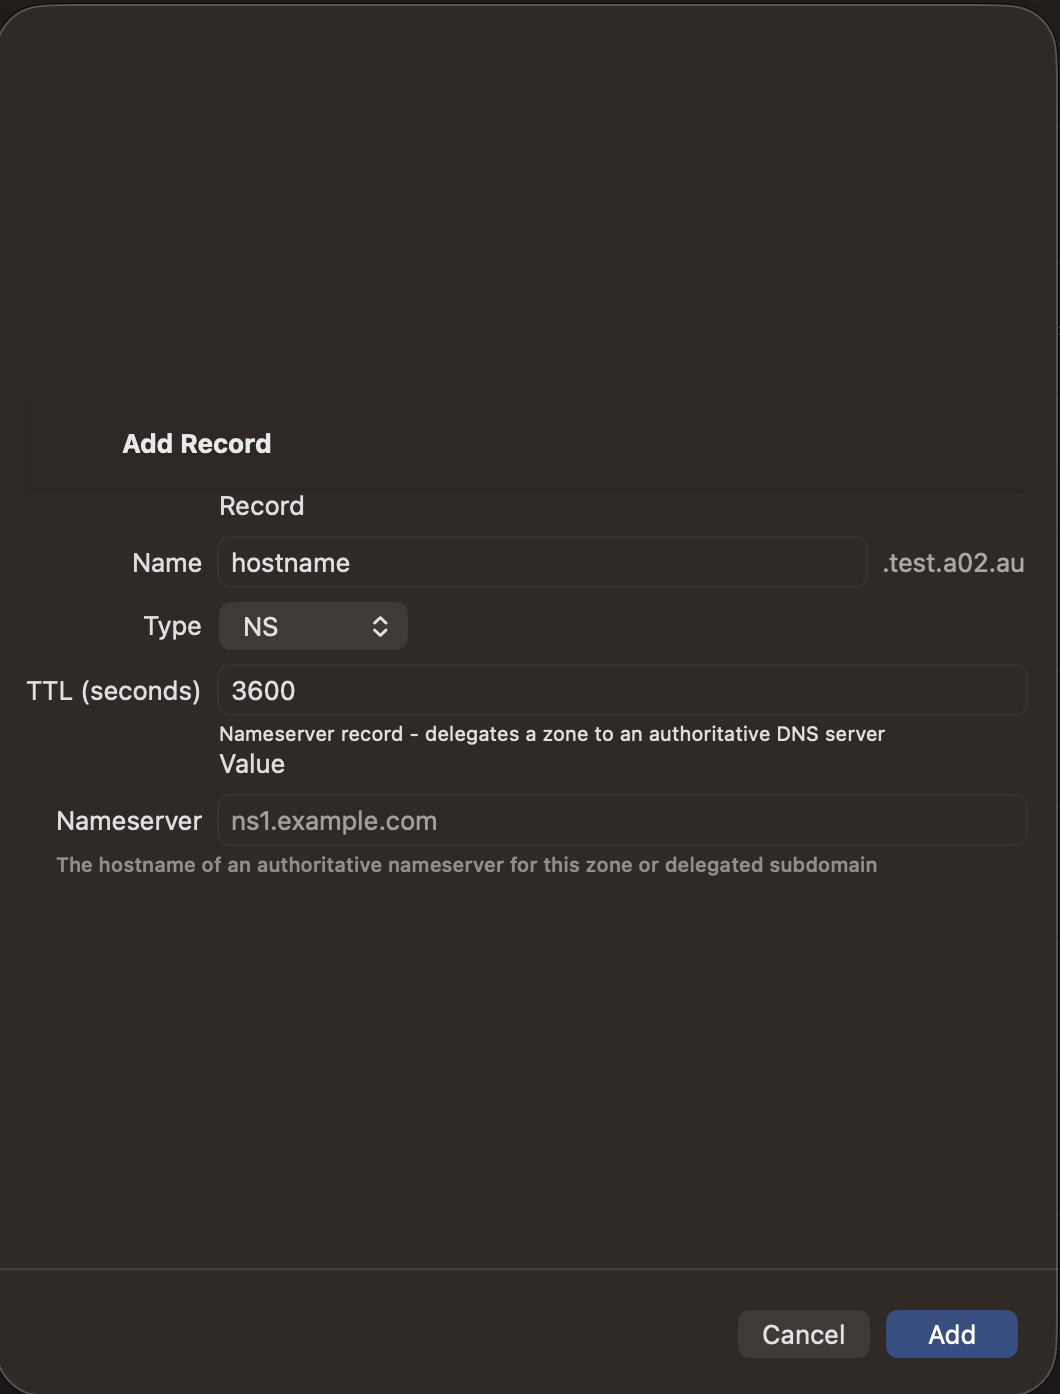
Fields
- Name — The zone apex "@" or a subdomain to delegate
- TTL — Time-to-live in seconds
- Nameserver — The hostname of an authoritative nameserver
SRV Record
SRVSpecifies the location of services (host and port). Used by applications to discover services like LDAP, XMPP, SIP, and others.
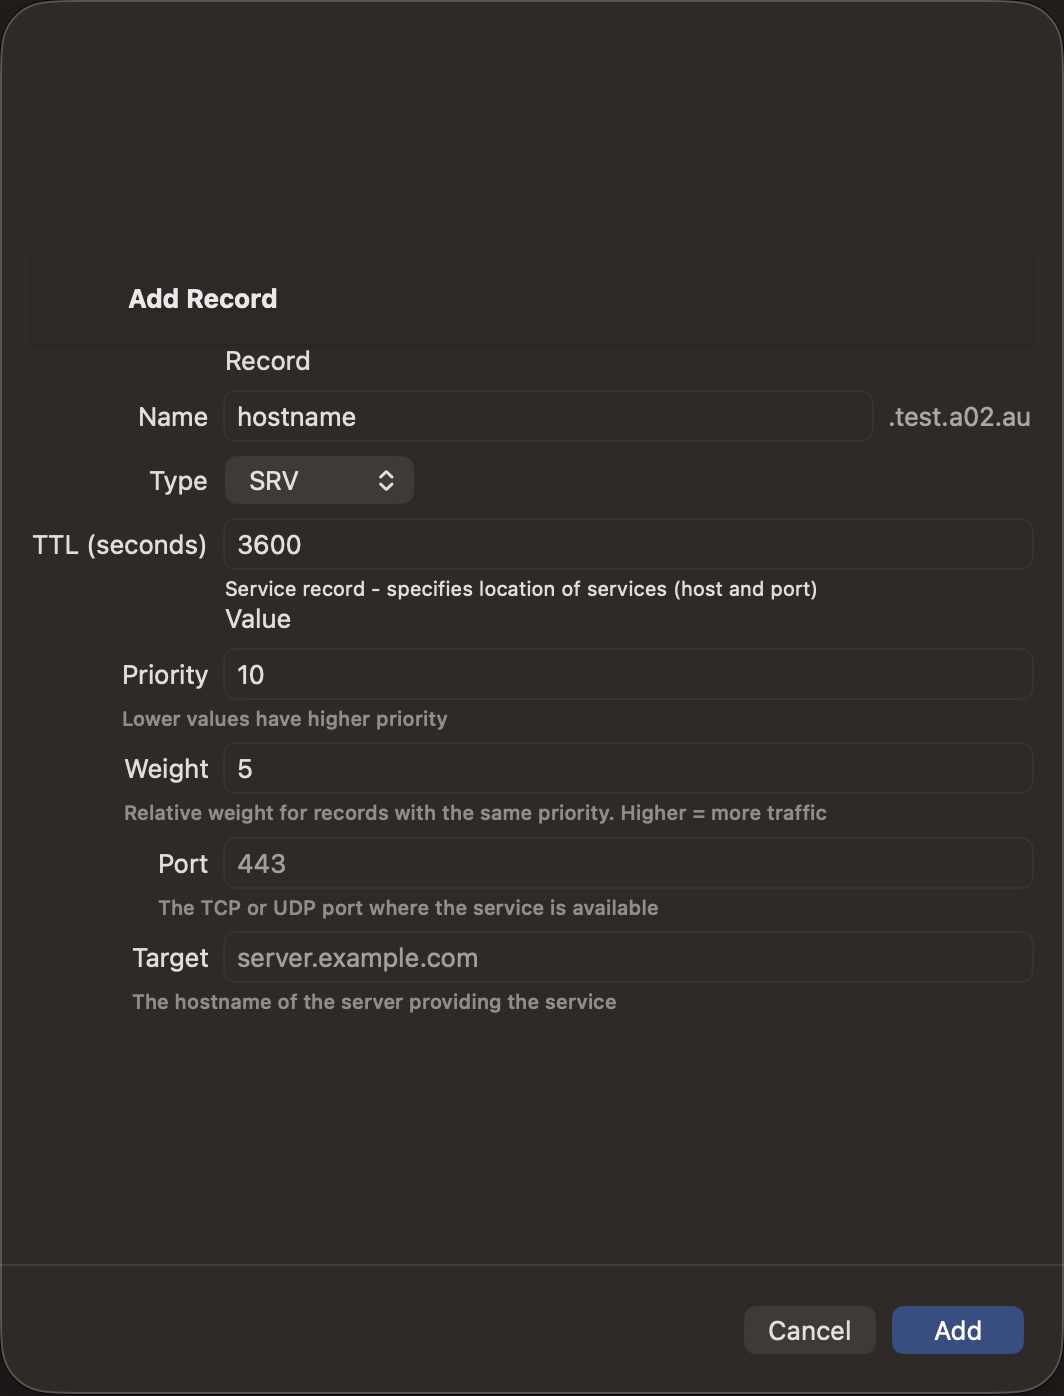
Fields
- Name — Service name in format _service._protocol (e.g., _ldap._tcp)
- TTL — Time-to-live in seconds
- Priority — Lower values have higher priority
- Weight — Relative weight for records with same priority. Higher = more traffic
- Port — The TCP or UDP port where the service is available
- Target — The hostname of the server providing the service
PTR Record
PTRMaps an IP address back to a hostname (reverse DNS). Used in reverse zones like in-addr.arpa for IPv4 or ip6.arpa for IPv6.
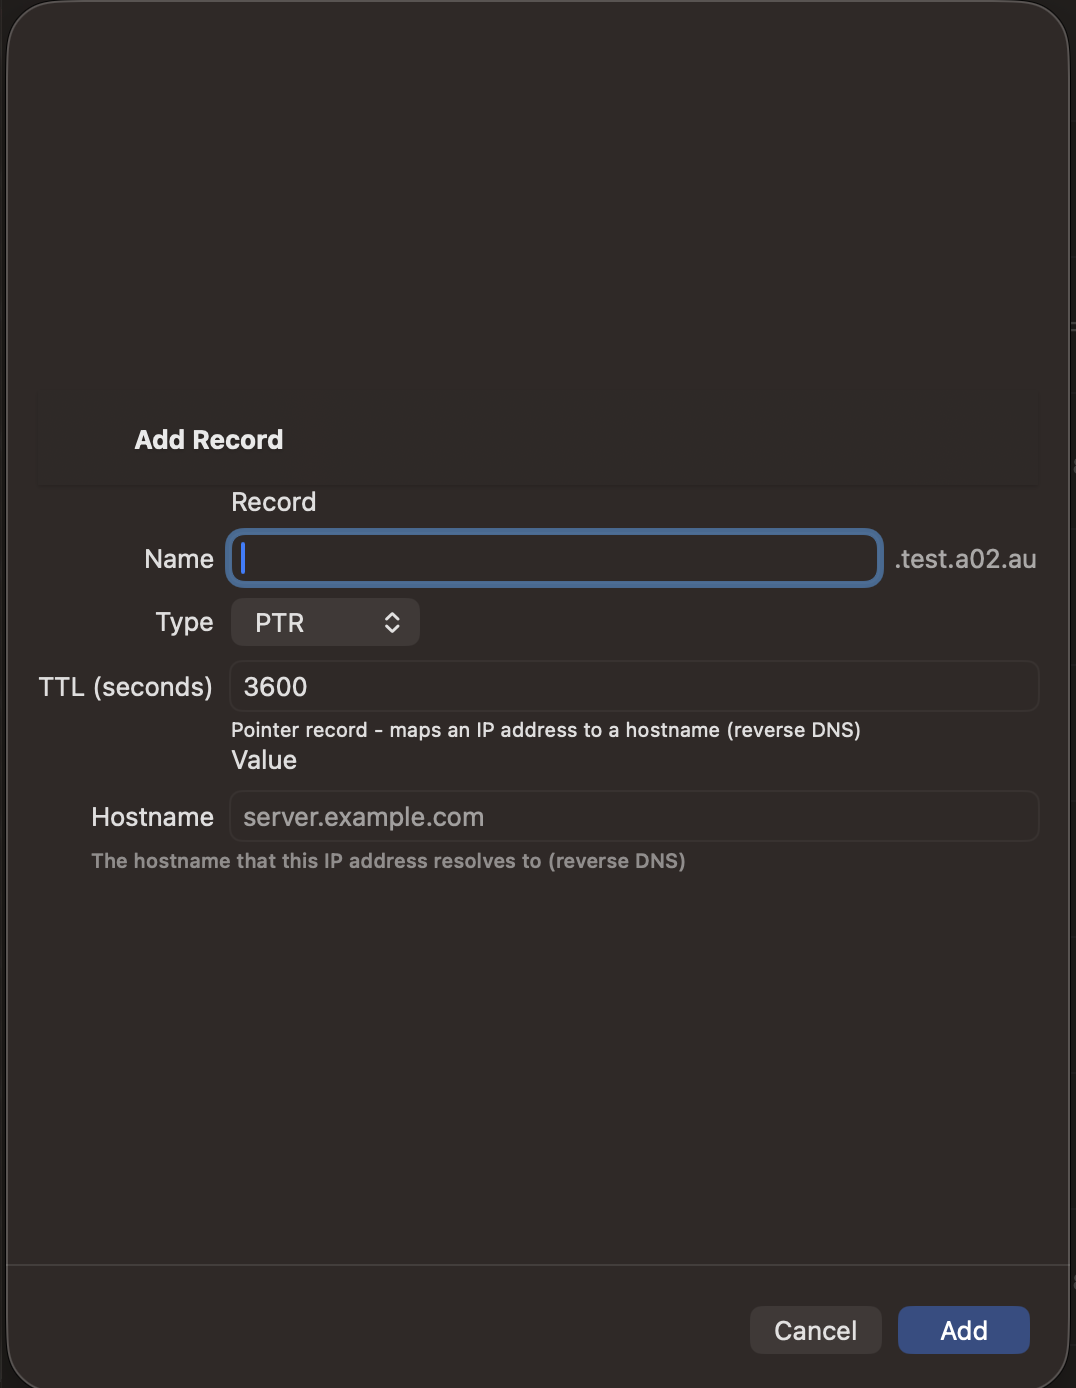
Fields
- Name — The reversed IP octets (e.g., "1" for 192.168.1.1 in zone 1.168.192.in-addr.arpa)
- TTL — Time-to-live in seconds
- Hostname — The forward hostname this IP resolves to
CAA Record
CAACertificate Authority Authorization. Specifies which certificate authorities are allowed to issue certificates for this domain.
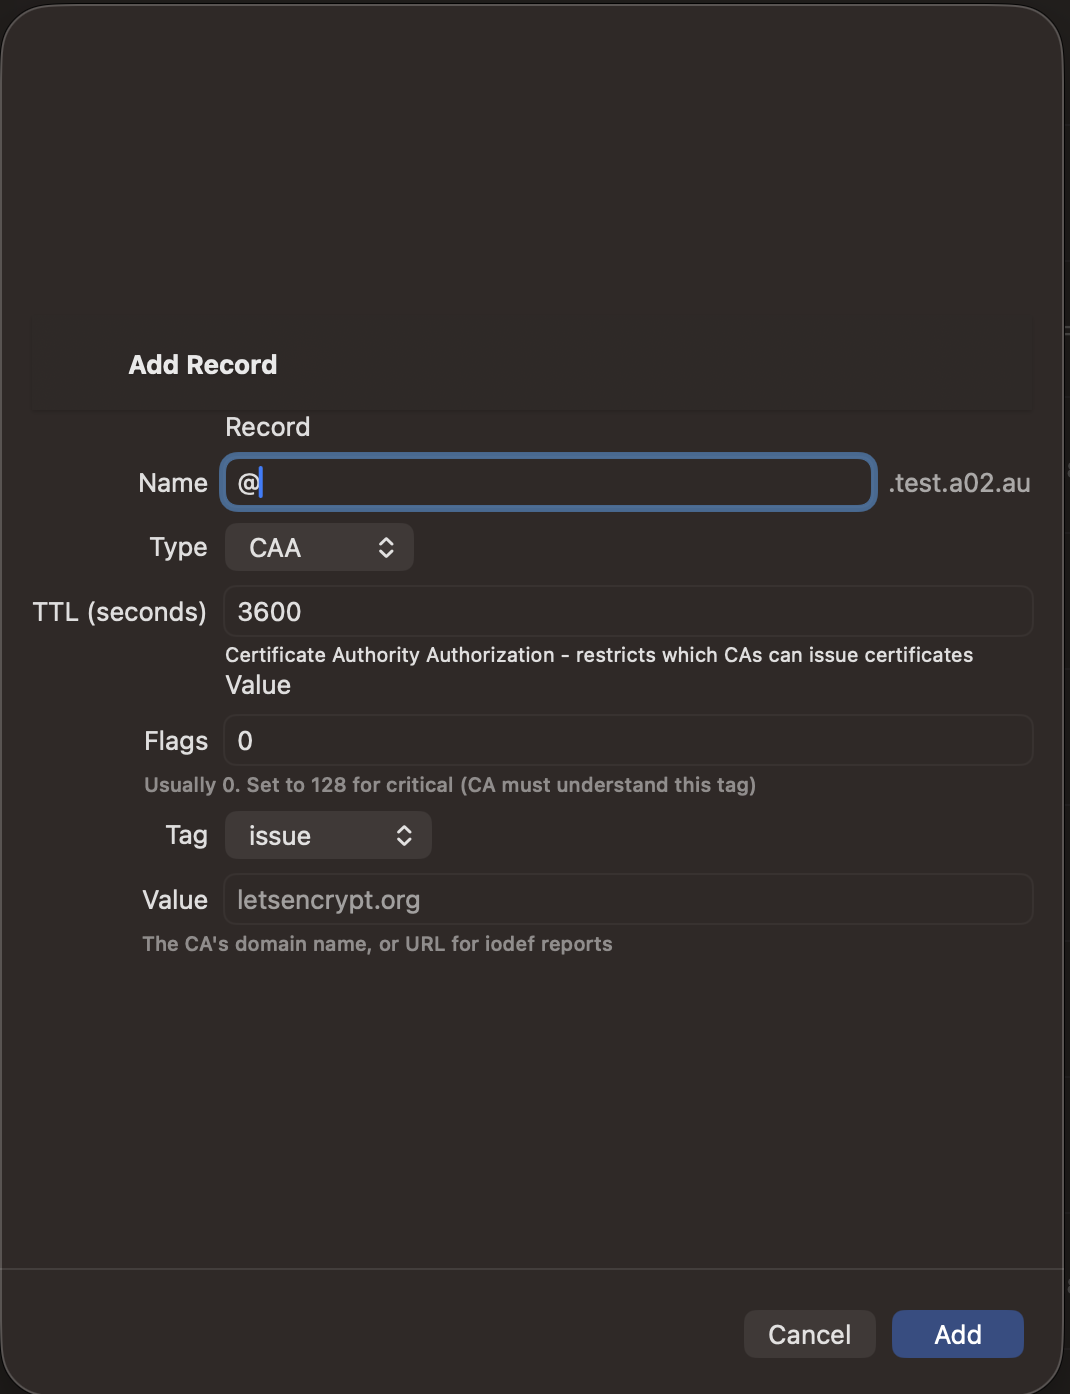
Fields
- Name — Usually "@" for the zone apex
- TTL — Time-to-live in seconds
- Flags — Usually 0. Set to 128 for critical (CA must understand the tag)
- Tag — "issue" (allow issuance), "issuewild" (wildcards), or "iodef" (violation reports)
- Value — The CA's domain name (e.g., letsencrypt.org) or URL for iodef reports
NAPTR Record
NAPTRNaming Authority Pointer. Used for ENUM (telephone number to URI mapping), SIP, and other URI rewriting applications.
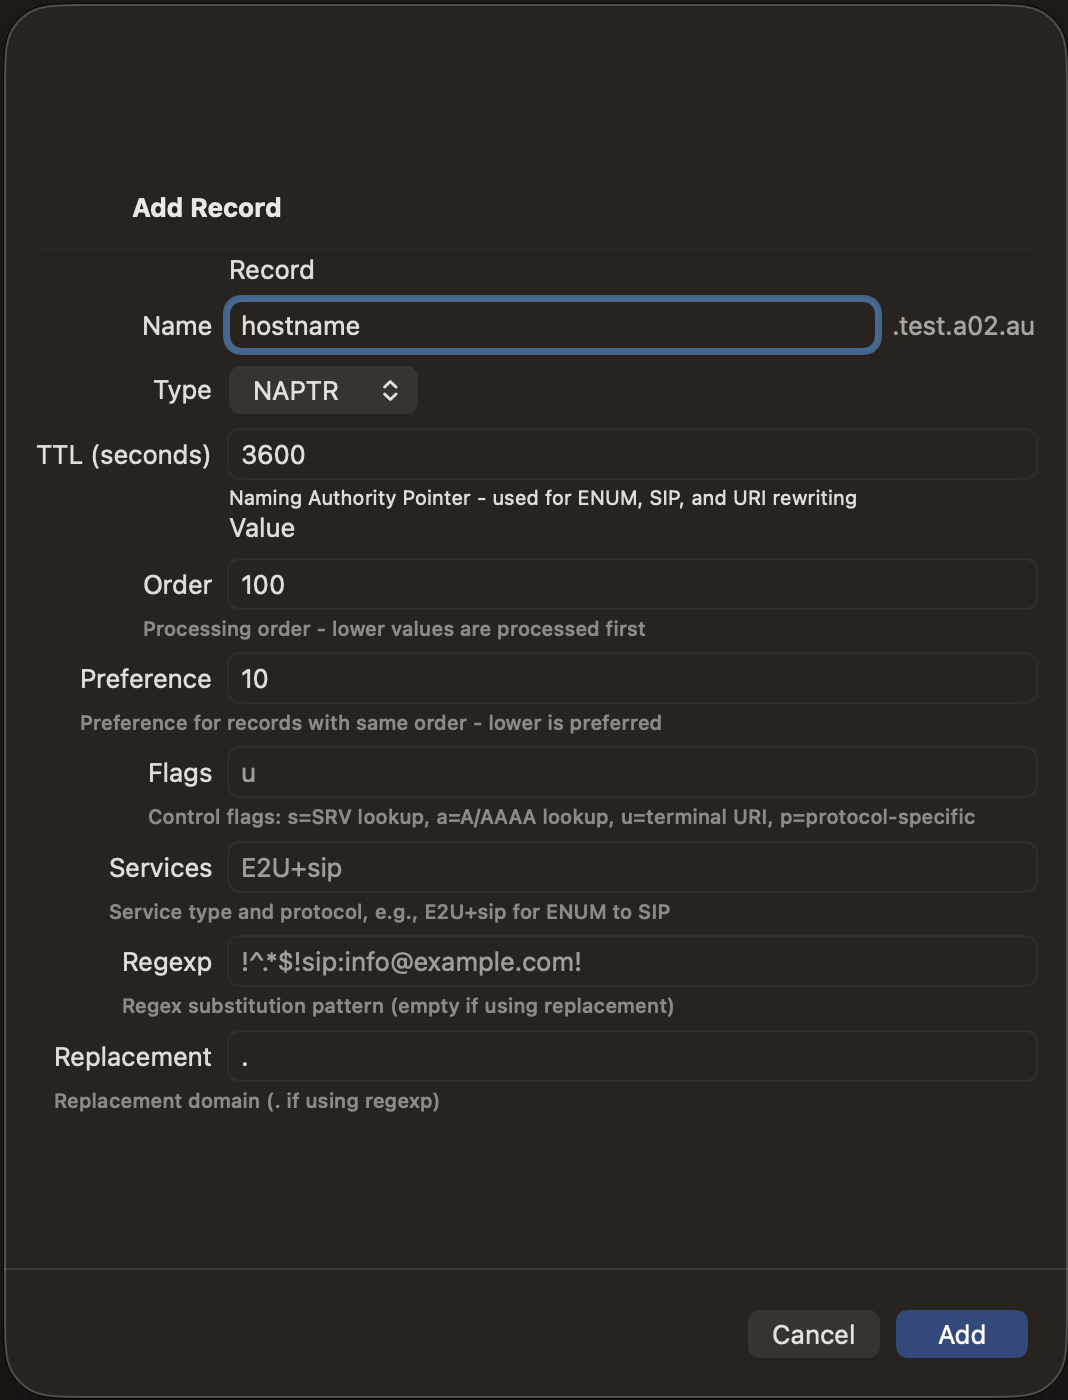
Fields
- Name — The name to match (often a reversed phone number for ENUM)
- TTL — Time-to-live in seconds
- Order — Processing order. Lower values are processed first
- Preference — Preference among records with same order. Lower is preferred
- Flags — Control flags: "u" (terminal URI), "s" (SRV lookup), "a" (A/AAAA lookup), "p" (protocol-specific)
- Services — Service type and protocol (e.g., "E2U+sip" for ENUM to SIP)
- Regexp — Regex substitution pattern (empty if using replacement)
- Replacement — Replacement domain (use "." if using regexp)
LOC Record
LOCGeographic location record. Specifies the physical location of a host using latitude, longitude, and altitude.
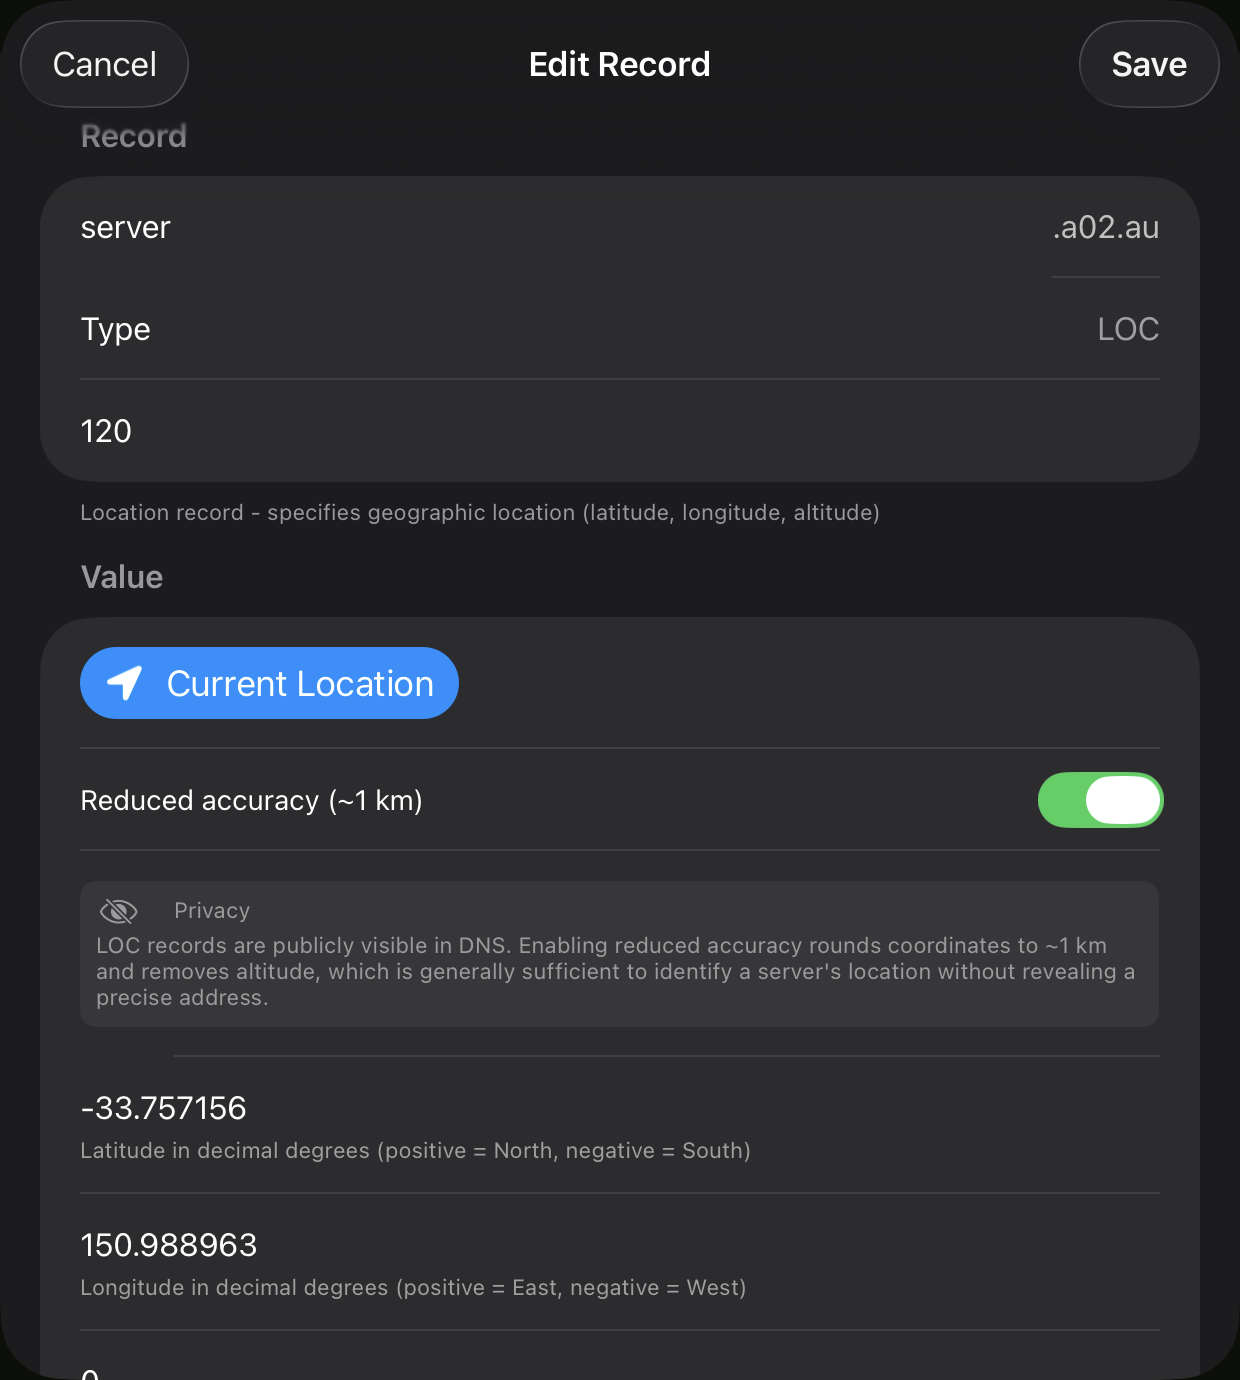
Fields
- Current Location — Tap to auto-fill latitude, longitude, and altitude from your device's GPS
- Name — The hostname to geolocate
- TTL — Time-to-live in seconds
- Latitude — Latitude in decimal degrees (positive = North, negative = South)
- Longitude — Longitude in decimal degrees (positive = East, negative = West)
- Altitude — Altitude in meters above sea level
- Size — Diameter of the location sphere in meters
- Horizontal Precision — Horizontal precision in meters
- Vertical Precision — Vertical precision in meters
- Reduced accuracy (~1 km) — A privacy toggle that obscures the precise location. When enabled, coordinates are offset by a random 200–500 m in a random direction, altitude is removed, and size/precision values are set to 1000 m. LOC records are publicly visible in DNS, so enabling this prevents the record from revealing an exact street address while still being accurate enough to identify the city or region where a server is located.

The QuickLook viewer displays LOC records with a map showing the pinned location, along with standard and satellite views.
HTTPS Record
HTTPSHTTPS Service Binding. Specifies how to connect via HTTPS, including supported protocols (HTTP/2, HTTP/3), ports, and address hints. Improves connection efficiency.
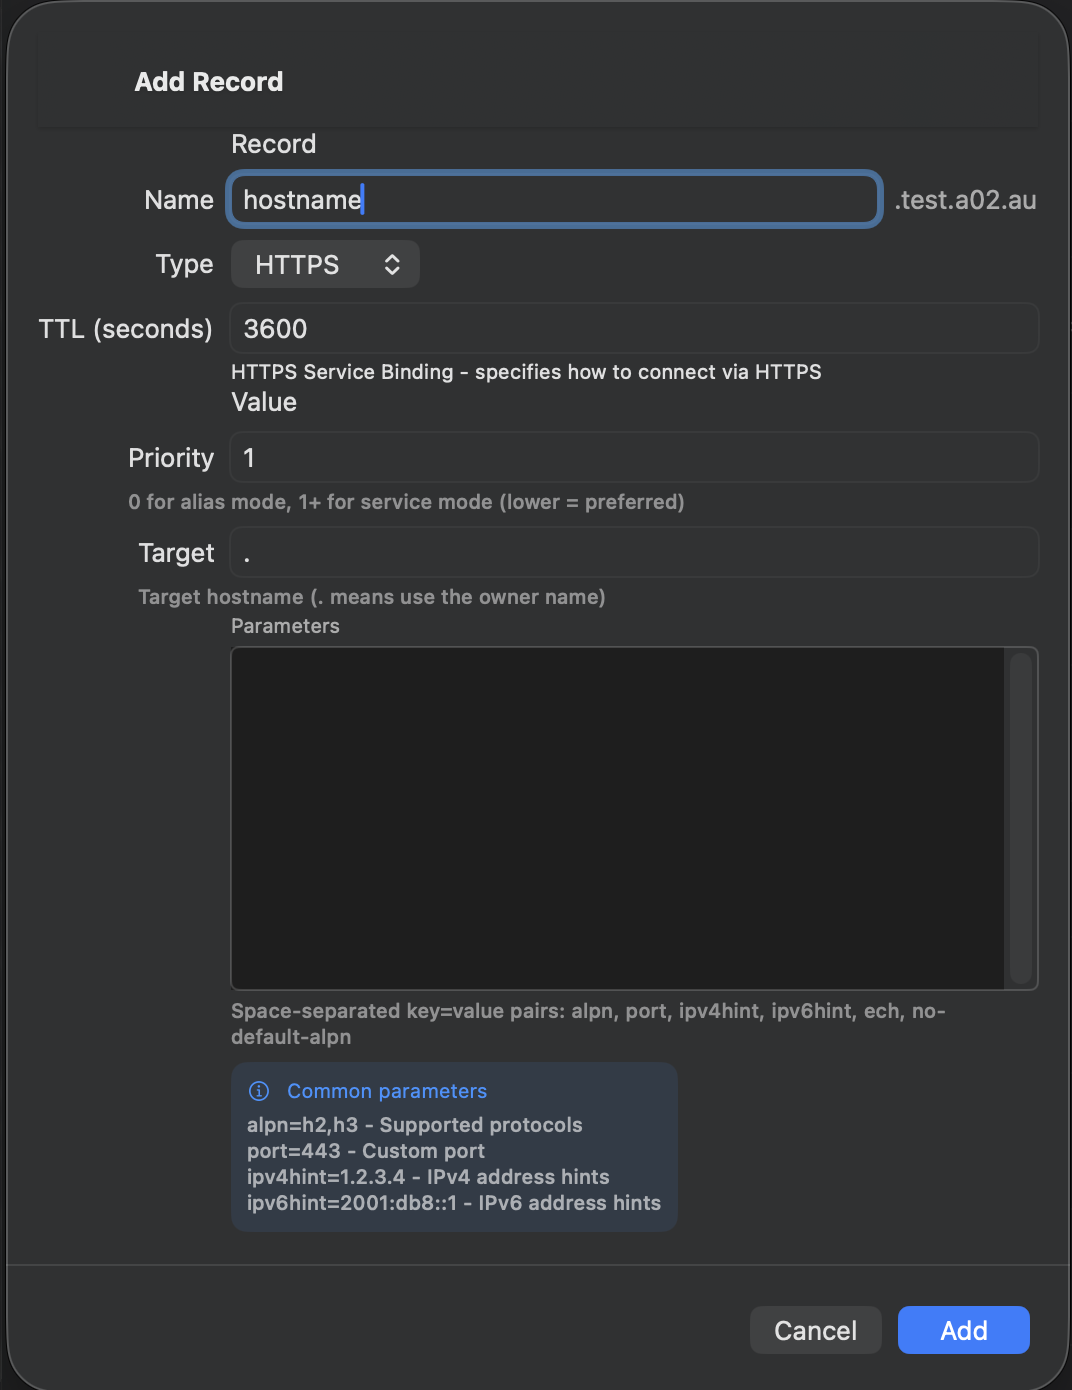
Fields
- Name — The hostname (often "@" for the zone apex)
- TTL — Time-to-live in seconds
- Priority — 0 for alias mode (like CNAME), 1+ for service mode (lower = preferred)
- Target — Target hostname. Use "." to mean the owner name itself
- Parameters — Space-separated key=value pairs
Common Parameters
- alpn=h2,h3 — Supported protocols (HTTP/2, HTTP/3)
- port=443 — Custom port if not 443
- ipv4hint=1.2.3.4 — IPv4 address hint
- ipv6hint=2001:db8::1 — IPv6 address hint
SVCB Record
SVCBService Binding. A general-purpose service endpoint discovery record. HTTPS records are a specialized form of SVCB for web services.
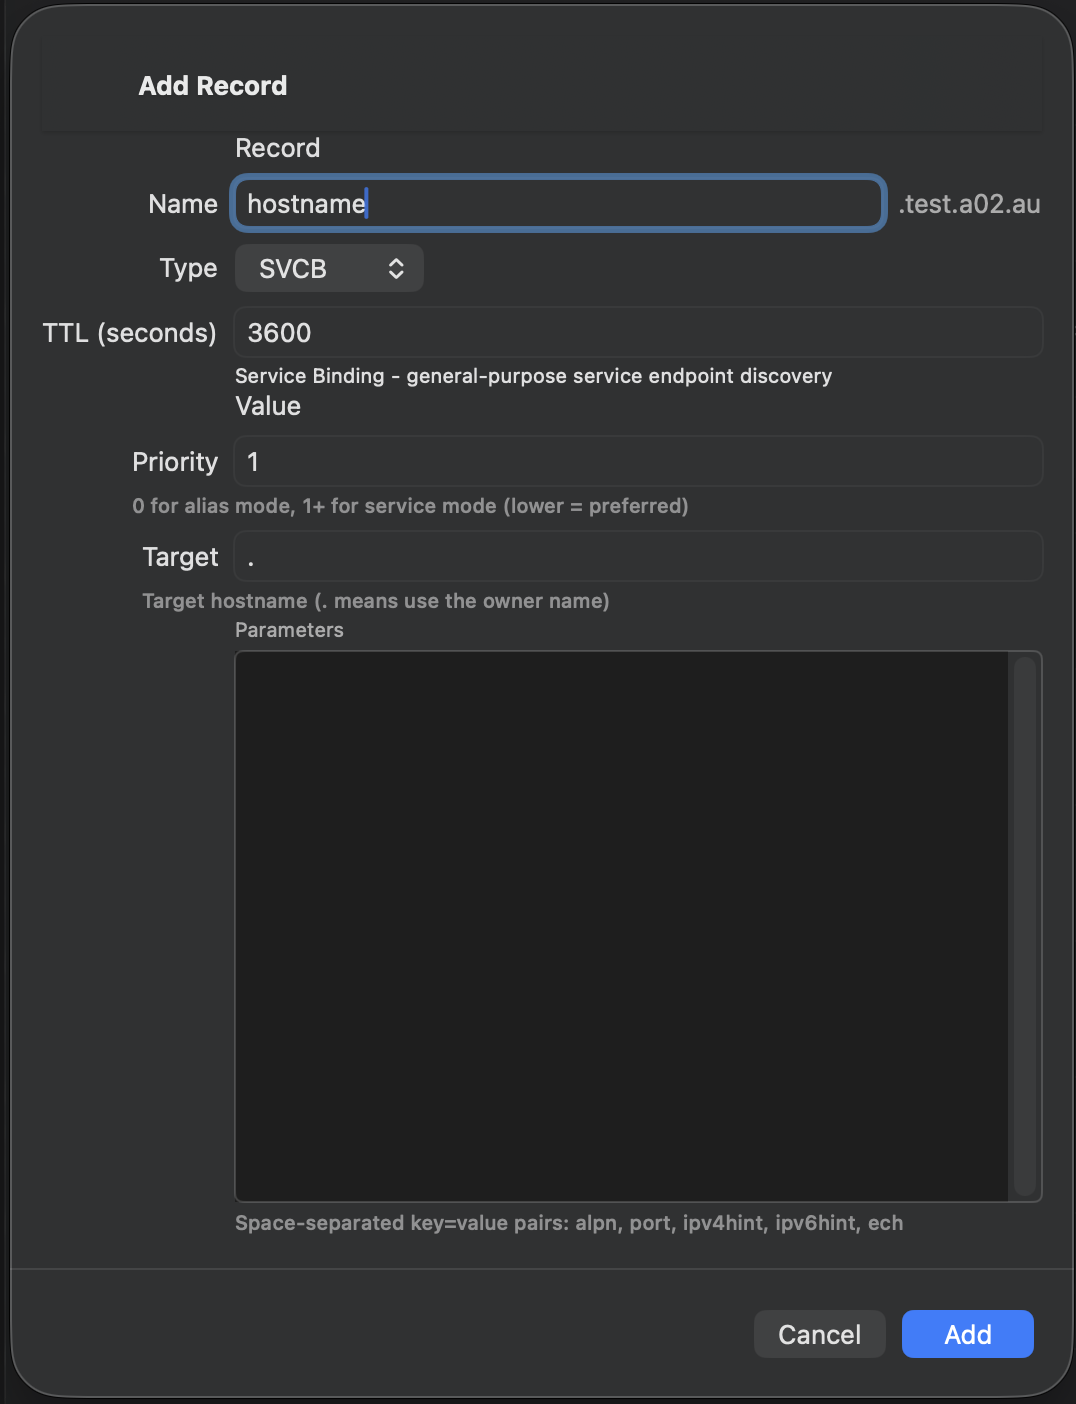
Fields
- Name — The service name (e.g., _api for API endpoints)
- TTL — Time-to-live in seconds
- Priority — 0 for alias mode, 1+ for service mode
- Target — Target hostname. Use "." for the owner name
- Parameters — Space-separated key=value pairs (alpn, port, ipv4hint, ipv6hint, ech)
SSHFP Record
SSHFPSSH Fingerprint. Publishes SSH host key fingerprints in DNS, allowing SSH clients to verify host keys via DNSSEC instead of trusting on first use.
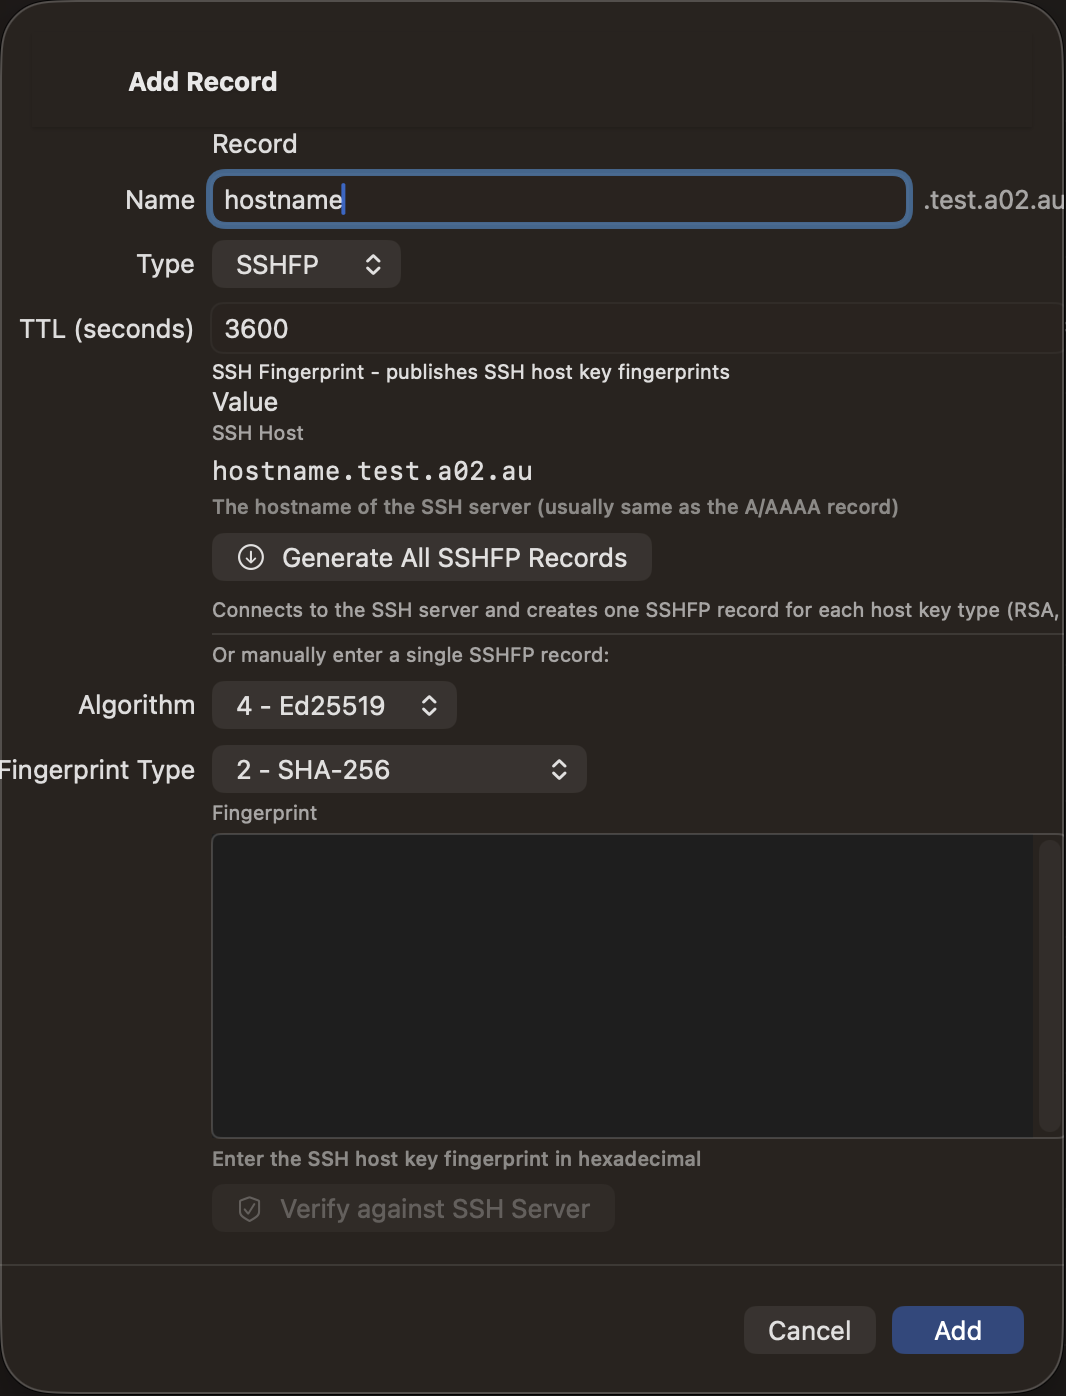
Fields
- Name — The SSH server hostname
- TTL — Time-to-live in seconds
- SSH Host — The hostname to connect to for auto-generation
- Algorithm — Key algorithm: 1 (RSA), 3 (ECDSA), 4 (Ed25519)
- Fingerprint Type — Hash algorithm: 1 (SHA-1), 2 (SHA-256)
- Fingerprint — The key fingerprint in hexadecimal
Tip: Use "Generate All SSHFP Records" to automatically fetch all host keys from the server. Always use copy/paste for fingerprint data to avoid transcription errors.
TLSA Record
TLSADANE TLS Authentication. Associates TLS certificates with domain names, allowing certificate verification via DNSSEC without relying solely on certificate authorities.
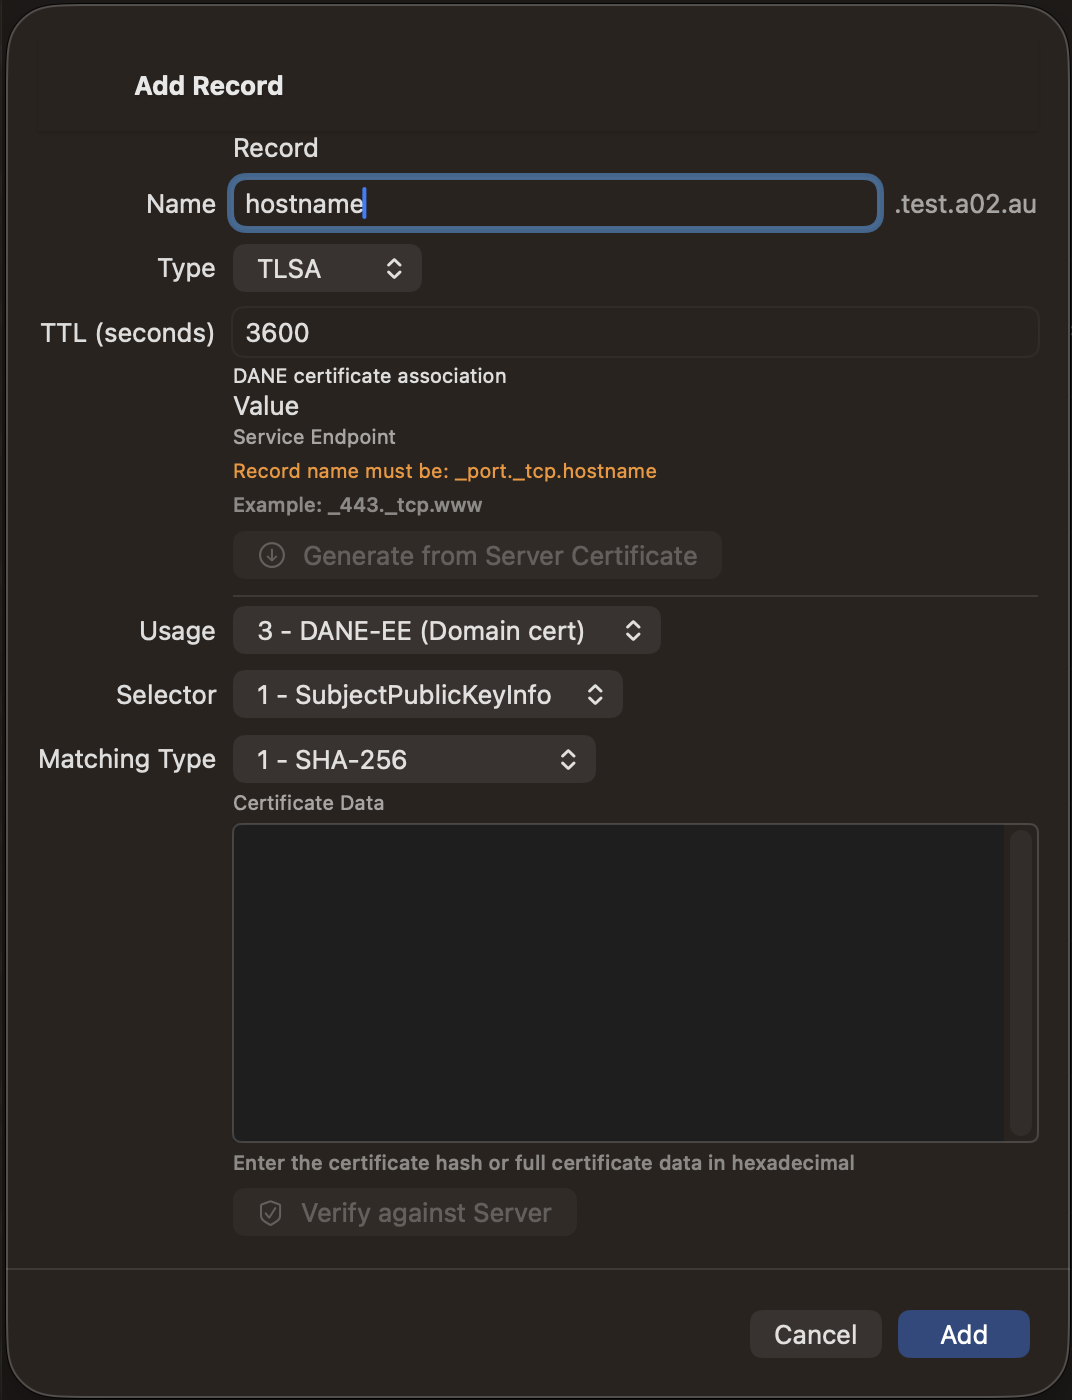
Fields
- Name — Must be in format _port._tcp.hostname (e.g., _443._tcp.www)
- TTL — Time-to-live in seconds
- Usage — Certificate usage: 0 (PKIX-TA), 1 (PKIX-EE), 2 (DANE-TA), 3 (DANE-EE, most common)
- Selector — What to match: 0 (full certificate), 1 (SubjectPublicKeyInfo)
- Matching Type — How to match: 0 (exact), 1 (SHA-256), 2 (SHA-512)
- Certificate Data — Certificate hash or data in hexadecimal
Tip: Use "Generate from Server Certificate" to fetch and hash the certificate automatically. For STARTTLS ports (25, 587, 143, 110), the app performs the protocol handshake before fetching the certificate. Always use copy/paste for certificate data to avoid errors.
DS Record
DSDelegation Signer. Establishes the chain of trust for DNSSEC by publishing a hash of a child zone's DNSKEY in the parent zone.
Important: DS records are only used in the parent zone of the domain they secure. You will typically only add DS records for subdomains that you have delegated and signed with DNSSEC.

Fields
- Name — The subdomain name (the child zone you're delegating)
- TTL — Time-to-live in seconds
- Child Zone — The FQDN of the child zone for auto-generation
- Key Tag — 16-bit identifier matching the child's DNSKEY
- Algorithm — DNSSEC algorithm (e.g., 13 for ECDSA P-256)
- Digest Type — Hash algorithm: 1 (SHA-1), 2 (SHA-256), 4 (SHA-384)
- Digest — The DNSKEY digest in hexadecimal
Tip: You can paste the child zone's CDS record data directly into the Digest field — it will be automatically parsed and the fields will be populated. Always use copy/paste for digest data to avoid errors.
RP Record
RPResponsible Person. Specifies contact information for a domain, including an email address and optional reference to a TXT record with more information.
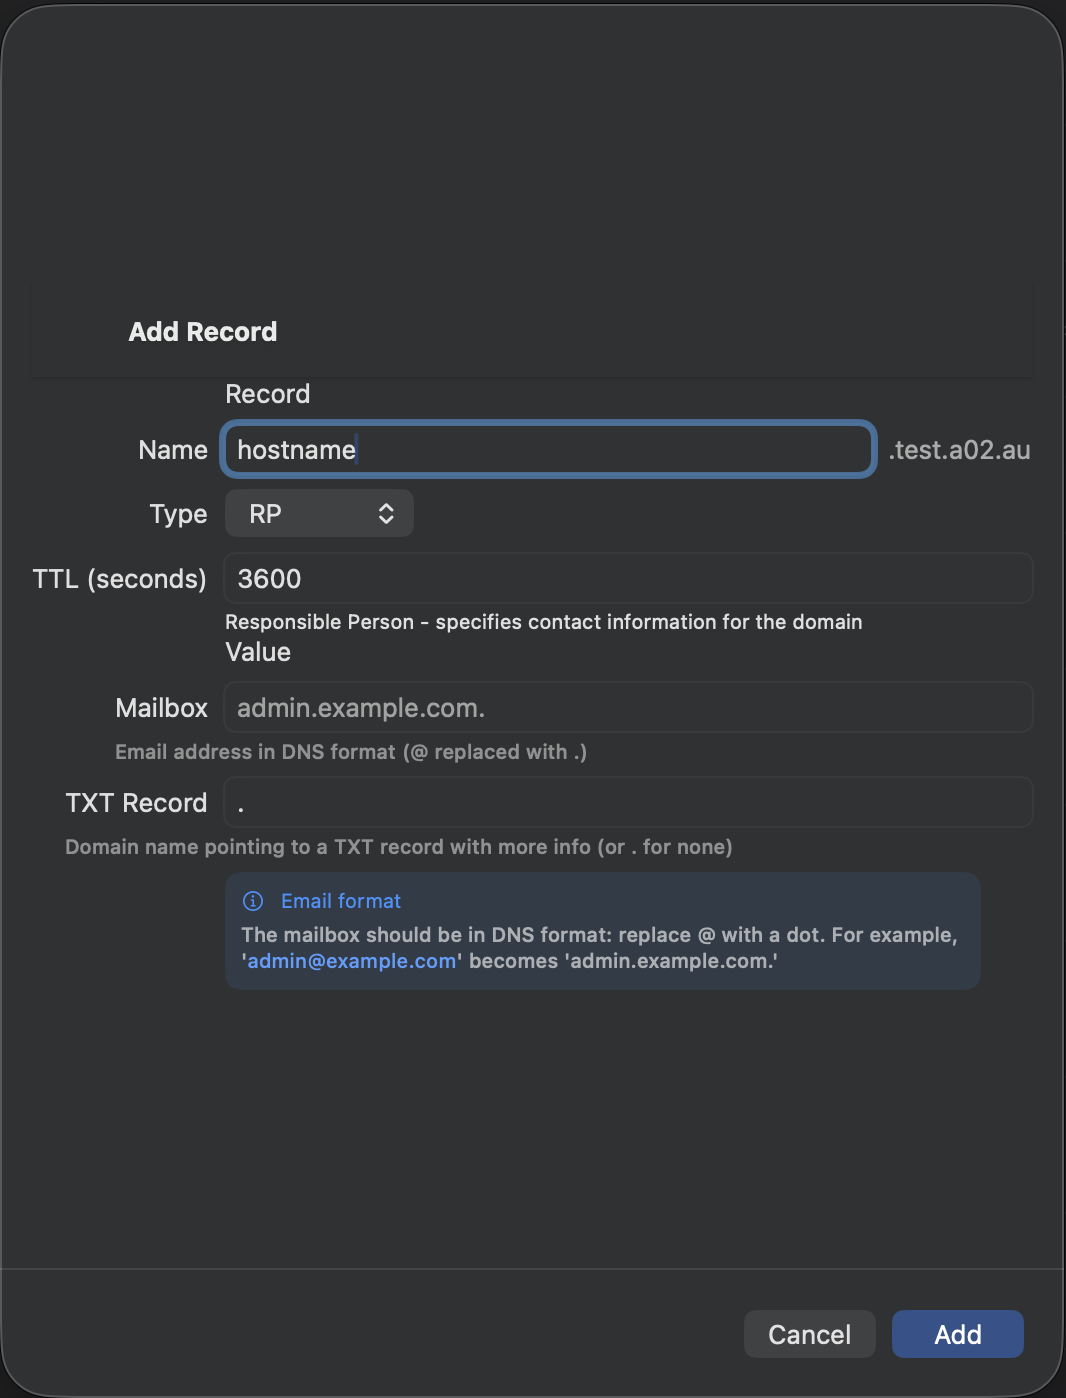
Fields
- Name — The hostname this contact is responsible for
- TTL — Time-to-live in seconds
- Mailbox — Email address in DNS format (replace @ with a dot). For example, "admin@example.com" becomes "admin.example.com."
- TXT Record — Domain name pointing to a TXT record with more info, or "." for none
HINFO Record
HINFOHost Information. Describes the hardware and operating system of a host. Rarely used today due to security concerns about exposing system details.
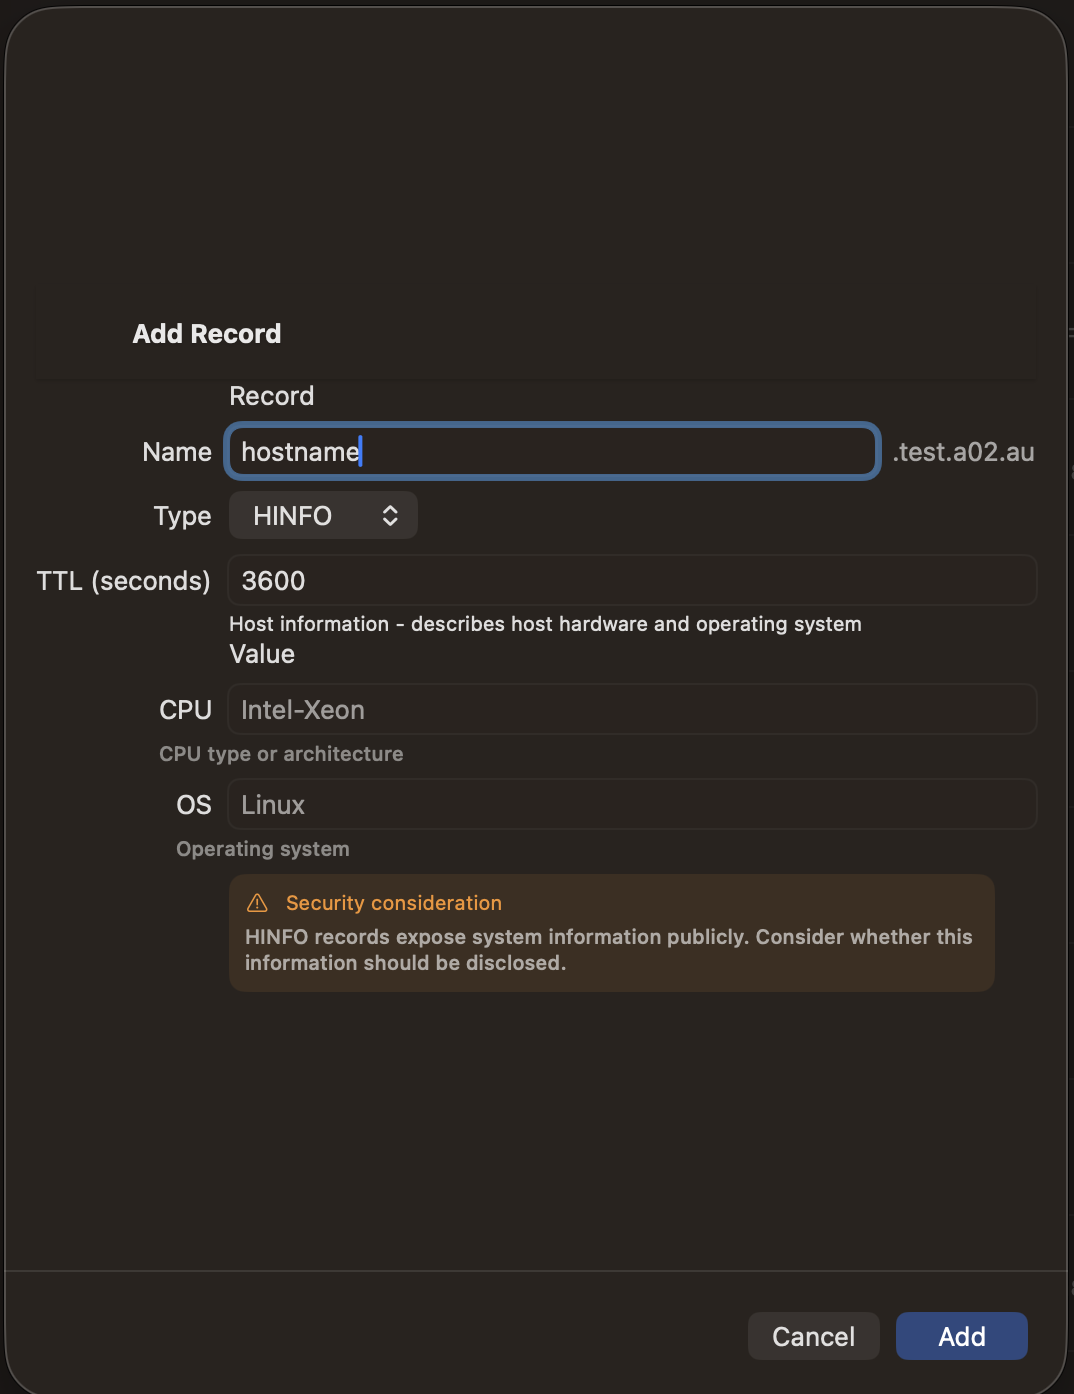
Fields
- Name — The hostname
- TTL — Time-to-live in seconds
- CPU — CPU type or architecture (e.g., "Intel-Xeon", "ARM64")
- OS — Operating system (e.g., "Linux", "FreeBSD")
Security note: HINFO records expose system information publicly. Consider whether this information should be disclosed.